Content
- 1 Hello dear readers!
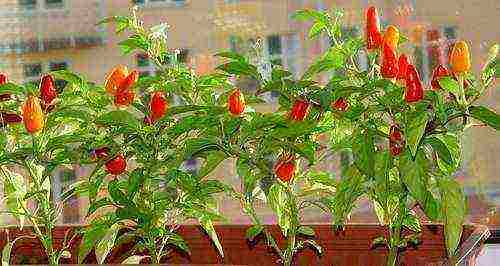
- 2 Best grade pepper on the windowsill
- 3 Seed preparation
- 4 Getting started landing
- 5 Preparing the soil
- 6 Taking care of our pepper
- 7 We are waiting for the harvest
- 8 Hello dear readers!
- 9 Best grade pepper on the windowsill
- 10 Seed preparation
- 11 Getting started landing
- 12 Preparing the soil
- 13 Taking care of our pepper
- 14 We are waiting for the harvest
- 15 Growing peppers from seeds at home with a step by step photo
- 16 The first shoots have sprung up, what to do next?
- 17 Soil for pepper and top dressing
- 18 Watering
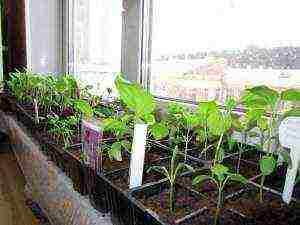
- 19 Growing pepper seedlings on the windowsill
- 20 Additional care
- 21 Interesting
- 22 Useful video
- 23 What kind of pepper can you grow in a pot on a windowsill?
- 24 How to grow hot red peppers at home?
- 25 Bell peppers: how to grow?
- 26 How to grow
- 27 Pepper seedlings: from seedlings to picking (video)
- 28 Growing hot and sweet peppers in the house
- 29 Growing hot peppers on a windowsill
- 30 How to grow chili peppers at home (video)
- 31 Gallery: pepper at home (15 photos)
- 32 The choice of container and substrate for seedlings of peppers
- 33 Dive pepper
- 34 Possible problems and ways to solve them
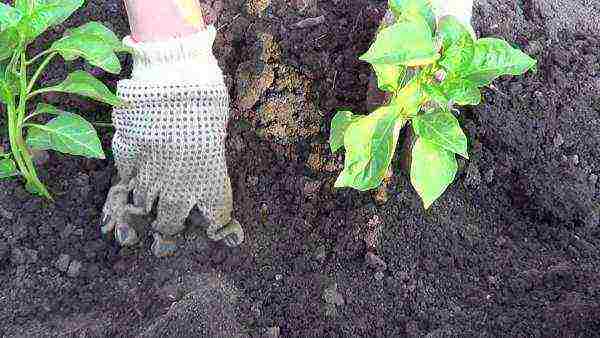
- 35 Landing in open ground
Hello dear readers!
So, dear friends, after reading the previous articles, you are probably thinking about planting lemon, dill, parsley or cilantro at home. Maybe some of you have already planted these plants? Then let's talk about the next inhabitant of our windowsill - sweet pepper.
Sweet pepper is very beautiful for its tight fruits, bright, tasty, full of vitamins. It is him that we lack so much on rainy autumn days, and on harsh winter weekdays, and during the period of spring beriberi.
Do you want to admire the pepper and eat it all year round? In this case, feel free to start landing. pepper on his windowsill, as these plants are ideal for home care and cultivation.
Best grade pepper on the windowsill
Compact, undersized varieties of pepper (they are the most unpretentious and persistent) will be ideal for planting at home. The growth of this plant will reach half a meter and it will perfectly fit into the size of your window. The best varieties:
- Treasure Island. After 90-100 days, the pepper will invite you to taste its juicy orange-red heart-shaped fruits. Their mass reaches 60 grams, the thickness of the peel is up to 7 mm.
- The firstborn of Siberia. The crop ripens in 108-113 days from the moment of germination. The fruits are large, up to 100 g (peel thickness up to 6 mm). Bright red in color, these peppers are aromatic and tasty.
- Dwarf. Pepper variety with juicy, red fleshy cone-shaped fruits. Their weight reaches up to 83 grams (walls up to 9 mm). You can harvest the crop after 110 days from the time the sprouts appear.
- Watercolor. Glossy scarlet cone peppers will be ready for your table in 110 days. This pepper on the windowsill has small fruits, "for one bite", their weight reaches 30 grams, with a thin peel up to 2.5 mm.
- Gift from Moldova. Large peppers of a dark red color will delight you with a rich, sweet taste after 124-136 days. The weight of the fruit reaches 90 grams, the thickness of the peel is up to 6 mm.
- Martin. A fragrant variety, the red juicy fruits of which can be used to decorate the table after 130 days. Fruits are large, up to 84 grams, with thick (up to 5 mm) walls.
These varieties of pepper are highly productive and will delight you with their attractive fruits all year round.
Seed preparation
To rid future plants of infections, the seeds should be kept for 20 minutes in a 2% solution of potassium permanganate, then rinsed with cool water. And soak in nutrient solutions of epin or zircon (growth biostimulants):
- Epin. Take 2 drops for 100 ml of water.
- Zircon. Add 1 drop to 300 ml of water.
In the healing solution, the seeds should be kept for about a day at room temperature. Then place them in damp gauze and place them in a dark, warm place.
Keep the pepper seeds there for 3 days at a temperature of + 20 ° C to + 25 ° C. Periodically moisten the cloth with warm water (it must not be allowed to dry out).
As soon as the seeds hatch, you can transfer pepper on the windowsill.
Getting started landing
We need to prepare several containers in advance for growing pepper... Each pepper needs its own house, a separate wide and deep enough pot (so that the root of the plant is spacious and comfortable).
Do not forget about the drainage layer (fine gravel, expanded clay or broken small pieces of red brick will do).
You can plant seeds at one of the most convenient periods for you:
- The last days of February are the beginning of March. It is necessary to find the most suitable time for landing (be guided by the weather forecast). If, a week after planting the seeds, nature decides to pamper us with very warm, sunny weather, the pepper can slow down its growth. In this case, at the beginning of its growth, it is better to keep the pepper at home on the northern window for a while.
- Winter months. When planting seeds in winter, it is necessary to ensure that the daylight hours are 12 hours daily. In addition, light the pepper with fluorescent lamps.
- The plant germinates well when planting seeds in late July or early September. Again, keep an eye on the weather forecast (so there are no too warm days ahead).
Preparing the soil
For peppers, it is better to purchase ready-made soil ("Terra-Vita" or "Ogorodnik"). This soil is already enriched with essential microelements and does not contain harmful microorganisms.
If you decide to use ordinary garden soil, ignite it first with a saturated solution of potassium permanganate, then pour it over with water. Or prepare an enriched soil:
- Sod land 2 parts
- Humus 1 part
- Clean, sifted sand 1 part
Sod land is best taken from the place where meadow clover grows. Ash must be added to any soil (2 glasses of ash for every 10 kg of soil). Peppers are extremely sensitive to soil salt and acidity levels. Add dolomite flour or lime to the soil (take 16 grams of the substance for 1 kg of soil).
You can use special hydrogels. They are made for home gardening. When hydrogels mix with the soil, they swell, absorb excess water and simultaneously loosen the soil, retaining nutrients.
Planting seeds
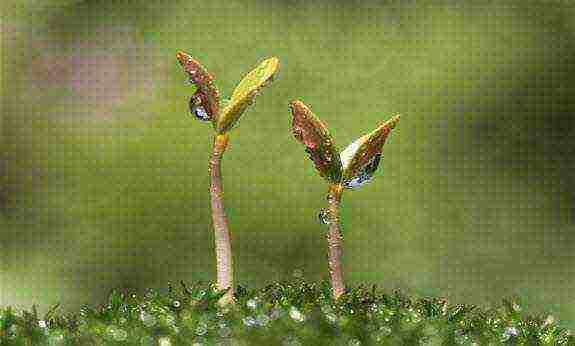
To wait for the first shoots of pepper on the windowsill, you need to be patient. Peppers germinate after 1-2 weeks.
If the plant stubbornly does not want to germinate, increase the length of daylight hours (extend additional lighting from 7 am to 9 pm).
- Plant two seeds in small peat pots (pre-filled with loose, fertile soil). Pour and cover the pots with cling film. Place them in a warm place at a temperature of + 25 ° C. The pots can be buried under adult, fruiting peppers in a lighted place (if you have already grown peppers before).
- After the first, tender sprouts appear, pierce the film with a knitting needle in several different places.When the peppers start growing confidently and acquire the first two or three leaves, the film can be removed. And start transplanting (picking) one young sprout into a large pot. We remove the weaker plant.
Picking. Transplanting seedlings into a more spacious dwelling (with root shortening). The shortened root begins to branch out and develop more violently.
The rhizome after the pick becomes stronger, wraps around and holds the earthen ball better, and the homemade pepper itself on the windowsill brings more harvest. Dive process:
- fill the soil in the pot where you will transplant the pepper with plenty of water a day;
- before diving, make a depression in the center of the pot in the new ground;
- moisten the soil around the sprout abundantly an hour or two before the operation;
- gently take it and lift it together with an earthen lump, shake it off the ground;
- very carefully shorten the root by about 1/3 (you can pluck it with your nails);
- gently place it in the prepared hole in a new pot so that the central root does not bend, and the leaves are 2 cm above the soil level;
- compact the soil around the seedling with your fingers;
- pour warm water over the transplanted pepper.
In order for the pepper to grow large, fertile, it must be transplanted and grown in small capacious buckets or large ceramic bowls.
Before diving, gradually accustom the young sprout to more severe conditions (gradually take it out into fresh air, increasing the walking time).
But make sure that the small pepper does not fall under drafts and the effect of a low, destructive temperature for it (below + 13 ° C).
Taking care of our pepper
| Operation | Pepper desires | Advice |
| Watering | As needed | Pepper on the windowsill should be watered with settled warm water (water temperature + 30 ° C). Sprinkle the pepper with warm water daily. To prevent the plant from overheating during the winter heating season, cover the battery with a damp cloth. Remember to loosen the soil constantly. |
| Lighting | In winter, daylight hours should be 12 hours | Periodically turn the plant with different sides to the window. Fluorescent lamps will work with the usual white spectrum. Avoid direct sunlight. |
| Temperature | Day + 25 ° - + 27 ° С Night +10 ° - + 15 ° С | In the summer, it is good to keep the pepper on the balcony, in the winter, transfer it to the windows in the south. Beware of drafts and sudden temperature fluctuations. |
| Top dressing | Fertilize once every two weeks after watering | You can feed the peppers on the windowsill with purchased nitrogen fertilizers for indoor flowers. Or make a nutrient solution (3 liters of water and 6 tablespoons of ash). As a top dressing, you can prepare decoctions of nettle, plantain, clover. This is very beneficial for peppers. |
The plant may suffer from a lack of minerals. How to grow peppers in the most favorable conditions? Just monitor the condition of its leaves and apply the necessary fertilizer with a suitable composition in a timely manner:
- the leaves curl, a dry edge appears at the edges - a lack of potassium (add potassium sulfate or potassium nitrate);
- the matte color of the leaves with a grayish tint, the foliage begins to shrink - there is not enough nitrogen (ammonium nitrate, which contains 35% nitrogen, will help);
- the lower part of the leaves acquires a purple color, and the leaves themselves begin to nestle against the trunk and stretch up - there is little phosphorus (phosphoric acid is needed 16-18% percent);
- the deciduous crown acquires a marble color - the pepper on the windowsill lacks magnesium in the diet (magnesium in sulfate form is needed).
You can not use potassium salt, potassium chloride (their composition with an excess of chlorine is harmful to the roots of the pepper). But the excess nitrogen is not terrible for pepper.
We are waiting for the harvest
Most domestic peppers are self-pollinated plants. By the way, they can also be pollinated. Therefore, try to keep different varieties of peppers apart from each other.
When the first fruits appear, do not overload the plant - leave up to 4-5 fruits on it.
Getting our own seeds
For this we select red, ripe fruits. Cut the pepper neatly in the circle of the stalk and very carefully remove the seed-bearing, holding it by the stalk.
We devote the next 4 days to drying the seed crop at a temperature from + 25 ° C to + 30 ° C. And we separate the seeds. Store them in a paper bag in a warm, dark place.
The maximum shelf life of seeds is 5 years.
We transplant the plant
It is necessary to transplant peppers on the windowsill once a year. He wants new, fresh land for a richer harvest (after all, he has already taken everything useful from the old soil). Change the land completely to fresh.
Transplant the plant carefully, being careful not to injure the root system with an earthy clod.
And after two years of the pepper's life, it already needs to be changed. It is a biennial plant and will readily pass the baton to younger, stronger peppers.
I wish you a rich harvest!
See you soon, dear readers!
You can also read on this topic:
Tags: pepper
Hello dear readers!
So, dear friends, after reading the previous articles, you are probably thinking about planting lemon, dill, parsley or cilantro at home. Maybe some of you have already planted these plants? Then let's talk about the next inhabitant of our windowsill - sweet pepper.
Sweet pepper is very beautiful for its tight fruits, bright, tasty, full of vitamins. It is him that we lack so much on rainy autumn days, and on harsh winter weekdays, and during the period of spring beriberi.
Do you want to admire the pepper and eat it all year round? In this case, feel free to start landing. pepper on his windowsill, as these plants are ideal for home care and cultivation.
Best grade pepper on the windowsill
Compact, undersized varieties of pepper (they are the most unpretentious and persistent) will be ideal for planting at home. The growth of this plant will reach half a meter and it will perfectly fit into the size of your window. The best varieties:
- Treasure Island. After 90-100 days, the pepper will invite you to taste its juicy orange-red heart-shaped fruits. Their mass reaches 60 grams, the thickness of the peel is up to 7 mm.
- The firstborn of Siberia. The crop ripens in 108-113 days from the moment of germination. The fruits are large, up to 100 g (peel thickness up to 6 mm). Bright red in color, these peppers are aromatic and tasty.
- Dwarf. Pepper variety with juicy, red fleshy cone-shaped fruits. Their weight reaches up to 83 grams (walls up to 9 mm). You can harvest the crop after 110 days from the time the sprouts appear.
- Watercolor. Glossy scarlet cone peppers will be ready for your table in 110 days. This pepper on the windowsill has small fruits, "for one bite", their weight reaches 30 grams, with a thin peel up to 2.5 mm.
- Gift from Moldova. Large peppers of a dark red color will delight you with a rich, sweet taste after 124-136 days. The weight of the fruit reaches 90 grams, the thickness of the peel is up to 6 mm.
- Martin. A fragrant variety, the red juicy fruits of which can be used to decorate the table after 130 days. Fruits are large, up to 84 grams, with thick (up to 5 mm) walls.
These varieties of pepper are highly productive and will delight you with their attractive fruits all year round.
Seed preparation
To rid future plants of infections, the seeds should be kept for 20 minutes in a 2% solution of potassium permanganate, then rinsed with cool water. And soak in nutrient solutions of epin or zircon (growth biostimulants):
- Epin. Take 2 drops for 100 ml of water.
- Zircon. Add 1 drop to 300 ml of water.
In the healing solution, the seeds should be kept for about a day at room temperature. Then place them in damp gauze and place them in a dark, warm place.
Keep the pepper seeds there for 3 days at a temperature of + 20 ° C to + 25 ° C.Dampen the cloth from time to time with warm water (do not let it dry).
As soon as the seeds hatch, you can transfer pepper on the windowsill.
Getting started landing
We need to prepare several containers in advance for growing pepper... Each pepper needs its own house, a separate wide and deep enough pot (so that the root of the plant is spacious and comfortable).
Do not forget about the drainage layer (fine gravel, expanded clay or broken small pieces of red brick will do).
You can plant seeds at one of the most convenient periods for you:
- The last days of February are the beginning of March. It is necessary to find the most suitable time for landing (be guided by the weather forecast). If, a week after planting the seeds, nature decides to pamper us with very warm, sunny weather, the pepper can slow down its growth. In this case, at the beginning of its growth, it is better to keep the pepper at home on the northern window for a while.
- Winter months. When planting seeds in winter, it is necessary to ensure that the daylight hours are 12 hours daily. In addition, light the pepper with fluorescent lamps.
- The plant germinates well when planting seeds in late July or early September. Again, keep an eye on the weather forecast (so there are no too warm days ahead).
Preparing the soil
For peppers, it is better to purchase ready-made soil ("Terra-Vita" or "Ogorodnik"). This soil is already enriched with essential microelements and does not contain harmful microorganisms.
If you decide to use ordinary garden soil, ignite it first with a saturated solution of potassium permanganate, then pour it over with water. Or prepare an enriched soil:
- Sod land 2 parts
- Humus 1 part
- Clean, sifted sand 1 part
Sod land is best taken from the place where meadow clover grows. Ash must be added to any soil (2 glasses of ash for every 10 kg of soil). Peppers are extremely sensitive to soil salt and acidity levels. Add dolomite flour or lime to the soil (take 16 grams of the substance for 1 kg of soil).
You can use special hydrogels. They are made for home gardening. When hydrogels mix with the soil, they swell, absorb excess water and simultaneously loosen the soil, retaining nutrients.
Planting seeds
To wait for the first shoots of pepper on the windowsill, you need to be patient. Peppers germinate after 1-2 weeks.
If the plant stubbornly does not want to germinate, increase the length of daylight hours (extend additional lighting from 7 am to 9 pm).
- Plant two seeds in small peat pots (pre-filled with loose, fertile soil). Pour and cover the pots with cling film. Place them in a warm place at a temperature of + 25 ° C. The pots can be buried under adult, fruiting peppers in a lighted place (if you have already grown peppers before).
- After the first, tender sprouts appear, pierce the film with a knitting needle in several different places. When the peppers start growing confidently and acquire the first two or three leaves, the film can be removed. And start transplanting (picking) one young sprout into a large pot. We remove the weaker plant.
Picking. Transplanting seedlings into a more spacious dwelling (with root shortening). The shortened root begins to branch out and develop more violently.
The rhizome after the pick becomes stronger, wraps around and holds the earthen ball better, and the homemade pepper itself on the windowsill brings more harvest. Dive process:
- fill the soil in the pot where you will transplant the pepper with plenty of water a day;
- before diving, make a depression in the center of the pot in the new ground;
- moisten the soil around the sprout abundantly an hour or two before the operation;
- gently take it and lift it together with an earthen lump, shake it off the ground;
- very carefully shorten the root by about 1/3 (you can pluck it with your nails);
- gently place it in the prepared hole in a new pot so that the central root does not bend, and the leaves are 2 cm above the soil level;
- compact the soil around the seedling with your fingers;
- pour warm water over the transplanted pepper.
In order for the pepper to grow large, fertile, it must be transplanted and grown in small capacious buckets or large ceramic bowls.
Before diving, gradually accustom the young sprout to more severe conditions (gradually take it out into the fresh air, increasing the walking time).
But make sure that the small pepper does not fall under drafts and the effect of a low, destructive temperature for it (below + 13 ° C).
Taking care of our pepper
| Operation | Pepper desires | Advice |
| Watering | As needed | Pepper on the windowsill should be watered with settled warm water (water temperature + 30 ° C). Sprinkle the pepper with warm water daily. To prevent the plant from overheating during the winter heating season, cover the battery with a damp cloth. Remember to loosen the soil constantly. |
| Lighting | In winter, daylight hours should be 12 hours | Periodically turn the plant with different sides to the window. Fluorescent lamps will work with the usual white spectrum. Avoid direct sunlight. |
| Temperature | Day + 25 ° - + 27 ° С Night +10 ° - + 15 ° С | In the summer, it is good to keep the pepper on the balcony, in the winter, transfer it to the windows in the south. Beware of drafts and sudden temperature fluctuations. |
| Top dressing | Fertilize once every two weeks after watering | You can feed the peppers on the windowsill with purchased nitrogen fertilizers for indoor flowers. Or make a nutrient solution (3 liters of water and 6 tablespoons of ash). As a top dressing, you can prepare decoctions of nettle, plantain, clover. This is very beneficial for peppers. |
The plant may suffer from a lack of minerals. How to grow peppers in the most favorable conditions? Just monitor the condition of its leaves and apply the necessary fertilizer with a suitable composition in a timely manner:
- the leaves curl, a dry edge appears at the edges - a lack of potassium (add potassium sulfate or potassium nitrate);
- the matte color of the leaves with a grayish tint, the foliage begins to shrink - there is not enough nitrogen (ammonium nitrate, which contains 35% nitrogen, will help);
- the lower part of the leaves acquires a purple color, and the leaves themselves begin to nestle against the trunk and stretch up - there is little phosphorus (phosphoric acid is needed 16-18% percent);
- the deciduous crown acquires a marble color - the pepper on the windowsill lacks magnesium in the diet (magnesium in sulfate form is needed).
You can not use potassium salt, potassium chloride (their composition with an excess of chlorine is harmful to the roots of the pepper). But the excess nitrogen is not terrible for pepper.
We are waiting for the harvest
Most domestic peppers are self-pollinated plants. By the way, they can also be pollinated. Therefore, try to keep different varieties of peppers apart from each other.
When the first fruits appear, do not overload the plant - leave up to 4-5 fruits on it.
Getting our own seeds
For this we select red, ripe fruits. Cut the pepper neatly in the circle of the stalk and very carefully remove the seed-bearing, holding it by the stalk.
We devote the next 4 days to drying the seed crop at a temperature from + 25 ° C to + 30 ° C. And we separate the seeds. Store them in a paper bag in a warm, dark place.
The maximum shelf life of seeds is 5 years.
We transplant the plant
It is necessary to transplant pepper on the windowsill once a year. He wants new, fresh land for a richer harvest (after all, he has already taken everything useful from the old soil). Change the land completely to fresh.
Transplant the plant carefully, being careful not to injure the root system with an earthy clod.
And after two years of the pepper's life, it already needs to be changed.It is a biennial plant and will readily pass the baton to younger, stronger peppers.
I wish you a rich harvest!
See you soon, dear readers!
You can also read on this topic:
Tags: pepper

Growing peppers at home is becoming an increasingly popular activity for those who do not have a summer cottage. Now there are many interesting varieties that are suitable for planting on balconies and window sills. If there is not much space in the house, then it is better to choose mini-varieties.
Conditionally, pepper for the home can be divided into sweet varieties and hot ones, there is also a decorative pepper. The latter are more suitable, since they are of short stature and abundant fruiting.
…
However, if you want to grow bell peppers, then there is nothing difficult, you just need to follow the recommendations.
Growing peppers from seeds at home with a step by step photo
This is southern culture loves warmth and bright sunso it is important to provide it with an appropriate location. However, seedlings should be protected from exposure to too bright sun, so as not to burn weak leaves.
Choosing seeds
When you enter a gardening store, you are faced with a difficult choice: which variety is better.
Important! Not all peppers are suitable for balcony cultivation.
Pay attention to the size of the adult plant. You should also take into account the timing of germination and the rate of fruiting. At home, we want to get the fruits as quickly as possible.

We plant
How to grow peppers from seeds at home? After you have chosen the right variety, you should plant the seeds. Many experienced gardeners recommend pre-soak them in a damp cloth or cheesecloth for four days. There are also recommendations to soak them for several hours in a weak solution of potassium permanganate to avoid the appearance of diseases.
After the seeds have hatched, they must be carefully planted in small containers. For these purposes seedling pots work wellsuch as peat or small plastic cups.
You can plant seeds directly into the ground, they will germinate a little longer. For these purposes also small peat tablets are conveniently suitable for seedlings.
REFERENCE! Learn about planting methods such as toilet paper and snail.
Different varieties germinate in different ways, some up to 3 weeks, so you have to be patient.
Attention! Check soil moisture daily. The soil should not dry out, but also not be too wet. You can use a spray bottle to moisten the soil.
You should adhere to the temperature regime... The optimum temperature for germination of pepper seeds is 18-25ºC.
The first shoots have sprung up, what to do next?
After a while, seedlings appear. Now they need create the most optimal conditions... The first is light. If it is not enough, then the plants will begin to stretch, and then completely die.
Attention! Do not place young seedlings directly under the scorching sun.
It is convenient to use artificial lighting for seedlings. Special lamps for flowers are now on sale, but you can also use daylight, choosing the right amount. Incandescent lamps are not suitable for these purposes - they emit little light, but a lot of heat, which can burn delicate leaves.
Daylight lamps are positioned at a height of about 30 cm, daylight hours should last about 18 hours, but not less than 14 hours. To make it more convenient, you can connect special on / off control timers to the luminaire.
We land on a permanent place
As soon as the pepper seedlings reach 10-15 cm, it must be dropped off at a permanent place... Use large pots or boxes for these purposes: it grows quickly and has an extensive root system.
We carefully take out the sprout. The most convenient and less traumatic for the plant use the transshipment method... Pepper, sprouted in peat tablets, is planted with them in a pot.
Keep in mind that the larger the planting container, the larger the plant will be. As soon as the frost passes, the plant is taken out to the balcony.
If you grow large varieties of bell peppers, then take care of large containers and methods of garter plants.
Soil for pepper and top dressing
Fine suitable soil for seedlings, as well as garden soil... Peppers need a lot of nutrients for good fruiting, so humus is added.
Fertilizers are used only specially designed for vegetable crops.
Remember! You eat the fruits, so it is not recommended to over-water with top dressing.
The safest feeding is humus. You can also mix wood ash with water at the rate of 2 tablespoons per liter.
Watering
The plant needs a regular supply of moisture. Water is used warm, better settled, without chlorine... Do not allow the soil to dry out, otherwise the buds and fruits may begin to fall off.
Growing pepper seedlings on the windowsill
As we remember, pepper is a southern culture. Place it in the lightest and warmest place. Avoid drafts. It is great if the balcony is glazed, so you can avoid the effects of spring frosts.
Growing peppers on a windowsill has its own characteristics: choose the lightest window or provide additional lighting.
Additional care
 Inspect the plant for pests daily. Even at home in plants sometimes diseases appear and pests attack.
If you notice dark spots, yellow, curled and falling leaves, or insects, take action immediately, otherwise the plant may be lost. What to do if seedlings fall?
Interesting
Many varieties of chili peppers can grow and bear fruit in a room for several years. There is an interesting variety, the fruits of which change color depending on the stage of development. Hot peppers come in varying degrees of pungency. The sizes of the fruits also differ. A small-fruited variety is suitable for the kitchen, it will also be a decoration of the room and an excellent seasoning for dishes.
In general, caring for sweet and hot peppers is not difficult. The most important thing is to germinate the seedlings correctly, choose a large container and ensure the maximum supply of light.
So, today we looked at how to grow pepper seedlings on the windowsill, what nuances do you need to take into account? But growing peppers on the balcony is much easier, so we recommend this method for novice gardeners.
Useful video
Add some peppercorns to your life ... literally! You don't need to run to the vegetable shop: let's find out how to get pepper fruits at home.
What kind of peppers can be grown in a pot on a windowsill?
Pepper cultivation on the windowsill can be carried out in order to obtain fruits and for decorative effect. Both tasks can be combined, since its fruits look very aesthetically pleasing in the interior due to its interesting shape and bright color.
The species division includes two subgroups:
- Piper - he's peppercorns. The plant has racemose inflorescences similar to a bunch of grapes. The fruit is a drupe. Each cluster forms up to 50 berries with a pericarp;
- Capsicum - vegetable crops with a fleshy juicy fruit and a variety of colors (green, red, yellow, purple, etc.).
What kind of pepper crops can I potted at home?
- Red and green chili peppers;
- Bell peppers;
Popular varieties of hot chili peppers:
- Chipotle;
- Piri-piri;
- Jalapeno.
Sweet peppers are the most delicious varieties:
- Pimento;
- Padron;
- Apricot Favorite;
- California miracle.
For those who prefer it hot, we recommend growing hot peppers to get raw materials for seasoning and as a separate product, right on the windowsill.
How to grow hot red peppers at home?
Growing hot peppers indoors is not only a cultivation but also a decorative process.For planting, a special variety of vegetables called "Little Miracle" is used. The "wonderful" pepper comes from Holland, but in our country it has been bred for a long time. Gardeners love this variety for its abundant fruiting and original decorative appearance. The fruits of the "Little Miracle" are rather diminutive, but this does not affect its taste in the least.
The tiny red pepper is hot and piquant and can be rolled up in jars, pickled, added to salads, soups and stir-fries. The bush itself looks unusually picturesque and attracts the eye. The plant is very compact in size, so it is grown even in a small kitchen in cramped conditions.
The grown bush is covered with small thick-walled fruits with a blunt cone shape. They are only 3 cm long and weigh five grams. More than 50 fruits can be harvested from just one bush. At different stages of ripening, the peppercorns change color, the colors of which have many options: green, beige, yellowish, orange, red and purple. Variety "Little Miracle" in greenhouse conditions lives up to 5 years. When growing at home, you can achieve almost the same results if you care for the plant with great care.
There is a way to accelerate the ripening period by the end of spring. For this, various manipulations with lighting and thermal conditions are carried out. A vegetable planted in autumn is deliberately placed not in the most favorable conditions so that it does not waste energy on flowering and growing on cold days. As the duration of daylight hours increases, the pot is exposed to a bright window.: for this, the most adventurous gardeners "watch" the sunny weather, moving the pot as close to warmth and light as possible. This method can speed up the appearance of ovaries, which grow to pods by May.
Landing
Seeds of hot mini pepper are sown in February. A container with a volume of at least two liters is suitable as a pot, which is previously doused with boiling water for disinfection. A drainage layer is poured at the bottom of the pot, consisting of expanded clay or crushed stone and charcoal. The composition of the soil laid on top of the drainage should include rotted foliage, leafy soil and river sand. The proportions of the mixture are 5: 3: 2. A little trick: before planting, the soil is spilled with boiling water and allowed to cool for 15 to 20 minutes.
In the cooled soil layer, holes are sealed, their diameter is 1 - 1.5 centimeters. Seeds, previously soaked and swollen in water, are planted in a hole, two to three grains each. On top of the pot or container, a film, food grade or polyethylene, is stretched with a thin layer. If the pot has a rectangular shape, instead of a film, you can use glass or a plastic lid, but each gardener himself decides what is more convenient for him to work with. The finished container with seedlings is removed to a warm place. The light source must be present, but not burn out the soil.
After five or seven days, the first shoots begin to break through the soil. The time has come to rearrange the seedlings on the kitchen windowsill or balcony, where it will receive a sufficient amount of sunlight, warmth and fresh air. When leaves appear on the plants, you can pick and plant the strongest specimens in separate pots. Weak leaves are not needed, they should be removed so that they do not interfere with the development of the root system, taking resources from it.
In the near future, the planted bush will grow to 18 - 20 centimeters in height. During this period, he is pinched the top of his head. A pinched specimen will be branched and lush, which also contributes to better fruiting. Watering is carried out with warm (not hot) water as needed, about once every two days.
Care
Conditions for keeping miniature hot peppers are determined based on the basic rules of agricultural technology:
- The "Little Miracle" variety requires a minimum of 18 hours of light every day.If there is not enough natural light, an ultraviolet lamp is additionally purchased for seedlings. A bush that lacks lighting loses its ovaries and stretches upward;
- Window pepper does not tolerate constant drafts, temperature drops and temperature rises above 25 ° C;
- The bush can be sprayed with warm, settled water (see above for the soil moistening regime) 1 - 2 times a week;
- If ovaries have formed on the plant, the amount of watering must be increased;
- Before the ovaries appear, the shoots are fed with mineral or organic fertilizers every two to three weeks;
- Plants planted in February should bloom in June. Gardeners recommend shaking the bush occasionally during this period to stimulate pollination;
- Small hot peppers growing in a pot are transplanted into a larger container each year. The transplant is carried out by the transshipment method: a bush with a root system is pulled out of an old pot, shaken off, placed in a new container and soil is added.
With proper care, the bush will quickly begin to bear fruit and will live for at least two to three seasons. The maximum life span in a window sill is about five years. To prevent the plant from developing fungal diseases and pests, spray it for preventive purposes with difokol or malathion. If traces of gray rot, aphids or spider mites appear on the leaves, the pepper, unfortunately, will have to be destroyed.
When will the harvest be?
Pepper variety "Little Miracle" is considered ready to eat after acquiring a yellowish color. Plants planted in February bear fruit in early July and continue to harvest until early November. A fully ripe peppercorn has a red or orange hue. The ripening of the vegetable, if necessary, is carried out at a temperature of 20 ° C. To give the pepper an even more pronounced burning taste, you can dry it by stringing the stalks on a harsh branch.
Bell peppers: how to grow?
Chili pepper is not suitable for everyone, and it's not just about the conditions and possibilities for growing. The Capsicum annuum variety is considered the hottest spice, not suitable for use in the presence of problems with the organs of the gastrointestinal tract. In this case, you can try to cultivate sweet or bell peppers on the windowsill.
What varieties of sweet peppers are grown indoors?
- Sturdy;
- Sweet-chocolite;
- Triton;
- Western film;
- Carat;
- Yova;
- Red bell.
Bell peppers are not only tasty, but also healthy. It contains one of the highest concentrations of vitamin C, so doctors consider it an excellent product with dietary properties, as well as a beneficial effect on immunity.
What is sweet pepper famous for?
- Free radicals contained in its fruit are indispensable for maintaining the body's cellular metabolism;
- Heat treatment has little effect on the beneficial properties of pepper;
- The use of pepper lowers the level of cholesterol in the blood, prevents ischemia;
- Sweet peppers contain lycopene, a carotenoid pigment and antioxidant that has antitumor and immunostimulating effects.
Planting and leaving
The agricultural technique for growing sweet peppers at home is not much different from the greenhouse technique or the method of cultivating hot peppers. The process of sowing seeds and picking are carried out in a similar way. When the seedlings have about six leaves, they must be carefully transplanted into pots filled with fertile soil. A pot with a volume of at least 1.5 liters is taken, its bottom is covered with gravel, expanded clay or fine gravel. For the growth of bell pepper, the moisture regime of the soil coma and air humidity are important.... It must not be allowed to dry out and overflow. The soil is irrigated with warm water, which has settled for several days. Tap water will kill the growth.
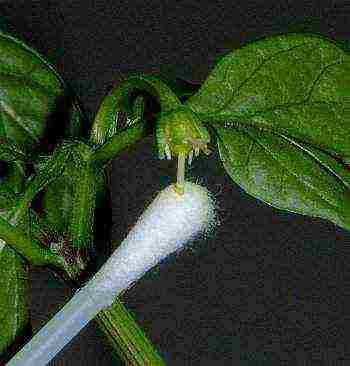
Top dressing is done every two weeks with a fertilizer based on microelements.Once every 30 days, pepper is watered with an extract of wood ash, prepared in a proportion of 20 grams per liter of water. To stimulate the ovary, you can "help" the plant: to do this, walk over the flower with a cotton swab, transferring pollen from one inflorescence to another.
 Pepper has long become one of the favorite spices of housewives. Even if there is no way to plant it in the garden, growing pepper at home is a completely simple process. The best place for a vegetable to live would be a windowsill or balcony. And in order to please the harvest, it is worth considering that the plant loves warmth and light, and is also afraid of drafts. Let's take a closer look at the question of how to grow pepper.
How to grow
To grow peppers at home, it is worth choosing low varieties, up to half a meter high.Seeds need to be poured with water at room temperature, after adding a little salt there. The specimens that have floated to the surface can be thrown away: they will not bear fruit. The rest should be rinsed with clean water. If the seeds are left in damp gauze overnight, the germination process will go faster.
To grow peppers at home, they need proper care. The room temperature should be at least 15 ° C with high humidity. The plant needs light for 14 hours, therefore, it is better to plant it at home with a long daylight hours or provide it with artificial lighting.
When wondering how to grow pepper seedlings at home correctly and with minimal cost, you need to consider that it is better to buy specially prepared land... It is recommended to connect the soil with the soil taken from the site where it is planned to plant pepper in the future. This is done so that in the future the plant can quickly get used to a new place.
Growing pepper seedlings in your home requires choosing an opaque container, as light affects the roots of the plant worse than the leaves. If there is only a transparent container, then it should be painted with dark paint or wrapped in foil to prevent light penetration.

The selected containers must be filled with prepared soil by 7 cm. The day before planting, the soil should be watered abundantly. Pepper seeds are placed shallow, at a distance of no more than 1 cm, and between them it is better to leave a distance of 2-5 cm, depending on the parameters of the container. The planted seeds should be lightly sprinkled with sand and nutrient mixture, then lightly pressed down with your hand.
Before shoots appear, it is better to cover the container with cellophane. This is done to create a favorable climate that will help the seeds to sprout faster. Until shoots appear, there is no need to water the plant.
When growing pepper seedlings at home, it should be fed a couple of times before planting in open ground... This should be done with special fertilizers. The first time - when 2 or more true leaves appear, the second time - when 5 leaves appear.
To determine that the cultivation of pepper seedlings is completed successfully and the plant is ready for planting, you can as follows:
- in sweet pepper, the height reached 25 cm and 10 leaves appeared;
- bitter has a height of 20 cm and 5 leaves.
Do not plant bitter and sweet varieties next to it., since the former self-pollinates, and it is highly likely that only this variety will be harvested.
Pepper should be planted in open ground at the end of May, when the soil has already warmed up enough. It does not take root in cold, heavy soil, in this case it is worth adding peat or humus to the soil.
Pepper seedlings: from seedlings to picking (video)
Growing hot and sweet peppers in the house
In principle, there are no big differences between the cultivation of bitter and sweet peppers. The main rules: their habitat should be light and warm.
Many people grow hot peppers on the windowsill. In addition to being a useful, bitter option, it also decorates the interior. You can start growing hot peppers at any time of the year.To do this, you need to take the seeds of the plant, soak them in a weak solution of potassium permanganate, then rinse.
The land for planting must be loose and moist. You should take a small container, pour the soil there, and sow the seeds, about 3. Then you need to sprinkle them a little with earth and water, and then cover with polyethylene until the first shoots appear.
After the indoor pepper has sprouted, it needs to be watered regularly, and once every 7 days it is necessary to feed with mineral fertilizers... When the first crop appears, you can stop feeding.
Growing sweet peppers at home also doesn't require a lot of work. Water it with warm water as needed and fertilize it at least once a month. When the sprouts have 6 leaves, it is better to transplant them into separate pots. And when the plant blooms, it needs to be pollinated, for example, with a soft brush.
It is worth noting that indoor sweet peppers have a more pronounced taste than those grown in the garden.
Growing hot peppers on a windowsill
In addition to the above types, hot peppers can be grown at home. In cooking, it is used when hot spices are needed, and even improves digestion.
Sowing seeds is recommended in February.
It is recommended to put drainage in the lower part of the container, for this you will need expanded clay. Next, you need to fill in the soil. Before planting pepper in the ground, water it, and then deepen a couple of pre-prepared seeds there. The container should be covered in the same way as described above. When the leaves appear, it is better to transplant the plants into separate containers, so they will be freer. All of the above recommendations are also suitable for growing hot peppers.
How to grow chili peppers at home (video)
Growing peppers at home is a great idea. After all, there will always be fresh peppers on the table, guaranteed without chemicals. And it will also help save money on the family budget, since vegetables are not cheap in the winter season. Good luck!
Gallery: pepper at home (15 photos)
Having a fresh, vitamin-rich product in your refrigerator all year round is far from a luxury, but a completely feasible task. It is not only an experienced gardener who can grow pepper seedlings at home. Everyone can cope with this, with a little effort, because, as they say: the eyes are afraid, but the hands are doing!
How to grow pepper seedlings at home
The choice of container and substrate for seedlings of peppers
What you need to know about seedling boxes and pots
Experienced gardeners say that it is best if the container is made of opaque plastic and will not let the sun through. Natural light is useful only for the outer part of the pepper, its leaves, but the roots can be badly damaged by it. The sun's rays slow down the development of the root system, which directly affects the growth rate of seedlings and their quality.
The best container for seedlings is a box made of opaque plastic
There are several requirements for a container for growing pepper seedlings:
- it is desirable that it be integral, not divided into sectors;
- the optimal volume of the container is 0.3-0.5 l (for 2-3 pepper seeds);
- the presence of a flat bottom so that it can be covered with a thin layer of drainage (river pebbles, broken brick, expanded clay, polystyrene).
In order to grow pepper seedlings, wooden boxes, closed on the sides, or peat pots are also ideal. But if nothing like this is at hand, then you can use ordinary disposable plastic containers. And so that the sunlight does not have access to the roots, they can be placed next to each other in a deep cardboard box.
Substrate preparation
As soon as the seedling containers are prepared, it is necessary to proceed with the selection of the substrate. The land, in order for healthy seedlings to grow, must be very fertile.It is better not to use soil from a common garden or vegetable garden, as it has high acidity and is too heavy for pepper.
The soil for pepper seedlings must be very fertile.
The substrate should consist of:
- humus (3 parts);
- turf / peat (3 parts);
- river sand (1 part)
- ash (250 g of ash is added to 5 liters of soil).
If there is no experience in making a substrate, then, in order to avoid risks, you can purchase an earthen mixture in a store. It will contain all the necessary components for the effective and rapid growth of seedlings.
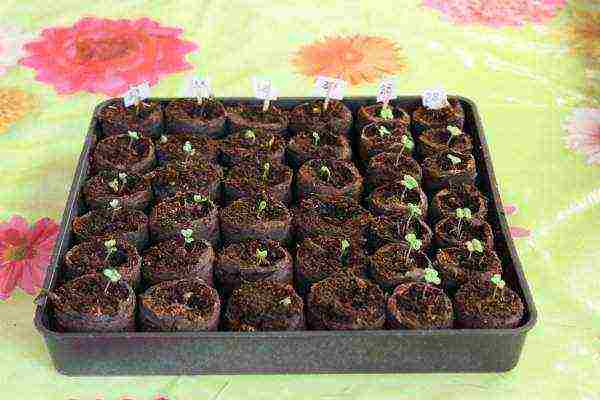
Sowing seeds
Pepper seeds are planted 2-2.5 months before the planned planting in open ground. This is how long it takes for the seedlings to emerge and be ready for transplantation. Usually, seeds are planted in the ground at the very end of winter - early spring. The optimal time is considered to be the end of February - the beginning of March.
The best time for planting peppers is late February - early March.
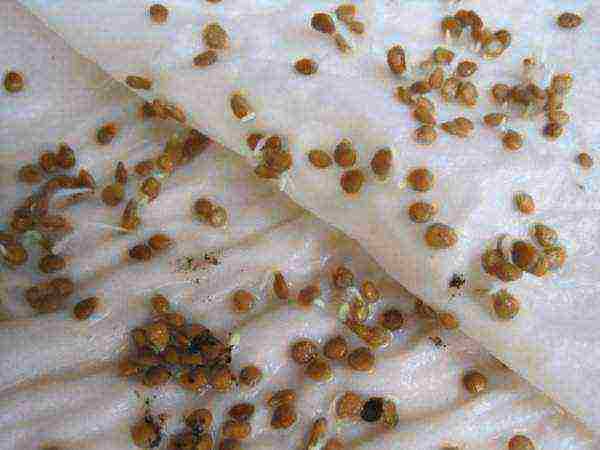
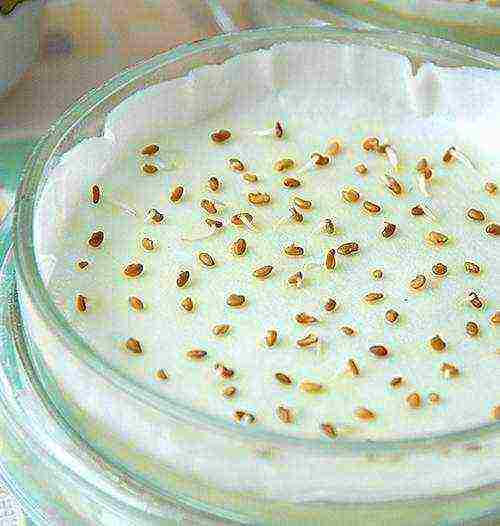
Before planting seeds in a container with earth, they must be properly prepared. The preparation process includes:
- Disinfection. In order for the seedlings to be less susceptible to its characteristic diseases, both the seeds and the container where they will be located must be treated with a weak solution of potassium permanganate (1 g of potassium permanganate per 100 ml of water). The day before planting the seeds, the soil in which they will germinate should also be disinfected: for this, it must be poured abundantly with boiling water, loosened and left to dry until the next day.
Disinfection of seeds with potassium permanganate
- Soak. This procedure is necessary in order to test the seeds for germination. They are soaked for 5-7 minutes in salted water (for 0.5 l of 1 tbsp. L of salt). The planting material that has surfaced can be thrown away without regret - it will not sprout. After the good seeds have been selected for planting, they are soaked again, for 1-2 days to swell.
Soaking different varieties of peppers
- Tank and soil preparation. The bottom is covered with drainage, with a layer of no more than 1.5-2 cm. Soil, previously treated with boiling water, is poured on top. The optimum height of the ground level for planting seeds is 8-10 cm.
Drainage layer with soil for planting pepper seedlings
- Disembarkation... If the container has a rectangular shape, then it can be divided into grooves, about 5 cm wide. The planting material is planted along the grooves at a distance of about 2 cm from each other. From above, the seeds are slightly sprinkled with the same substrate.
Planting pepper with grooves
After the seeds are planted in the ground, they are covered with cling film or glass, and left in a room with a temperature of 23-25 ° C. Over the next few days, it is not necessary to water the planted material, the existing moisture will be enough for it.
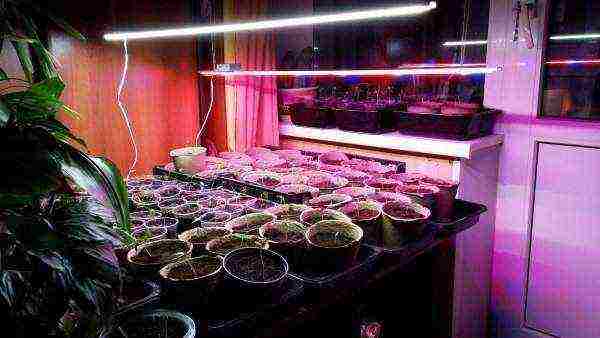
Seedling care and feeding
Pepper is a light-loving plant, and even a short-term lack of light can cause irreversible changes in seedlings.
When caring for seedlings, the following conditions must be observed:
1 condition: constant temperature not lower than 20 ° С. In order for the seedlings to grow intensively, the temperature can be increased to 24-26 ° C. The main thing is not to overdo it, because the rapid increase in sprouts can weaken the stem and leaves, they will lack nutrients.
For intensive growth of seedlings, the room temperature should be at least 20 ° С
2 condition: moderate humidity. You need to be careful with watering seedlings: the roots are quickly affected by rot if you overdo it with soil moisture. At the same time, excessive dryness of the substrate can affect further harvest. Pepper watering is carried out:
- after 3-5 days after planting seeds, already in moist soil;
- daily, after the appearance of the first leaves;
- 1 time in 4-5 days, but abundantly, as soon as the seedlings have grown and matured enough.
Watering pepper seedlings is carried out daily, after the appearance of the first leaves
3 condition: feeding.You need to fertilize pepper only a few times from the moment the seeds are planted into the substrate and until the already matured seedlings are planted in open ground. Top dressing is carried out in 2 stages:
- When the first 2-4 leaves appear on the seedlings. The optimal composition of top dressing for 5 liters of water includes 10 g of potassium sulfate, 10 g of urea, 30 g of superphosphate. On average, for every 10 sprouts, 1 liter of the prepared mixture is consumed.
- When more than 5 leaves appear on each sprout. In terms of time, this is about 2-3 weeks after the first feeding. Often, this top dressing coincides with the dive time of the pepper. The procedure must be repeated, increasing the concentration of fertilizers by half. However, to facilitate the work, you can buy ready-made fertilizers and mixtures.
Top dressing of pepper seedlings is carried out when the first 2-4 leaves appear in seedlings
After each top dressing, it is necessary to water the soil with pepper seedlings with plain or melt water to avoid scalding the root system. You should also make sure that neither water nor fertilizer gets on the leaves of the seedlings. They are very sensitive to moisture and minerals.
Video - Tips for growing peppers
Dive pepper
The opinions of gardeners about diving pepper differ: someone advises to carry out this procedure, and someone advises not to touch the seedlings until the very moment of transplanting it into open ground. A dive should be carried out only if the seeds were planted in one whole container. Pepper leaves in the process of growth begin to cast a shadow on each other, which leads to a slowdown in the growth of seedlings or even its death. If, initially, the planting material was seated in separate pots, then this procedure can be neglected.
Preparing the ground for picking pepper
If the planting material was in very fertile soil, which was used to accelerate the germination of seedlings, then the land for picking should be chosen more adapted to the external environment. It is desirable that it be enriched with such macronutrients as potassium, magnesium and phosphorus.
Pepper soil should contain potassium, magnesium and phosphorus.
Pepper pick
Pepper roots are very sensitive to all manipulations. In order not to damage the fragile root system, it is recommended to remove the soil from the container with several shoots at once. The soil is located on a horizontal surface and is carefully separated from the roots of the seedlings.
Shrinkage of pepper seedlings
After the sprouts of the pepper are separated from the substrate, they can be pinched a little, i.e. shorten if they are too long and thin. The shoot is planted in the center of a small container in the ground, the earth around it is compacted a little. The planting field must be watered with pepper.
A. Uncooked root system. B. Root system that has passed the pick
In order for the young sprouts of pepper to feel comfortable and take root in a new place, they need to be protected from bright sunlight for 3-5 days and shortened if they are too long and thin. The shoot is planted in the center of a small container in the ground, the earth around it is compacted a little. The planting field must be watered with pepper.
Possible problems and solutions
It would seem that there is nothing difficult in growing pepper at home. However, some problems may arise on the path of novice gardeners, presented in the table below.
| The seeds did not sprout | Poor quality planting material was chosen; insufficient disinfection of the soil, container and seeds themselves |
Do not store seeds for more than 4 years; carefully carry out the disinfection procedure |
| Seedlings grow very slowly | Lack of light; lack of fertilizer; scarcity of soil; excessive moisture; the effect of light on the roots of seedlings |
Install artificial light lamps aimed at the leaves and stems of the shoots; fertilize and feed seedlings regularly; watering as the land dries up; protect plant roots from light |
| After the dive, the seedlings overgrown and stretched out | Lack of light; planting pepper too early in open ground; excessively favorable indoor climate for growth |
Plant peppers no earlier than mid-April; reduce the room temperature, where the pepper is located, to 18-20 ° С |
Both too favorable and not very favorable, the conditions for keeping pepper seedlings can play a cruel joke with it. If the seedling grows very quickly, its stem becomes very thin and unstable, it can easily break or deform. Therefore, if the growth began to rapidly gain "height and weight", then it should be suspended a little.
Landing in open ground
Growing pepper: from seeds to planting in the ground
Pepper seedlings should be planted in open ground only at a time when the average daily air temperature, even at night, does not drop below 12-14 ° C. A number of conditions must be met:
- Choose a suitable place. Seedlings should be in a sunny, draft-free place.
- Dig up the ground to the depth of the shovel bayonet.
- Fertilize the soil with peat or humus.
- Dig holes for each seedling. The holes should be placed from each other at a distance of 0.3-0.5 m from each other. Rows with seedlings should be at least one and a half meters apart.
- Pour a mineral fertilizer consisting of potassium, phosphorus and nitrogen into each well.
- Carefully remove the seedlings from the pots. There is no need to shake off the previous soil from the roots, it is better to plant seedlings in the holes with it. Then it will be easier for the pepper to adapt to changing conditions.
- Place the seedlings in the hole, sprinkle with earth. The layer of dust should be small so that the soil only covers the roots of the plant.
- Water abundantly the planted seedlings in the holes.
- After the moisture has been absorbed into the ground, it is necessary to completely fill the holes so that their surface is equal to the surface of the rest of the soil. The soil, with which the pepper will be covered, must first be loosened.
- Mulch with peat. Lightly sprinkle the area under the bushes with peat.
If all the rules and conditions are met, and the seedlings successfully take root, then, soon, you will have a fragrant, sweet, environmentally friendly pepper in your beds. With proper care of the plant, it will bear fruit until late autumn.
Delicious, sweet, aromatic pepper, which is suitable for many salads, canning, stuffing, etc., can be grown simply in your country house in the open field. Gardeners have long proven that fairly thermophilic crops, such as peppers, can grow in more severe conditions if certain rules are followed and appropriate care is taken. This article will discuss how to cultivate pepper in the open field.
Before you start growing peppers, you need to prepare open ground. In regions where the climate is mild, sweet peppers grow well in the open field in areas protected from the wind, provided there is enough sunlight. These requirements are met by the site, which is located next to the southern wall of the house. If wind protection is not provided, you can build a curtain shield consisting of plants or create a windbreak in the form of a wattle fence.
It is worth saying that the cultivation of peppers cannot be carried out earlier than 3 years after the growth of nightshade crops on the ground (for example, tomatoes, eggplants, potatoes). A large number of diseases of these plants can be transmitted through the soil. Before planting, you can grow cabbage, zucchini, cucumbers, other pumpkin and legumes, table roots.

The soil in the area where you are going to grow the pepper must be drained, fertile, and retain moisture well. Site preparation must be done in the fall. After the previous crop has been harvested, you need to completely free the soil from plant residues and dig up the soil.
It should be noted that from 30 to 50 grams of superphosphates, from 50 to 80 grams of wood ash and from 5 to 10 kg of humus or manure are introduced per 1 m2. At the same time, I would like to focus your attention on the fact that you should not plant peppers on the ground where fresh manure has just been added. An excess of soluble nitrogen negatively affects the preservation of the ovary, as well as the ripening of the fetus.
In the autumn, you need to carefully dig up the area where you are going to grow the peppers. In the spring, it is necessary to loosen the soil, add 30 to 40 grams of fertilizers (potash and phosphate) and 20 to 30 grams of nitrogen fertilizer per 1 m2.
To get a really great harvest, planting must be done according to certain rules.
The cultivation of peppers in the open field is usually carried out in the last days of May. During this time, the danger of frost is minimized. Peppers are planted according to the scheme 60-70 x 20-30 cm. Before planting, you need to water the seedlings abundantly so that during the planting process your pepper does not look wilted, it can take root better, and grow faster.

When planting peppers in the heat, it is better to choose the second half of the day to enable the plant to grow stronger overnight. When the weather is cloudy, disembarkation can be done in the morning.
Prepared holes should be poured with plenty of water: at the rate of 1-2 liters per hole. In this case, it is better to use water heated in the sun. After carefully pulling the seedlings out of the pots, they must be placed in the holes in an upright position and planted a little deeper than they grew in the pots. This is necessary to provide your pepper with additional nutrition, which will help the adventitious roots that have appeared on the stems covered with earth.
To grow a good harvest of pepper, it is necessary to carry out certain care, which consists in ensuring proper watering, weeding, feeding, garter and other actions.
When growing, the optimum temperature should be between +20 and +25 ° C. If the temperature is below + 13 ° C, cover the peppers with a special material or film. If you see lilac shades on the fruits, this will indicate a violation of the temperature regime.

It is better to water your peppers with water that has settled, or with rainwater. The optimum water temperature for irrigation is from + 24 ° C to + 26 ° C. Before flowering, you need to water once a week, and in the heat - 2 times. The irrigation rate is up to 12 liters per 1 m2. During flowering and fruiting, it is worth watering 2-3 times throughout the week. At the same time, the irrigation rate is up to 14 liters per 1 m2.
The first feeding must be done when 1-2 leaves appear on the pepper seedlings. You need to mix 3 grams of superphosphates, 1 gram of potassium fertilizer and 0.5 grams of ammonium nitrate in one liter of water. After 14 days, you need to re-feed your pepper. In this case, the dose of mineral fertilizers should be doubled.
The soil under the pepper must be loosened. Loosening is carried out to a not very great depth (up to 5 cm), since the roots are located in the upper layer. In addition, it is necessary to huddle and weed the plants.

Pepper shoots are very fragile, break easily, so they must be tied to pegs. And it is better to plant tall crops around the garden bed, which will create protection for your planting from the winds.
As soon as you plant the pepper seedlings in open ground, you need to take care to protect the plants from frost. As an excellent protection from the cold, it is recommended to use tents, which are made of wooden blocks, cardboard, burlap and other materials. Such tents should be covered with pepper in the evening and opened in the morning. If the cold snap lasts longer, it is better to use a portable temporary film cover.

Another long-known means for protecting plants from frost is sprinkling and fuming. It is better to select a material for combustion that can provide thick smoke.The sprinkler must be capable of fine atomization of water. This will have the greatest effect.
Peppers can be susceptible to the same diseases as other vegetables from the nightshade family. Diseases can be caused by a variety of viruses, bacteria and fungi. The most famous diseases of peppers are wilting and blackleg. "Black leg" is associated with the defeat of pepper seedlings. To solve the problem of this disease, you need to adjust the temperature and humidity. Adult crops are prone to withering. The manifestation of this disease occurs in a change in the color of the leaf blades, the shedding of leaves and the browning of the vessels on the stems. In the end, all this leads to the death of plants.

Disease control and prevention measures are primarily the purchase of high-quality seeds and seedlings, the elimination of pests and weeds, the observance of crop rotation and the removal of diseased plants. The main pests for peppers are mites, slugs and aphids. Good old proven folk methods are suitable for dealing with them. Such a solution will help to overcome aphids: 200-250 grams of wood ash is taken in a bucket of water (+ 50 ° C). To protect peppers from spider mites, you can apply chopped onions or garlic (200 grams), as well as dandelion leaves (200 grams) in a bucket of water. The above solutions must be infused for at least a day. Stir and strain before use. To increase the effect, you can add a little liquid soap to the solution (30-40 grams). Regular loosening and processing of the soil with dry mustard or crushed red pepper (one teaspoonful per 1 m2) will save you from slugs. Straw mulch can also help.
As you can see, it's pretty easy to grow a good quality pepper crop outdoors. You just need to follow the recommendations outlined in this article. We wish you a rich harvest.
Secrets from an experienced gardener. She will tell you how to care for peppers, what top dressing to use and how to identify missing trace elements by the appearance of the pepper.
3>Most read:
How to feed cucumbers during flowering and fruiting
Cucumber care ...
Serum for cucumbers and tomatoes: use for processing and feeding vegetables
To vegetable to ...
Determinant and indeterminate tomato varieties - what is it? Country houses
Determinant ...
How to rejuvenate an old blackcurrant bush: when to prune, fall or spring
How right about ...
Tomato varieties for greenhouses: the best yielding tomatoes for greenhouses
How not to drown ...
Lichen on an apple tree: treatment, effective control measures
Lichens before ...
Tomato Demidov: characteristics and description of the variety
Hardy rast ...
Apple variety Rozhdestvenskoe: photos, reviews, descriptions, characteristics
Christmas ...
How to properly grow an apple tree from a seed: recommendations
You bought on ry ...
Apple tree Kovalenkovskoe: variety description, photos, cultivation features
Our ancestors of govs ...
Kale cabbage: cultivation features and varieties
Kale cabbage ...
Late varieties of pear: description and characteristics
Advantages and n ...
Eggplant variety Fabina, description, characteristics and reviews, as well as cultivation features
Fabina is a university ...
Strawberry Gigantella: preparation for planting, planting, care, disease prevention, video, photo
Strawberry Gigan ...
Gooseberry Russian yellow - planting, growing, care, video
Landing of the Russian ...
Prestige for processing potatoes, is it harmful to health?
A home for the whole ...
Hybrids of plum and apricot, peach, nectarine and apple: description
The most unusual ...
Mildew of grapes - means, preparations of effective action photo
Mildew grapes ...
Cherry assol variety description photo reviews
Description of self-propelled ...
Growing melon outdoors
Melon cultivation ...
Grape varieties for wine
From varieties ...
Diseases of eggplant in a greenhouse photo and their treatment
How can it hurt ...
Sineglazka potatoes: description and characteristics of the variety, reviews of gardeners, planting and care
Description and hara ...
High-yielding cherry Morozovka - variety description, photo of fruits, pollinators
Cherry frost ...
Pears in Memory of Yakovlev: description and characteristics of the variety
Tips for growing ...
Cherry fly: processing time and control methods
Before we say ...
How to plant strawberries in spring: soil preparation, seedlings and planting methods
How to plant a club ...
Pear Elena: description of the variety, characteristics, photo
In our country …