Content
- 1 Orchid pot
- 2 Soil preparation
- 3 Where to put the flower
- 4 Temperature regime
- 5 Watering the orchid
- 6 Plant transplant
- 7 Post-flowering care
- 8 Reproduction at home
- 9 What does the Phalaenopsis orchid look like?
- 10 Reproduction of a plant at home
- 11 Step by step instructions
- 12 Cytokinin paste: what it is and how to use it
- 13 Possible problems with the reproduction of phalaenopsis

Orchid is a beautiful, mysterious, extraordinary and, indeed, a royal flower. There are about 20 thousand varieties around the world. And only some of them managed to be tamed by flower growers: Wanda orchid, Cymbidium, Phalaenopsis, Dendrobium, Pafiopedilum - the most suitable species for indoor conditions.
Growing an orchid at home still scares novice flower lovers. Since it is believed that she is extremely capricious, demanding, and will not take root in every home. For some amateur flower growers, it grows without problems, and does not take much time to care, for others it requires constant attention. What does an orchid need in order for it to endow the house with flowering for many years? Read this article for details.
Orchid pot
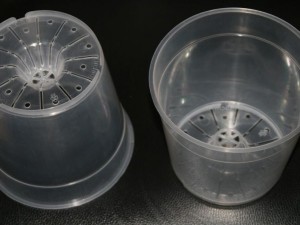
You can make a similar pot with your own hands.
It is necessary to take care of the pot in which the flower will grow. For those who have just decided to purchase an orchid, you should know that it will not grow in an ordinary flower pot.
This means that it is necessary to create the appropriate conditions for growth.
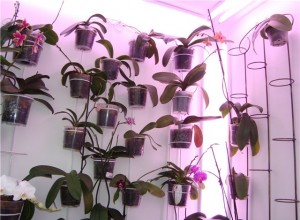
The pot should be made of clear plastic. It is necessary to make holes on it on the sides and bottom. It is desirable that small legs from 0.5 mm are present. This is done so that air flows to the roots of the plant. Some types of orchids prefer to grow in baskets that are hung from the wall.
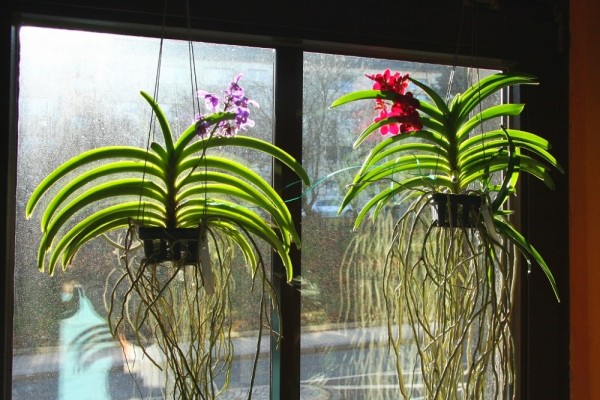
Orchid Vanda in a hanging pot
Note: The orchid is sold in a transparent pot with air holes.
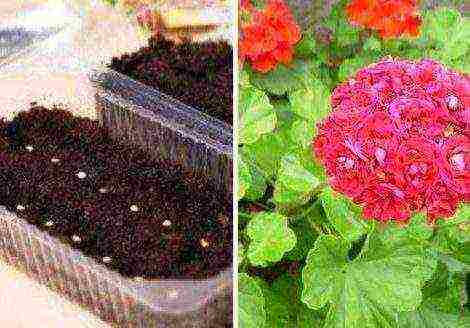
Soil preparation
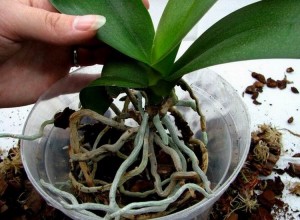
The orchid should be freely removed from the pot along with the soil.
An orchid will not grow in the ground. No matter how high quality and nutritious it is. In the wild, this flower (orchids - epiphytes) grows on trees high from the soil.
The same conditions must be created at home.
You don't need to rack your brains over this. The stores sell ready-made substrates for orchids. It is a mixture of sphagnum moss, pine bark, high-moor peat, a small amount of charcoal. Additional components are added to these main components. Therefore, the substrates are different.
It is important to know: the amount of charcoal should not exceed 5%. Since over time it accumulates salts, which negatively affects the growth of the flower. The soil should lie freely in the pot, it should not be tamped.
Where to put the flower
Side light is one of the conditions for proper orchid cultivation
Orchid is a plant that makes you admire yourself. Each hostess is proud of her favorite and wants to put it in a prominent place.
In this case, the following points should be taken into account:
- the orchid loves a lot of light, but it should be diffused;
- it is better to put the flower not on the windowsill, but to allocate a special stand for it, which should be placed on the side of the plant;
- after winter, the orchid weaned from bright sunlight, for a while it needs to be shaded.
Note: if the leaves turn pale, turn yellow, the roots stretch out, then the orchid does not have enough light.
Temperature regime
The orchid on the loggia in the summer feels great
Orchid is a heat-loving flower.
The room temperature must be at least 15 degrees Celsius. Otherwise, the flower may simply freeze. At high temperatures, the flower feels much more comfortable. But there are some nuances.
If the air temperature is over 25 degrees, so-called "babies" will begin to appear on the orchid. These are small shoots on shoots, roots. As they develop, they can be detached from the main flower, and transplanted into a separate pot. Sometimes such conditions are created on purpose.
Note: You can take the orchid out into the fresh air in the warm season in the morning and in the evening. The scorching sun can scorch the leaves and the plant dries up.
Watering the orchid
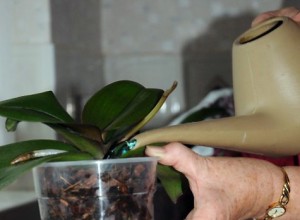
Watering the orchid is best over the sink.
In the case of an orchid, the rule applies: it is better to underfill than to overdo it. In the warm season, it is enough to water the flower once a week. In winter, once every 14 days.
There are 3 methods:
- Pour water into a pot - pour the liquid around the edges. Watering should be abundant. Residual moisture flows out through the holes.
- Submerge the pot in water - immerse the entire pot to the brim for 30 minutes. Then they put the water on the glass.
- Spraying - the whole plant is treated, except for the inflorescences. From the presence of water, they fade, wither, spots appear. Care must be taken to ensure that the water does not stagnate in the leaves.
Very important: the water should be at room temperature or slightly warm.
Soft water can be used from the tap. Before that, she insists for a day. Hard - boil, and then also defend. If the orchid likes acidic soil, add a few drops of vinegar, citric acid or juice.
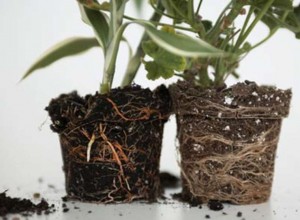
Plant transplant
The new pot shouldn't be too big
The orchid does not like frequent transplant procedures. The optimal period of time is 2 years. This should be taken into account when choosing the size of the pot.
The best time of the year for this is spring and early summer.
The orchid transplant procedure itself includes the following steps:
- water well the day before;
- gently remove the orchid from the pot;
- place in water so that the soil is soaked;
- view the roots - cut off spoiled or with the presence of rot, treat the tips with activated carbon;
- place in a new pot and add a new substrate;
- water only after 1-2 days.
Attention: should not be replanted when the orchid is in bloom or the roots have resumed growth after winter. You can tell by the tips of the roots - they turn bright green.
The plant itself will say that the time has come for transplantation. The roots will stick out from above, become thin, the leaves will no longer be saturated. It seems that the orchid has little space.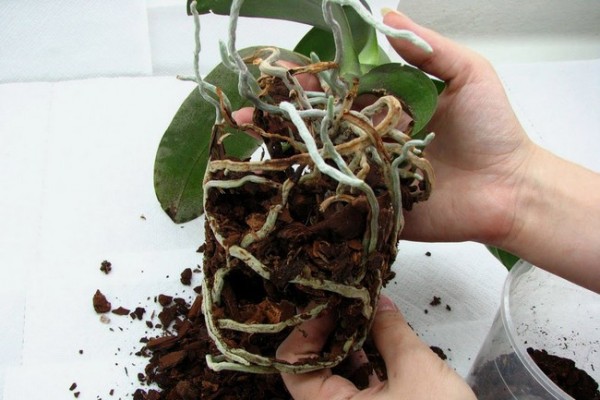
Post-flowering care
The scissors must be sharp so that there is no dent on the shoot
The orchid is distinguished by long flowering. Some species stand in flowers all year round (for example, the Phalaenopsis orchid). On average, this takes 6 months. The buds open gradually. What to do with the stem after flowering?
There are 2 options: cut it off or wait until it dries.
The second option is more appropriate. New flowers may appear on the stem, the formation of which may not be noticeable at the time of cutting. It is better to wait until it dries, and then carefully cut it off. Interestingly, with this care, the orchid will bloom much faster than when the stem is cut off right away!
Reproduction at home
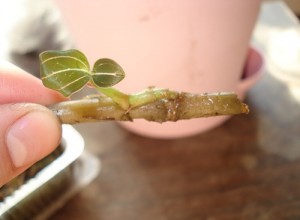
It looks like a cutting, ready for transplant.
Breeding orchids is a process that requires neatness, sterility and aging.
There are several ways to dilute a greenhouse of flowers from one plant:
- Reproduction by division. The flower is taken out of the pot, soaked. A sharp knife is used, which is previously disinfected or pierced over a fire. The flower is carefully cut into 2 parts. The cut site is treated with activated carbon.
- Propagation by cuttings. Suitable for fast growing orchids with one apical point of growth. Young shoots are used. The knife is pre-prepared. Cut at the base of leaf growth. Cuttings are cut into 20 cm each. The ends are treated with activated carbon. Then it is necessary to dry in the open air for 1 day. The substrate should be light. The day before transplanting the cuttings, it should be well moistened. Next, you need to arrange them correctly. Do not stick, just lay on top of the substrate. Make a greenhouse. Just cover with plastic wrap. To create conditions of high humidity and warmth. When leaves and roots appear, you can transplant.
- Orchid propagation by seeds at home is almost impossible to carry out. Complete sterility must be observed. And everything. A special temperature regime is created. The composition of the substance in which the seed will develop. Moreover, the seed of the orchid is very small - the size of a speck of dust.
- Reproduction by children. One of the easiest and safest options. At elevated air temperatures, leaves and new roots appear on the shoots, which grow in different directions. These are kids. It is necessary to provide the flower with high humidity. After the neoplasm gets stronger, you can cut it off and transplant it into another pot. Another breeding option is to gently bend the shoot into another pot of soil and sprinkle it. After it takes root, cut it off.
You can find out more useful information about the methods of breeding orchids at home from this article.
The orchid should feel cared for, warm, calm at home. Then she will delight with excellent flowers and become a talisman of good luck for her mistress or master. Orchid care is no different from other flowers, it's just special.
Look video tips for growing orchids at home:
Rate the article
(
estimates, average:
out of 5)
It is very difficult to find flower growers who are indifferent to orchids. These plants are highly valued for their abundance, duration, showiness of flowering and amazingly beautiful color of petals. Phalaenopsis is one of the most "capricious" and undemanding varieties to care for, so even a novice orchid grower can grow it. However, with the reproduction of a plant, difficulties often arise. To avoid them, you need to study the process and the corresponding technology in advance.
What does the Phalaenopsis orchid look like?
Phalaenopsis is one of the many genera belonging to the Orchidaceae family. At the moment, about 70 of its representatives are known, not counting the hybrids bred by breeding (there are more than five hundred). Most of the "natural" varieties can be found in Southeast Asia, as well as on the islands that form the border between the Indian and Pacific oceans - Indonesia, Kalimantan, the Philippines, the Sunda and Malay archipelago.
Phalaenopsis compares favorably with other orchids in comparative unpretentiousness
Literally translated from Greek, "phalaenopsis" means "like a moth" (phalaina - "moth" and opsis - "similar"). The plant owes its name to a small incident. The researcher of tropical flora from the Netherlands Karl Blume, having discovered the first phalaenopsis on one of the islands of the Malay archipelago, at dusk took its inflorescence for a flock of moths. He had to come very close to the plant to realize his mistake.
Phalaenopsis flowers really resemble exotic tropical butterflies
Phalaenopsis differs from other orchids in the absence of tuberidia or pseudobulbs - characteristic ovoid thickenings on the stems. An adult plant looks like a rosette of leaves arranged in two rows. The stem is very short, so it appears to be lying on the ground.
Phalaenopsis differs from other orchids in the absence of pseudobulbs
In nature, phalaenopsis leads an epiphytic lifestyle. He needs "classic" roots only to cling to cracks in the bark of trees, thereby gaining support. The plant does not need anything more from the "owner", it is not a parasite. The orchid provides itself with moisture and nutrients, drawing them from the atmosphere with the help of a developed system of aerial roots. They are thick (up to 8 mm in diameter) and covered with a thick layer of a special absorbent fabric (velamena). Because of this, the roots have an atypical greenish-silvery hue.
In nature, orchids most often settle on tree trunks, less often they cling to their roots in crevices in rocks.
The average height of the phalaenopsis is 50–70 cm. An adult plant is a rosette of 4–6 leaves. A maximum of two new leaves can grow in a year. They are very dense, fleshy, rich dark green hue.
The peduncles of the plant are long (70–80 cm), slightly curved, branching. Flowers 2–12 cm in diameter (depending on the species) are collected in brushes or panicles. The buds do not bloom immediately, so the flowering period is quite long (2-6 months). There can be more than a hundred of them in one inflorescence. Most often, the petals are painted in delicate pastel shades - pink, purple, pale lemon, salad, snow-white. A scarlet, inky purple, olive green or chocolate lip contrasts effectively with them. Often this tone is also present on the petals in the form of strokes or specks. The flowers of most natural varieties emit an unobtrusive, pleasant aroma.
Phalaenopsis blooms twice or even three times a year.
The plant does not have a clearly expressed dormancy period. It usually blooms at home twice a year - in spring and autumn. If you create an orchid close to ideal conditions, you can achieve a third flowering.
Video: the amazing variety of phalaenopsis
Reproduction of a plant at home
Phalaenopsis belongs to the so-called monopodial orchids. This means that the only growth point is at the top of the shoot. It is more difficult to reproduce them, as in sympodial orchids, which grow not upwards, but to the side, there are much more such “buds”.
Monopodial orchids are harder to propagate than sympodial orchids
Before starting to reproduce a flower at home, you need to familiarize yourself with the basic rules:
- Any instrument must be thoroughly disinfected before the procedure, knives and secateurs must be sharpened, hands must be washed with soap and water.
- All damage inflicted on the plant in the process of damage is immediately processed. "Wounds" can be sprinkled with crushed chalk, activated carbon, colloidal sulfur, sifted wood ash, cinnamon. Iodine and brilliant green, suitable for other indoor plants, are not recommended for processing orchid cuts.
- The roots should be handled as carefully as possible. They are thick but fragile and break very easily.
- Young orchids that have given roots are placed in a substrate suitable for them, previously well moistened with soft water heated to a temperature slightly above room temperature. After transplantation, Phalaenopsis is provided with a constant temperature of 25-28 ° C and diffused light (light partial shade is also suitable). For a month, protect it from direct sunlight and do not water (limit yourself to spraying).
Only perfectly healthy plants are suitable for reproduction, without the slightest signs of damage by pathogenic fungi, plants, insects. Orchid keeping conditions should be as close to ideal as possible. Proper lighting is especially important.The minimum daylight hours are 12-14 hours.
Such phalaenopsis is clearly not suitable for reproduction.
You should not take breeding material from newly acquired orchids. Store plants are often treated with artificial flowering stimulants and other harmful chemicals. Let the flower adapt to normal conditions, at least for a year.
The substrate for young plants is prepared mainly from small (0.5–1 cm) pieces of pine bark. Better to take it from a pot with an adult orchid. The rest of the additives (sphagnum moss, coconut fiber, fern rhizomes, peat chips, charcoal) together make up no more than half of the total volume of the mixture.
Soil suitable for growing orchids has little resemblance to soil in the usual sense of the word.
Step by step instructions
Most often, at home, phalaenopsis reproduces vegetatively. The plant has only one point of growth, but you can slightly "tweak" the nature.
Seeding "children" formed on the peduncle
Sitting "babies" is the most common way of reproduction of phalaenopsis. The offspring is separated from the mother plant 1.5–2 months after flowering. The procedure most often takes place in the spring. Growth buds are formed in the axils of the leaves or on the peduncles of orchids at the age of two years, with at least 4 healthy leaves. Sometimes they form on faded peduncles no older than one and a half years.
Often, phalaenopsis at home forms "babies" without additional stimulation
The appearance of "babies" can be stimulated in several ways:
- The difference between the daytime (28–30 ° C) and night (18–20 ° C) temperature of the content. At the same time, high air humidity (70% or more) and daylight hours with a duration of at least 12 hours are necessarily ensured.
- "Sunbathing". The orchid is left in direct sunlight for an hour a day in early spring. When a slight purple “tan” appears on the leaves, it’s not scary, but if it changes color to ink purple, and there are still no “babies”, stop the procedure.
- Artificial "drought". The plant is not watered for 12-14 days, protecting the orchid from direct sunlight. Moistening of the substrate is resumed 2-3 days after the roots acquire a silvery-gray hue. Thus, the flower is made to believe that his death has come, in the face of which the instinct of procreation is activated in him.
- Use of fertilizers with a high nitrogen content. The method is rather risky. Orchids do not like this macronutrient too much, so there is a real risk of ruining the mother specimen. Even if he gives a "baby", he will definitely not have to wait for his flowering this year.
Phalaenopsis "babies" are planted in a substrate based on pine bark, but with a smaller fraction than for adult plants
As for when exactly it is necessary to separate the "baby" from the mother plant, there is no consensus among flower growers. Most believe that you need to wait for at least one root to appear. Others are of the opinion that this greatly depletes the "parent", so they cut off the "offspring" when the first pair of leaves appears.
- Separate the baby from the mother plant. Process the sections. Dry in the open air for 24 hours.
- Fill transparent cups with a mixture of finely chopped sphagnum moss with pine bark and fern rhizomes (1: 3: 1). The more uniform the soil is, the better. In containers, you need to make 3-4 drainage holes.
- Moisten the substrate. Plant young orchids in the ground and place the containers in a home mini-greenhouse, florarium or homemade greenhouse. Maintain a constant temperature of 23–25 ° C and bright, diffused light.
- As it dries, moisten the substrate with a solution of a root formation stimulator - Kornevin, Heteroauxin, Zircon, Epin (3-5 ml per liter of water). Air the plantings daily for 5-7 minutes.
- If the bottom pair of leaves turns yellow, this is normal. You cannot cut them off - the forming roots receive nutrition from them. When the time comes, they dry up and fall off on their own.
- Wait until the roots are 4–5 cm long, then transplant the phalaenopsis into adult soil. The procedure is not quick, it usually takes about a year.
Alternative way:
- Pour water warmed to a temperature slightly above room temperature into a glass. You can add a tablet of succinic acid to it.
- In the morning, place the cut and dried "baby" so that the bottom is located at a distance of 1-2 mm from the water. You can, for example, take a piece of styrofoam, cut a hole of the appropriate diameter and put it on a glass.
- After 6 hours, remove the "baby" from the water. Dry it outdoors the rest of the time.
- Continue manipulating daily until roots appear. The water should be fresh every day. Then proceed as described above.
It is possible to root the "offspring" of phalaenopsis over water, about the same reanimate orchids that have lost their roots
Video: is it worth cutting off and rooting offspring
Video: stimulating root growth in an orchid offspring
Propagation by cuttings
The method is considered the simplest and least labor-intensive. It is used for reproduction of orchids that have bloomed 2-3 months ago. Orchid cuttings are pieces of a peduncle. If the plant has bloomed more than a year ago, it will not work to use it as a planting material.
Orchid cuttings - parts of a recently faded peduncle
- Cut the stem as close to the base as possible. Treat the "wounds" on it and on the mother plant.
- Using a sharpened scalpel or razor blade, cut it into pieces 5–7 cm long at a slight angle. Each of them must have at least one "dormant" bud, preferably in the middle of the cutting. It is believed that the lower the growth point is, the stronger the bud. Accordingly, it is more likely that a viable plant will develop from it in a short time.
- Fill shallow, wide containers with finely chopped sphagnum moss. Spray it with a biostimulant solution. Spread the parts of the stalk horizontally on a moistened substrate.
- Cover the plantings with glass or plastic wrap. Provide a constant temperature of 25-28 ° C, bright diffused light, humidity not less than 70%. Air the plantings, spray the dried substrate with a solution of a root formation stimulator.
- Wait for 3–5 cm long roots and two pairs of leaves to appear. In fact, the same "babies" are formed on the cuttings. If part of the peduncle dries up, this is normal, it feeds on a young plant. Before transplanting, separate the dead tissue from the "offspring", trying to injure him as little as possible.
- Transplant the phalaenopsis into adult orchid soil.
Phalaenopsis cuttings are laid horizontally on the substrate
There is another option:
- Place the cut, faded peduncle in soft warm water. Add activated charcoal (one 0.2 liter tablet) or potassium permanganate crystals (until pale pink) and succinic acid (0.5 liter tablet) or biostimulant (3-5 drops per liter).
- Place the container in direct sunlight, covered with a plastic bag or glass cover. Spray daily with a solution of any biostimulant (Epin, Zircon, Kornevin, Heteroauxin) or specialized fertilizer for orchids. Reduce the concentration by a factor of 2–2.5 compared to the recommended by the manufacturer. Change the water every 3-4 days.
- Under the influence of drugs, high humidity, heat and light, the growth buds on the peduncle "wake up", forming "children". They are cut from the cutting and rooted as described above.
The stalk can give the same "babies" as the phalaenopsis itself
Video: orchid cuttings
Plant division
This method is rarely used by amateur flower growers. The likelihood of developing rot is high. Accordingly, you can lose the plant.The chosen phalaenopsis must be large and perfectly healthy. Other requirements are age (at least 4–5 years) and the number of leaves (6–8 pieces or more).
Dividing an orchid is a rather risky way to propagate a plant.
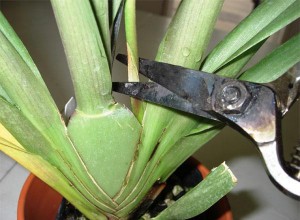
- Use a sharply sharpened disinfected knife or pruner to cut off the top of the plant, dividing it approximately in half. Leaves and aerial roots must be present on both parts. Process both cuts.
- Plant the separated shoot in a mixture of finely chopped sphagnum moss and pine bark (1: 2). The substrate must be dry. Provide the conditions that phalaenopsis require for normal growth and development (temperature, lighting, humidity). Do not water the soil as it dries, but spray it with a biostimulant solution. As soon as two pairs of new leaves appear, transplant the flower into soil suitable for adult orchids.
- Provide the old plant with long daylight hours, warmth and regular feeding with special preparations for orchids. After 2-3 months, lateral buds will appear at the cut site, which will develop into "offspring" or new shoots. The orchid will take on a normal appearance in about 1.5–2 years.
The circumcised phalaenopsis regains its former appearance in about one and a half to two years.
Video: reproduction of phalaenopsis by dividing the outlet
Germinating seeds
Growing orchids from seeds at home is a complex procedure that requires the grower to follow all instructions exactly, attentiveness, accuracy and patience. Until recently, it was believed that this is, in principle, impossible.
Dusty orchid seeds cannot be seen with the naked eye.
The specificity of the procedure is due to the structure of the seeds. First, they are very small (they can only be viewed through a microscope). Therefore, collecting them yourself is very problematic. Secondly, they lack the endosperm - the tissue surrounding the embryo, where amino acids, vegetable oils, starch and other substances necessary for its nutrition are stored. The future orchid cannot feed on its own, absorbing them from the soil. In addition, due to the absence of the same endosperm, the seeds are very vulnerable. Any interaction with pathogenic fungi, bacteria, negative environmental factors leads to their death.
Agar agar is the basis for the nutrient mixture in which orchid seeds germinate
You can germinate seeds at home if you prepare a special nutrient substrate and maintain complete and absolute sterility throughout the entire process. Green "balls" in the container will appear in 5-6 months. Orchid bloom will have to wait at least 4–5 years.
Orchid seeds are germinated in special flasks or in containers for chemicals
- Prepare an agar-based nutrient substrate. It is a mixture of polysaccharides produced from some species of ocean brown and red algae. For 10-15 g you will need 200 ml of distilled water, 10 g each of glucose and fructose (can be replaced with sugar), calcium carbonate solution and phosphoric acid.
- Cover the agar with water and let it swell. Pour jelly into boiling water, add glucose and fructose. Stir until all the crystals are dissolved, the mass becomes homogeneous. Acid and alkali are used to provide the required acidity (pH 4.8-5.2). The indicator is easy to determine using litmus tests.
- Sterilize clear glass vials or chemical flasks. The vessels must have tight-fitting plugs. If there is no alternative, small cans with screw caps will do.
- Pour 30-40 ml of formula into each container. Sterilize them in a water bath for 20 minutes.
- Let the jelly harden and wait 4–5 days. If during this time no mold appears in the flasks, disinfection was successful.
- Fill the seeds with a 1% bleach solution for a quarter of an hour.During this time, shake the container vigorously periodically.
- Cover the pot with boiling water with a wire rack or wire mesh. The cells must be such that the flask with the "substrate" can be fixed. The lid should be right there so that the steam can get on it.
- With a sterile syringe, gradually pull the seeds out of the disinfection solution and transfer them to the vessel without touching the "jelly". Seal containers hermetically and place them in a greenhouse or florarium. The conditions are the same as for cuttings.
- After six months, remove the seedlings from the vessel. To do this, pour about 50 ml of warm water into it and shake the contents in a circular motion. Then the mass is poured into a wide bowl, a few drops of 1% Fundazole solution are added and left for 10-15 minutes.
- After this time, take out the plants one at a time with a soft thin brush and plant them in a substrate of moss, pine bark and fern rhizomes (equally) with the addition of 2-3 tablets of activated carbon, crushed into powder.
- After another 5-6 months, phalaenopsis can be transplanted into a substrate for adult plants.
It is possible to germinate phalaenopsis seeds at home only if you observe complete and absolute sterility.
Video: seed reproduction of orchids at home
Cytokinin paste: what it is and how to use it
Cytokinin paste is a phytohormonal preparation that helps, among other things, to stimulate the formation of growth buds in orchids. It stimulates cell division at the site of application. The tool can only be used if the plant has a peduncle. Experienced orchid lovers are advised to apply the drug to the uppermost or lowermost "dormant" bud. The best time for the procedure is the end of February or March.
Cytokinin paste is a unique phytohormone that allows you to achieve significant success in the reproduction of orchids
- With a sterile razor blade, scalpel, needle, remove the integumentary scales from it. Remove loose tissue with tweezers. There should be a small light green dot under them.
- Scratch it very gently and shallowly 2-3 times with a clean needle.
- Pour cytokinin paste onto a toothpick (a ball with a diameter of about 2.5 mm is sufficient). If possible, distribute the preparation evenly over the kidney, lubricating it as a whole. It is important to comply with the norm. If there was little paste (a ball with a diameter of 1.5–2 mm), most likely, a peduncle will form. If you overdo it, several deformed, non-viable "babies" will develop.
- After a week or one and a half, it should hatch and begin to develop. Place Phalaenopsis with the emerging "offspring" in a warm and bright place, fertilize regularly. During this time, the orchid needs more nitrogen than usual.
The process of applying cytokinin paste looks like this
Cytokinin paste is used very sparingly (a maximum of three buds are "awakened" at the same time on the orchid) and pointwise (the drug should not get on the leaves, flowers, roots). The plant must be an adult (a young one can shed its leaves).
If done correctly, cytokinin paste guarantees a 100% positive result
Video: the use of cytokinin paste for orchid propagation
Possible problems with the reproduction of phalaenopsis
Young plants need extra care. To make it easier to control the condition of the roots, the grown phalaenopsis roots are planted in transparent pots. This method can also be practiced for mature plants, since aerial roots are involved in the process of photosynthesis.
It is important to choose the right substrate. All components are pre-sterilized by steam, heat or cold. Pine bark must be soaked for two days in warm water or a pale pink solution of potassium permanganate. Fundazol or any other fungicide (0.5% solution) is also suitable.
The main danger threatening a young orchid is rot. Often the florist himself contributes to its development, regularly flooding the plant. If the process has gone far, it will no longer be possible to save the phalaenopsis. This is evidenced by vague black spots on the leaves, a moldy substrate, and an unpleasant putrefactive smell. You need to start acting when individual brown "specks" appear on the roots.
The main danger threatening a young phalaenopsis is root rot
- Remove the orchid from the pot. Previously, in about half an hour, you need to water the plant abundantly.
- Clean the roots from the substrate, cut off all infected tissues with a sharpened disinfected knife. Do the same with the leaves affected by the fungus.
- Soak the roots for 25-30 minutes in a solution of any fungicide (Kuprozan, Abiga-Peak, Horus, Skor). Sprinkle the "wounds" on the leaves with crushed activated carbon, chalk, cinnamon.
- Transplant phalaenopsis by sterilizing the pot and completely changing the substrate. Add Trichodermin and Glyocladin granules to the soil.
- Within 2-3 months, replace the water for irrigation with a pale pink solution of potassium permanganate or 0.5% - Baikal-EM, Bayleton, Previkura.
A transparent pot allows the roots of the plant to participate in photosynthesis, and the grower - to control their condition
Phalaenopsis is relatively undemanding to care for and this compares favorably with most orchids, not inferior to them in the beauty of flowering. In principle, there is nothing difficult in getting a new plant at home. You just need to study all the nuances of the procedure in advance and follow the recommendations exactly.