Content
- 1 Bone medlar at home
- 2 How to propagate the German medlar
- 3 Propagation of medlar by cuttings
- 4 Caring for Japanese medlar in a room
- 5 Care of the German medlar
- 6 Types of medlar with photos and names
- 7 Varieties and varieties
- 8 Bone medlar
- 9 Reproduction of medlar
- 10 How to plant a medlar
- 11 How to grow medlar
- 12 Description of the plant
- 13 Rules for growing plants in indoor conditions
- 14 Caring for a medlar in an apartment
- 15 Cultural forms of medlar
- 16 Japanese medlar - lokva
- 17 Medlar in nature
- 18 Subtropical plant at home
- 19 German medlar. How to grow a plant from a seed?
- 20 Japanese medlar: growing at home
- 21 We take care of the loquat sprouts
- 22 Features of care for seedlings
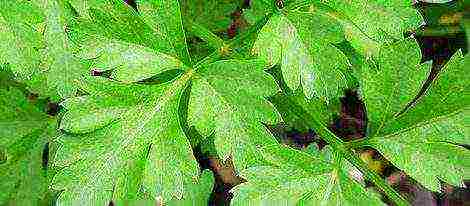
Medlar is a shrub or tree belonging to the Rosaceae family. It grows in the warm climate of the Balkan countries, Crimea, the Caucasus, in the south of the USA and Europe.
The fruits are rich in nutrients. They can be consumed fresh, they are used to make jams, jellies, marmalade, marshmallows, homemade wine, the leaves are used for medicinal purposes. The bush is decorative: snow-white inflorescences, similar to tuberose, flaunt on it for a long time. They exude a delicate delicate aroma.
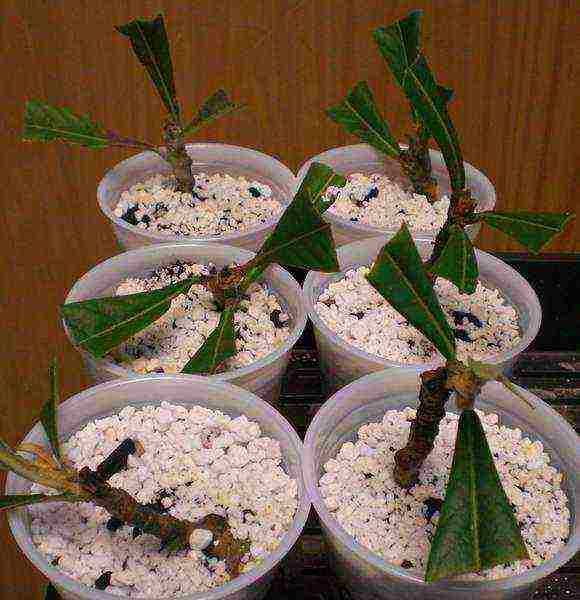
Bone medlar at home
Grow a medlar from a bone at home photo step by step
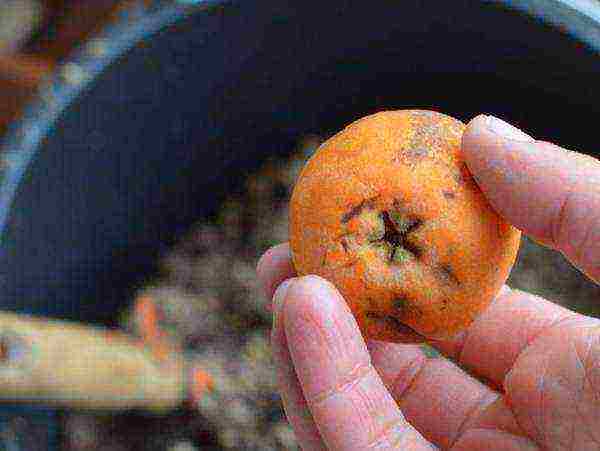
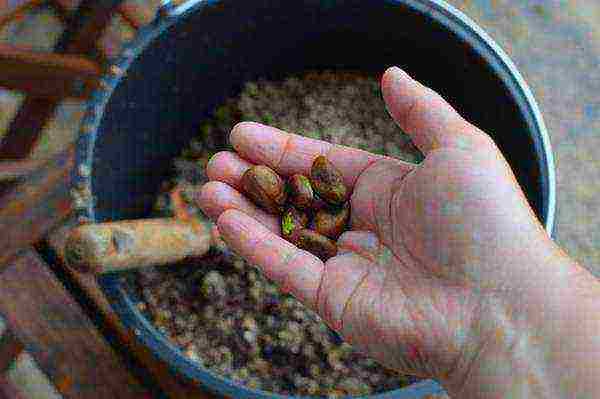
Japanese medlar or loqua can be grown from a seed. The seeds are easy to get out of the fruit, and they even make up most of it. They are very large, somewhat reminiscent of peanuts.
Take pots 7-9 cm in diameter with good drainage holes. Fill them with a sand and peat mixture. Sprinkle abundantly with water so that the liquid completely soaks the soil and flows out through the holes.
How to grow medlar from a bone at home photo step by step
Plant the seeds, deepening by 2-3 cm. You can plant one bone in a pot, or several. Not all seeds can sprout, but shoots can be waited for several months (up to five). All this time, you just need to maintain a moderate humidity without the development of mold.

Growing medlar from a bone at home photo
Cover crops with foil, put in a warm place. The sprout will not appear soon. During this time, regularly lift the film to remove condensation. Moisten the soil with a fine spray.

How to plant a medlar with a bone photo
Protect seedlings from direct sunlight. When you see the shoots, remove the shelter. The air temperature must be at least 18 ° C.

Lokva from a bone photo
With the appearance of 3-4 pairs of leaves, transplant the medlar from the bone into a container of a slightly larger diameter. Transplant soil: 2 parts of leafy land, 1 part of turf, 0.5 parts of sand.
Japanese medlar at home photo of a tree
How to propagate the German medlar
German medlar is propagated by seeds. Cut the fruit, remove the seeds, soak in a growth stimulant solution for 2-3 hours. As a soil, you can take a universal substrate for indoor flowering plants.
- Place 5-6 seeds in a pot with a volume of 1.5-2 liters, deepening by 3-4 cm.
- Cover the crops with foil, put in a warm place for germination.
- Ventilate daily, moisten the soil as it dries.
- Seedlings will appear in 40-45 days, and after about 25 days of growth, 3 true leaves will form.
- Then transplant the plants into separate pots using a transfer method.
Propagation of medlar by cuttings
Propagation of medlar by cuttings photo
Both types of medlar are surprisingly viable - they reproduce successfully by cuttings.
You can root the cuttings of the medlar in soil or water (in the latter version, take a non-transparent container or wrap the jar with a dark cloth, paper - the roots appear in the dark). Rooting soil - sand and peat in equal proportions. The bottom cut should be at a 45 ° angle, remove the leaves, leaving a couple at the top. Deepen into the soil by 4-5 cm, water. When rooting in water, a liquid level of up to 2 cm is sufficient. To create a greenhouse effect, cover with a bag or plastic cup on top. Place in a warm place.
The roots will appear in a couple of months. Transplant the cutting into loose, nutritious soil. Provide abundant watering, illuminate with lamps.
Caring for Japanese medlar in a room
Medlar japanese cultivation at home care and reproduction
Transfer
Japanese medlar (lokva) should be transplanted annually until the age of 5 years, then every 3-4 years. Be sure to place a drainage layer on the bottom of the container. Transfer together with the earthen lump, without violating its integrity. For mature plants, replace the topsoil every spring.
The least painful medlar tolerates the transplant after the end of fruiting.
Watering
Keep the soil slightly moist during vigorous growth: water 3-4 times a week. Light drying of the soil is allowed during the period of relative dormancy. Water for irrigation requires softened water, 3-4 ° C warmer than the air temperature. After watering, gently loosen the soil.
Air humidity
Adequate room humidity must be maintained. The leaves are pubescent, it is better not to spray the plant, but to bathe the floor with a warm shower once a month. Place periodically on a pallet with damp moss, pebbles, expanded clay.
For the summer season, take it out to the balcony or garden - keeping it outdoors encourages growth.
Lighting
Lighting is required bright. The most suitable for growing are the southeast-facing windows. Fruit setting occurs at a time when there is not enough sunlight. Extend daylight hours to 12 hours artificially. Use fluorescent lamps.
Pruning and feeding
The Japanese medlar does not need special pruning. Remove only dead or broken branches.
During the growing season, feed young plants every 3 weeks with complex mineral fertilizers. For an adult plant, 2-3 feeding per season is enough.
Care of the German medlar
When growing indoors, follow the same care guidelines as for Japanese medlar.
Some differences:
- In winter, the German variety does not bloom, so there is no need to create greenhouse conditions for it. Feel free to place the pot with the plant on the glazed balcony (the air temperature should not drop below +2 ° C), stop watering completely.
- Pinch the tops if you want to form a bush. No pruning is required for tree-shaped growth.
- German medlar can be sprayed.
Medlar medlar is often grown in the garden - it can withstand frosts down to -30 ° C. Choose a well-lit area with fertile, neutral soil. Avoid close groundwater, water sparingly.
Types of medlar with photos and names
Culturally cultivated 2 main types of medlar, which are very different from each other.
Japanese medlar or loqua Eriobotrya japonica

Japanese medlar or Lokva Eriobotrya japonica photo
An evergreen plant, the leaves are similar to those of a walnut, slightly pubescent. It begins to bloom in November and bears fruit in the spring (May). Blooms on this year's shoots.Fruits are round in shape, apricot color, have one large stone. The skin of the fruit is thin, the pulp is puree, has a delicate melting taste and apple aroma. They are absolutely not shelf-stable, you will not find them on sale - you should feast on immediately from the bush.
Lokva is thermophilic, grown outdoors in a subtropical climate. In autumn, flowering begins, the leaves acquire a red tint, which looks very impressive.
If the climate does not allow, grow loqua indoors. Do not be afraid that the tree will take up a lot of space: growth is limited to a height of 1.5 m.
Medlar German Mespilus germanica
German medlar Mespilus germanica photo
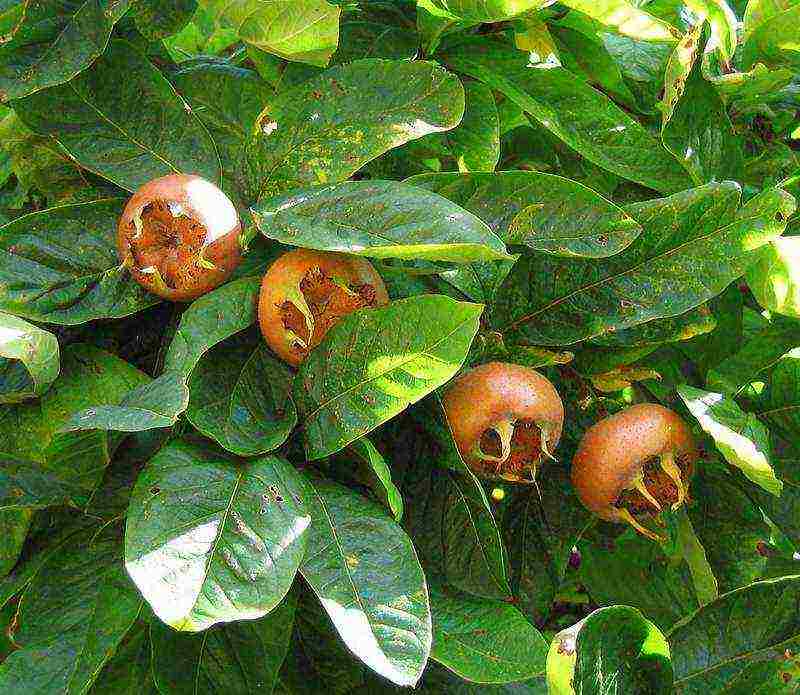
Deciduous plant. The leaves are oblong, dark green, glossy. Flowering occurs in late spring-early summer, fruiting occurs in October-November. Blooms on the shoots of last year. The fruit is firm, with a dense dark red skin, contains 5 small seeds. The berries taste sour, and when frozen, they become softer, acquire a sweet taste. Wait for the frost to taste them.
This type of medlar grows well in cold climates, tolerating frost stubbornly.
The delicate subtropical medlar plant, born in a warm, humid climate, expects the same conditions in the place where it will grow. At home, on a sunny southern windowsill, she will be comfortable. She will feel “at home”. The varieties and varieties of medlar are so diverse that you can choose a tree for growing at home to your liking. With proper care, the medlar will definitely bloom and bring juicy, unusual taste and aroma, useful fruits. And will delight you with beauty!
Varieties and varieties
Medlar is a thermophilic fruit tree that grows in the subtropics and southern latitudes. Its two varieties are best known:
- Caucasian medlar (another name for Germanic medlar)
- Japanese medlar
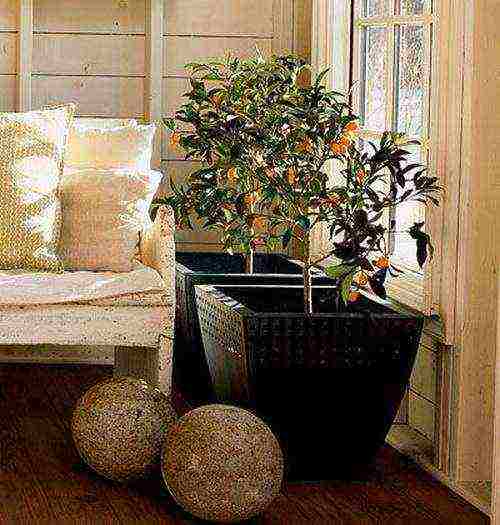
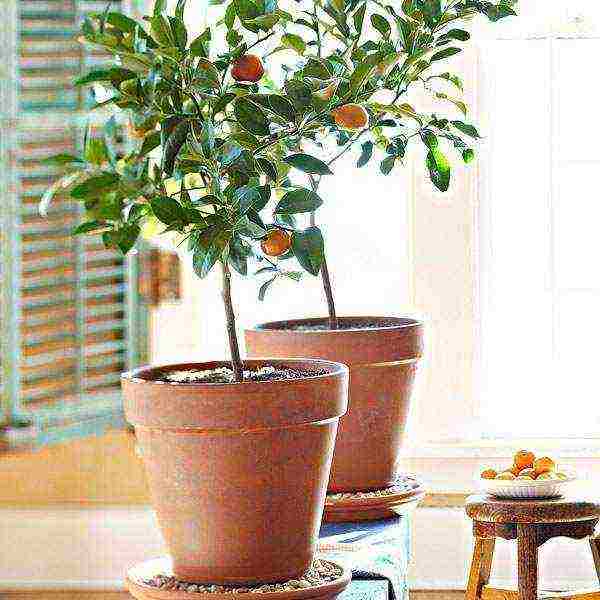
Beautiful, decorative evergreen Japanese medlar at home reaches a height of 1.5-2 meters. She thrives in conservatories, greenhouses, offices and bears fruit regularly. The fruits can hang on the branches for a long time - up to a month. Its thick, lush crown is pleasing to the eye, and when it blooms, its delicate scent creates a wonderful joyful mood.
The following varieties are suitable for growing at home:
- Frost - have fruits of bright yellow color and delicate aroma;
- Tanaka - orange-yellow sweet-sour pinkish fruits weighing 50-80g;
- Champagne - pubescent fruits with creamy pulp;
- Premier - orange-yellow fruits with a delicate taste;
- Silas - fruits taste like apricots;
- Victor, Orange, Advance - fruits are sweet and sour, bright yellow or orange
The fruits of the medlar, in addition to their unusual and varied taste, have many useful properties. They include:
- proteins, carbohydrates, sugar, fiber, tannins;
- vitamins of group B, A, E;
- trace elements: iron, phosphorus, potassium, magnesium;
- The calorie content of the fruit is low - only 42 kcal in 100 grams, which makes it a dietary product for weight loss.
Medlar fruits are good for health:
- Carotene-provitamin A gives the fruit orange color. Carotene has a special value for the eyes - it improves vision, prevents the development of cataracts and other eye diseases.
- This plant is especially beneficial for the liver and gastrointestinal tract. It helps to regulate cholesterol levels, improves intestinal microflora, removes toxins from the body.
- For the cardiovascular system - strengthens the walls of blood vessels, lowers blood pressure, prevents the formation of blood clots
- Helps dissolve small kidney stones by lowering uric acid levels
- Reduces blood sugar levels, regulates metabolic processes
- Calcium and organic acids prevent the development of osteoporosis
The medlar plant is rare for our cool climate.It can grow as a full-fledged fruit tree in the southern regions of Russia. But there are also varieties adapted for northern latitudes. For cultivation in cold winter conditions, breeders have bred the varieties Karadagskaya, Sochinskaya, Goytkhskaya, Sladkaya Dracheva.
There are lovers of rare plants who grow this "curiosity" at home, even living at the latitude of Magadan.
If you also decide to grow medlar at home, then here are the breeding methods:
- seeds (bone);
- layering;
- cuttings
Bone medlar
You have chosen the seed propagation method. The room temperature should be from 10 to 20˚С .. We adhere to the following algorithm:
- take fresh seeds from the fruits of the medlar and place them in the refrigerator for stratification for 2-3 months;
- soak in the root for 8 hours;
- plant a few seeds (2-4 pcs) in pots in the soil for flowers to a depth of no more than 1-2 cm;
- cover the pots with transparent film or glass and leave in a warm, well-lit place;
- do not water very much as the soil dries up;
- remove the film for 2-3 hours daily to allow air to reach the soil
Medlar at home in pots with planted seeds should be placed on the southern windowsill, well lit by the sun's rays. The plant is very fond of sunlight. Genetically, this plant is subtropics and only in conditions of sufficient illumination can it actively grow and bloom.
If everything is done correctly and with love, seedlings will appear in about 1.5 months. When 2-3 leaves appear, you can dive the plants. As it grows, the diameter of the pot increases.
You can plant seeds in the fall in open ground, then they will undergo natural stratification and will be more adapted to the area where they will then grow.
Reproduction of medlar
Layers
Medlar can also reproduce by layering. You can root several shoots at the same time. To do this, a healthy annual shoot from the mother plant is bent to the ground and fixed with a wire or hairpin. Layers take root rather slowly and the “baby” should be separated only with clear signs that the layering has taken root well. This method is best used in the fall. Rooting can be stimulated by adding "root" or aloe juice to the irrigation water, which is a natural plant stimulant.
Cuttings
For this breeding method, you need to do this:
- take several branches of last year's growth 15-20 cm long with two developed nodes
- trim the leaves in half to reduce evaporation
- powder the cuttings with ash
- place the cuttings vertically in pots with a thick layer of drainage
- water and spray the cuttings as the soil dries
- you can cover the pots with a dome of transparent material to create more comfortable rooting conditions
- it is advisable to add "root" to the water for irrigation, it will help the cuttings to take root faster
- after about a month, with proper care, you will notice that the cuttings are rooted
- for a long time, the increase will not be noticeable, because medlar will form the root system
- after a year, the plant can grow strongly and quickly, since the root system has become stronger
- good care will allow the medlar to develop into a full-fledged tree that will delight you with flowers and fruits
Medlar bloom with white or soft pink flowers with a delicate aroma. The fruits have an unusual and delicate taste, depending on the variety. Flavors of pear, apricot, apple. strawberries, cherries are fancifully mixed in medlar fruits in a variety of combinations. The desire to taste an exotic fruit can awaken the desire to grow it yourself. Try it!
How to plant a medlar
The Japanese medlar is an evergreen tree or shrub that lives only in the subtropics, blooms in the fall, and bears fruit in the spring. Our climate is in no way suitable for this "sissy", but it is much more adapted to Russian conditions Caucasian medlar.
The Caucasian medlar is a deciduous tree; it can grow well in gardens and bear fruit only in the southern zone of Russia. But in the Moscow region there are also amateur gardeners who grow Caucasian medlar, it is able to tolerate small frosts down to minus 14˚С.
Occurs in the gardens of the middle zone and the "wild" uncultivated loquat. Its fruits are small, reminiscent of rose hips, and this is easily explained - both plants belong to the Rosaceae family.
This tree loves sunlight and should be placed in well-lit areas of the garden. Medlar needs good drainage and where high groundwater does not need to be planted.
When landing on a permanent seat, you should:
- prepare a hole of the required diameter and depth, one third more than an earthen lump of the seedling
- lay a drainage layer at the bottom of the planting pit, sprinkle complex fertilizer together with bone meal
- prepare a soil mixture of humus, peat, sand and earth in equal proportions
- spill the planting hole with enough water
- place the seedling in the hole
- sprinkle with prepared soil mixture and tamp it well
- mulch the tree trunk circle with humus or compost
If you did everything correctly, the tree will root enough within a year and grow.
How to grow medlar
Choosing the right kind of medlar and a healthy, strong seedling is essential.
Planting a tree, and then growing it and waiting for the fruits is not a matter of one year. Saplings grow actively for about seven years, then they gain strength and grow again only after 13 years of life. But it will be possible to try the fruits earlier, 3-5 years after planting.
Watering
Watering trees in the garden should be done as needed. It should be moderate. Excessive moisture is not useful for this plant, but it is not necessary to dry out the soil either.
When grown at home, it should also be regularly watered and sprayed in moderation. In winter, watering the plant should be reduced, but the soil should not dry out.
Top dressing
Medlar prefers slightly acidic or neutral soil, quickly selects useful substances from it for its growth, therefore, in the summer, regular fertilizing of the plant should be carried out. The day before watering, make:
- potash fertilizers during active growth;
- phosphorus fertilizers - during the flowering period;
Medlar also loves feeding with mullein in a 1: 8 ratio with organic fertilizers. Saplings and young trees are fed once every three weeks, mature trees 2-3 times from spring to autumn.
Pruning
Pruning a tree not only makes it look beautiful and well-groomed, but also serves to keep it healthy and increase its yield.
For the first 3-4 years, pruning should be done at a third of the annual growth. All branches that are unsuccessfully intertwined in the center for 2-3 buds are also cut off. Dry, diseased, frozen and thickening branches are also removed. After 4 years, only sanitary pruning and pruning is carried out to maintain the beautiful shape of the crown.
Pests and diseases
When growing at home, pests do not need to be feared. Only improper watering can lead to stains on the leaves.
In the open ground, the enemies of the tender loquat are a sooty mushroom and a scale insect. To protect against pests, it is recommended to spray it twice a season with solutions of phytoverm, lepidocide or other insecticides in accordance with the instructions for use.
 In order for the medlar to grow at home from the bone well, you should know the features of this plant and the rules for planting it. It grows in the form of a tree, which is appreciated all over the world not only for its attractive appearance, but also for its interesting berries. Many have heard about this culture, but not everyone knows how medlar grows.
Description of the plant
 In nature, there are about 30 species of this plant. But despite this variety, only a few of them can be grown at home.The most popular is the Caucasian or German medlar, as it is also called. It is also good at home and in the open field, the Japanese loquat develops.
These types of fruit trees differ significantly from each other. The only thing that is similar in them is the fruit that tastes good. The berries of the Japanese medlar look very much like an apricot. The pulp is soft and juicy. They tolerate transportation and long-term storage well.
For the first time, the ancient Greeks began to grow medlar more than 2700 years ago.
As for the German medlar, it is not intended for fresh consumption. Before tasting the berries, it is necessary that they mature well and freeze a little. It is these conditions that give the pulp tenderness and pleasant taste.
Fruits are rich in nutrients such as:
- potassium;
- iodine;
- vitamins A, C, B;
- folic acid;
- selenium;
- manganese;
- calcium.
The native land of the plant is the Balkan Peninsulas, Iran, Asia Minor. It can often be found in the Crimean Mountains and the Caucasus.  The plant belongs to the group of thermophilic crops, therefore, loquat is increasingly grown at home. In a room, she is capable of reaching 2 meters in height. Deciduous plates are leathery. From above, each of them is shiny, and from below - velvet. During the flowering period, the room is filled with a pleasant almond aroma, which lasts for quite a long time.
 The flowers are self-pollinating. But despite this, many housewives, in order to increase yields, carry out artificial pollination. At the end of flowering, berries appear in place of the buds. Their diameter ranges from 8 cm. Fruits grow in clusters.
Rules for growing plants in indoor conditions
 A potted medlar at home is a real decoration of a family nest. She is not very demanding in care. Observance of several rules, and your house will acquire a beautiful appearance, pleasant aroma, and children will enjoy exotic fruits.
To grow a loquat in a pot, you can use both shoots and seeds. For those who decide to use the first method, you will need to separate last year's shoots. Cut the twigs into small cuttings and place in moist soil. Then cover the container with a glass jar and put in a warm place for a month.
The fruits of the plant are used to treat pathologies of the intestines and genitourinary system.
As for growing medlar fruit at home from a stone, this is the simplest and most popular method. Everyone can plant an exotic tree in this way. If everything is done correctly, then soon your windowsill will be decorated with a beautiful plant.
 The first thing to start with is the selection of ripe berries. From them you need to remove the bones and peel the pulp.
 Put the seeds in a container and rinse well under running water. Then put the seed on the windowsill so that it dries well. Since the grains are covered with a dense shell, apply scarification. To do this, you need to take sandpaper and rub the seed with it. You can also use a file. Processing with these methods, allows you to destroy the dense part, thus accelerating the germination of the bone.
The second step in growing a medlar tree at home is to soak the seeds. To do this, you need to immerse the seed in a container with water. It is important to keep the liquid at room temperature. All seeds that float can be thrown away. They are unsuitable for planting. Only those grains that remain at the bottom of the vessel need to be planted in the soil.
 After the first shoots appear, the container must be rearranged to partial shade. This is due to the fact that the seedlings are afraid of the scorching sun and may stop developing.
After the appearance of a full third pair of leaves, the plants can begin to form. It is during this period that you should pinch the medlar.This will allow you to get a beautiful tree that will delight the eye for many years.
Caring for a medlar in an apartment
 In order for a young plant to feel good, it is necessary not only to water it correctly, but also to choose the optimal place in the room. Also, special attention should be paid to watering. After all, a lot depends on the amount of moisture.
Lighting
This is one of the important conditions for growing medlar at home. The tree develops best on windows that face south. It also feels good in the southeastern part. The plant gives a bountiful harvest only if the flowerpot is not in the shade.
Before growing a medlar at home, it should be remembered that an adult tree responds well to direct sunlight.
Indoor air temperature
 Medlar is a tropical plant, therefore, the indicators must be appropriate. The optimal figures are 20 - 250 C. When growing in room conditions, care must be taken that the thermometer does not fall below 150 C. In the warm season, it is recommended to take the flowerpot out into the fresh air. It can be a balcony or a terrace. In winter, the tree is kept on the windowsill or away from the window. In the second case, additional lighting is required.
Planting substrate
 Before planting a medlar, you need to prepare a mixture. A peat substrate is best suited. You can buy it at any flower shop. When growing such a tree, it is important to ensure that the soil is neutral in acidity.
To prepare the earth yourself, you will need:
- four parts of sod soil;
- one part of sand (coarse);
- two pieces of deciduous land;
- one part of the compost.
All components must be mixed well. The resulting substrate does not need additional processing, so it can be used immediately for the procedure.
Transfer
If you follow the rules of soil renewal, you can be sure that the tree will always grow and bear fruit well. Unfortunately, not everyone knows when to replant the medlar, so often the leaves begin to fall off, and the tree does not increase in size.
The soil should be changed once a year. For this it is necessary to use the “transshipment” method. If the plant has grown significantly, then the flowerpot will need to be replaced. Adult crops need to change the soil every three years. The pot should be a few centimeters wider than the root system itself. It is imperative to lay drainage at the bottom of the container. To do this, you can use pebbles or crushed broken brick. Small crushed stone also performs well its tasks.
Fertilizer
 The tree should be fed from early April to September. The number of procedures performed should not exceed twice every 30 days. Complex preparations are best suited for this. A good option is products designed for cacti and indoor roses.
Irrigation
 Watering the crop directly depends on the season. In summer, when it is hot outside, you need to irrigate the tree often and abundantly. The soil should always be slightly damp. Winter is a dormant period for the tree. Therefore, the procedure must be carried out to a minimum, while ensuring that the earthen lump does not completely dry out. Water for irrigation should be taken exclusively at room temperature. It is recommended to stand well before using the liquid.
In order for the air to penetrate well to the roots, the top of the soil should be loosened once a week.
Pruning
It is necessary in order to form a beautiful bush. With the help of scissors, you need to periodically remove the tops of the shoots. To accelerate their growth, you will need to cut off the peak part of the plant. This significantly activates the growth of lateral branches.
Pests
 The tree is often affected by insects. Also, the plant can suffer from improper care. If the leaves of the medlar have begun to dry, it is necessary to carefully examine their back and front sides.Often a similar trait appears as a result of the development of insects. In the case of bystanders, the tree must be treated with an insecticide. Also, wilting of leaves can be observed as a result of waterlogging of the soil. If nothing is done, then the root system will fester, and the plant itself will die.
In order to get rid of the sooty fungus and scale insects, systemic drugs will be the best option. You can also treat the plates with water and laundry soap, but only after this procedure, the trees should be bought under a warm shower.
In order for the cultivation of medlar at home to bring only positive emotions, you should follow the tips and rules. Timely watering, proper feeding and the right choice of place will allow you to grow a healthy and beautiful tree with an unusual appearance and colorful fruits. Delicious and incredibly healthy berries will become the best fruits for dining tola.
Video about the beneficial properties of medlar
Medlar is a subtropical plant belonging to the Rosaceae family. It can reach 5-6 meters in height, but at home it rarely grows above 1.5-2 m acid. 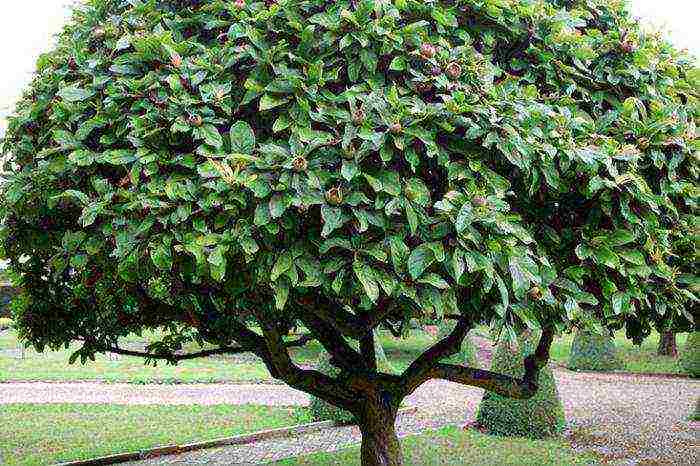 In this article, we will tell you how to grow a medlar from a bone on your own. And we will also describe how to properly care for this wonderful heat-loving plant so that it grows well, is healthy and brings crops regularly.
Cultural forms of medlar
Two main varieties are widespread - the Caucasian (Germanic) medlar and the Japanese medlar. They have their own distinctive features. Medlar is a deciduous tree or shrub with gray bark and large, dark green, glossy oval leaves. They bloom, as a rule, in the second half of April, and in the fall, before falling off, they change color to yellow and burgundy red.  Another distinctive feature of the German medlar is the five-petal flowers. They form at the tops of the shoots, have a white or pinkish color, reach a diameter of 4 cm and emit a delicate pleasant aroma. The Caucasian medlar blooms at the end of May. The red-brown fruits of the plant, collected in a brush, ripen in the fall, but become edible, tasty and sweet after the onset of frost. They reach 3-7 cm in diameter, have a spherical or oval shape. The pulp of the fruit is brownish in color, has a sweet and sour taste. One fruit contains several flattened seeds.
Japanese medlar - lokva
The Japanese medlar, in contrast to the Germanic, is an evergreen plant belonging to the genus Eriobotria. It has ovoid or lanceolate leaves, single large white or cream flowers. The fruits of the lokva are round, orange-yellow in color. They ripen not in autumn, but in spring, and have a pleasant sweetish taste.
Medlar in nature
This plant has been cultivated for 3 thousand years. It was especially popular in Ancient Rome and Ancient Greece. The fruits of the medlar were consumed fresh, and a variety of compotes, jams, wine and candied fruits were prepared from them. In the natural environment, medlar is common in the Caucasus and Crimea, Georgia, Azerbaijan, Iran, Turkmenistan and southern Ukraine.

You can find this plant in Western Europe and North Africa. The medlar tree prefers a mild and warm southern climate. It grows well on stony, calcareous, red earth and podzolic soils. Medlar planting in southern regions with a seaside climate is carried out in October or November. Beforehand, the bones are soaked for a day, and then they are placed directly in the open ground. The climatic conditions of central Russia are not suitable for growing medlar in a summer cottage.But if desired, this plant can be planted in a greenhouse, winter garden or indoors. How to grow a medlar from a bone, we will tell you further.
Subtropical plant at home
It is believed that the medlar plant is quite unpretentious and unpretentious. Growing at home does not require significant effort and time from the grower. The plant grows rapidly, develops and can give a small harvest in the third year. The most suitable varieties for indoor and greenhouse cultivation are:
- Morozko.
- Tanaka.
- Champagne.
- Premier.
- Victor.
- Orange

Let's look at how to grow a medlar from a bone. To get started, head to the store or market. Choose the ripe fruit of the medlar plant (fruit), without external defects, damage and rot. How to grow a copy out of it? Remove the seeds at home, wash them and dry them for three days. Next, the bones must be scarified, that is, wiped with sandpaper for 5 minutes in order to destroy the hard shell, thereby facilitating and accelerating the germination process. After this procedure, the seeds of the medlar should be soaked in water at room temperature for three days. Those bones that float should be discarded.
German medlar. How to grow a plant from a seed?
Suitable material must be dried and placed in a sulfuric acid solution for 4 or 5 hours. This solution is prepared at the rate of 1 tsp. sulfuric acid per 1 liter. water. Then the seeds are washed with water and dried again. Next, the seeds are placed in a container with wet sand, peat and sawdust. The dishes are placed in a refrigerator, in a compartment with a temperature of 1 ° C to 5 ° C. After 15 days, the container with seeds is transferred to the room, in the warmth. After two weeks, put it back in the refrigerator. And so heat and cold alternate for three months. 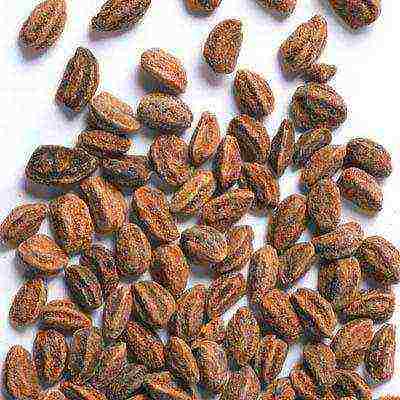 Seeds of German medlar are extremely poorly rooted at home, so this preparatory procedure is mandatory. At the same time, they do not forget to water the sand. It should always be moist. After three to four months, the seeds will begin to sprout. After the seedlings have good roots, it will be possible to pick into separate small containers with a good substrate of humus, peat and sand in equal proportions. In this case, the central root will need to be shortened somewhat. In the first year after planting, German medlar seedlings grow slowly, but then the rate of development increases.
Japanese medlar: growing at home
It is worth noting that it is extremely difficult to grow a German medlar from a bone at home. Loqua seeds (a Japanese variety of the plant) take root much easier. The planting procedure is desirable in the spring. How to grow a medlar from a bone? It is necessary to use seeds that have just been extracted from the fruit. First, you should prepare a high-quality substrate from equal parts of peat, sand, humus and leafy soil. The pot can be anything. Before planting, the soil is well moistened. 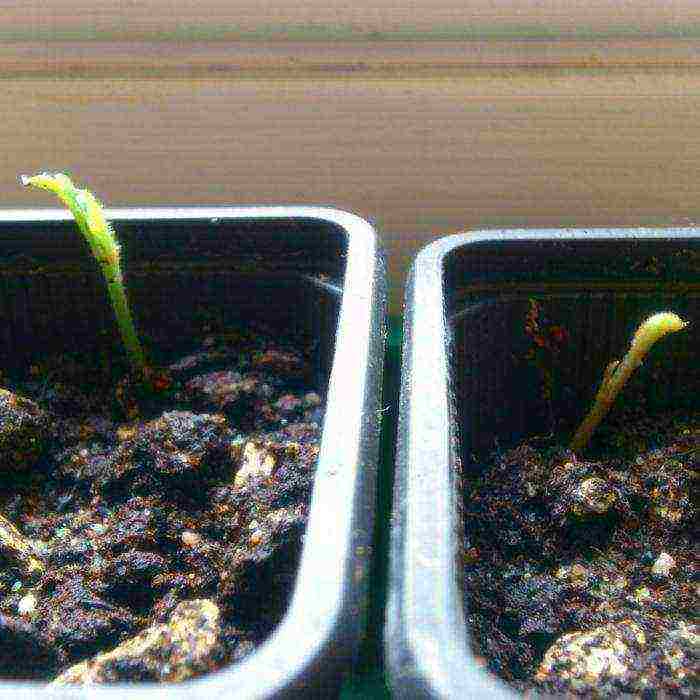 Medlar bones are placed in the substrate, slightly deepening (by 1.5-2 cm). The soil is regularly moistened, at least three times a week, and the top layer of the substrate is sprayed from a spray bottle every day. Medlar loves moisture, but does not tolerate liquid stagnation. Therefore, it is desirable that there are holes at the bottom of the pot for the outflow of excess water. The container should be covered with polyethylene. It must be removed for a while every day to prevent condensation mold from forming.
We take care of the loquat sprouts
After the shoots appear, and this will happen no earlier than three weeks later, the container must be moved from the windowsill to a more shaded place. Direct sunlight can kill young plants. When the shoots reach 2 cm in height, the polyethylene is removed from the pot, and the temperature in the room is maintained at not lower than 18 ° C.Watering is done 2 or 3 times a week. A month after the emergence of shoots, a dive is performed, otherwise the seedlings will interfere with each other. Land for planting is selected non-acidic, consisting of sand, humus and peat. Now you know how to grow a medlar from a bone. This is a rather laborious process that requires effort and time from the grower. Next, we will consider what conditions loquat prefers. 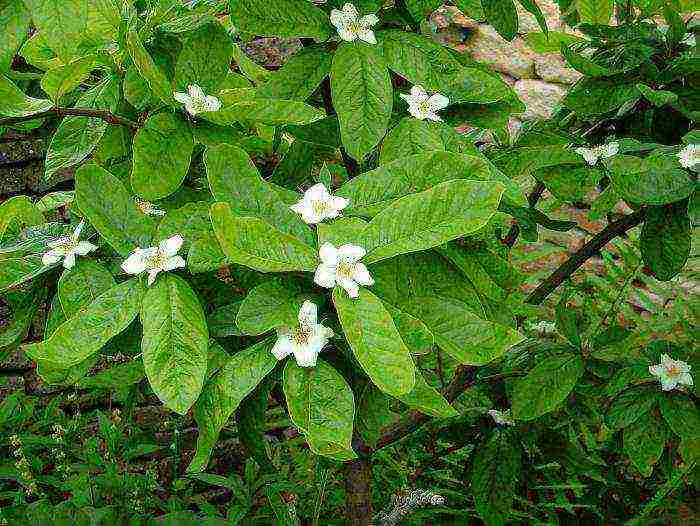
Features of care for seedlings
In order for the plant to feel comfortable, develop and grow well, it is necessary to create conditions for it that are as close to optimal as possible. The room should be kept at a temperature of at least 18 ° C. In the spring, after the onset of warmth, the pot with medlar can be taken out to the balcony, veranda or garden. The plant loves good lighting, so it is advisable to place it close to a source of natural light. As for watering, the medlar prefers regular moistening with warm, settled water. The potting medium should not dry out too much. Watering is less frequent in winter than in summer. The plant responds well to spraying with water at room temperature. In the period from April to the end of August, lokva are fed with complex mineral fertilizer twice a month. Also, if necessary, prune branches that are strongly intertwined or grow too high.
Let's conclude: if you follow simple agrotechnical rules, the medlar will feel great. Growing this beautiful subtropical plant at home is within the power of even a novice florist. Good luck!