Content
- 1 Growing mushroom mycelium at home
- 2 Before you start growing mushrooms
- 3 Premises
- 4 Substrate
- 5 Mycelium
- 6 Champignon plantation care
- 7 What is included in the soil?
- 8 Composting process
- 9 How to lay out the compost correctly?
- 10 Mycelium types
- 11 How to grow mushroom mycelium at home?
- 12 Correct mushroom cultivation technology
- 13 Champignons in bags
- 14 Harvest in bags
- 15 Benefits of growing mushrooms in bags
- 16 Champignons in the basement
- 17 How to properly grow mushrooms at home in the country?
- 18 Growing champignons in an apartment
- 19 Spore fingerprint
- 20 Cultivation of champignons video
Mushroom pickers have long noticed that in the natural environment, fungi reproduce well not only by spores, but also by myceliums - fragments of fungal tissue.
This property was adopted and began to grow the mycelium of champignons and other mushrooms in laboratories and even apartments. We will learn how to grow "seeds" for planting ourselves, so that later we can grow home crops of such a healthy and tasty mushroom.
Growing mushroom mycelium at home
Planting materials for obtaining mushroom harvests are necessary for both farmers and those who have decided to start cultivating champignons for their own consumption. You can, of course, plant the mushroom mycelium from a purchased mycelium, saving energy (but not money), but this does not guarantee the quality of the product. This is why some mushroom growers prefer to obtain compost or grain mycelium on their own.
To obtain material for planting, spores are sown or it is excreted from the fruiting body of the mushrooms, for which a special nutrient medium is used.
Culture medium options
Self-cultivation of champignon is carried out in the following substrates:
In wort-agar
- Mix a liter of beer wort with agar-agar (20 grams) and boil until it dissolves.
- Pour the composition into test tubes, occupying no more than a third, plug with cotton wool and keep it in an autoclave for 30 minutes at 101 degrees and 1.5 atmospheres.
- We arrange them in a very inclined form, leaving a distance of 3.5 cm to the corks, and wait until the wort hardens.
Usually mushroom pickers use this particular composition to make champignon mycelium with their own hands.
In oat agar
- Mix water (liter), oat flour (35 g) and agar-agar (20 g), boil for an hour, stirring regularly, and pass through a Gause filter.
- Pour into test tubes and wait for solidification.
 Growing mushroom mycelium at home
In carrot agar
- Grind the carrots, mix with water in a ratio of 2: 5, cook for 30 minutes and filter - you get a carrot extract.
- We mix this extract (0.4 l), water (0.6 l) and agar-agar (15 grams).
- We pour into test tubes according to the first method and leave to solidify.
When the nutrient medium for producing compost with mushroom mycelium hardens, add particles of fruit bodies or spores to the test tubes (observe sterility!).
For this process, an inoculation loop is required, which, like the mushroom mycelium, can be easily created with your own hands by calcining a knitting needle or steel wire over a fire.
Hydrogen peroxide, which needs to be treated with mushroom tissues, and opening the test tubes over a flame will help to create sterile conditions. We must burn the corks with fire.
How to grow mushroom mycelium
Until the test tubes overgrow, we keep them in a dark room (thermostats) at 24 degrees of heat: after a couple of weeks, the myceliums will completely master the culture media and will be ready for planting.
Growing mushroom mycelium at home allows you to get grain and compost planting materials.
Types of mushroom mycelium
Compost mycelium
You can get compost with mushroom mycelium using the following technology:
- Place the mushroom substrate, made as described above, in 3 liter jars, filling them to 23.
- We seal it and make a three-centimeter hole in the middle.
- We roll up the jar with an ordinary steel lid, making the same hole in it, and plug it with a cotton swab and gauze.
- We heat the compost to 24 degrees and add the mushroom material there.
We immediately plug the hole in the lids of the jars to protect the mycelium from infection.
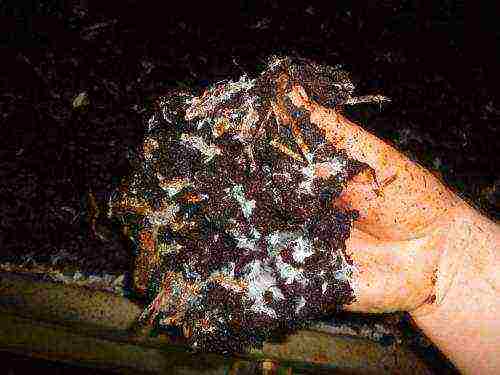
 Compost mushroom mycelium
Grain mycelium
It prepares like this:
- We put 10 kilos of grain into the tank and pour water (15 liters).
- We put on low heat and cook after boiling for 30-60 minutes: it depends on the hardness of the product.
At the exit, we get soft, but not boiled grains.
- We drain the water and dry the boiled grain, sprinkling it with a three centimeter layer.
- We pour the dried substrate into liter jars with holes in the lids (we also make holes in the grain mass), plug it with gauze and cotton swabs and put it in an autoclave with a pressure of 1.5 atmospheres for an hour and a half.
- Cool the contents of the jars and add mushroom material to the holes made in the grain mass.
We keep the jars in thermostats at 24 ° C until the mycelium completely assimilates the nutrient medium.
So, you have learned how to prepare the mushroom mycelium with your own hands. Finally, we advise you to store grain mycelium in cellophane bags for no longer than 6 months, keeping the temperature no higher than 4 ° С, and the compost one - in a cold place at 0 ° С for no more than a year.
You can store planting material in a warm room with a temperature of up to 18 ° C for 20 days, no longer, and then planting the mushroom mycelium will bear fruit.
Growing mushrooms in a private household, in dachas and even in apartments is becoming fashionable today. Firstly, in the store, mushroom products are not sold at a low price. Secondly, the homemade mushroom, grown without the use of unknown chemicals, is environmentally friendly and safe for consumption. Thirdly, mushroom growing can be made a profitable business, or at least a good source of additional income. Fourthly, it is a very interesting and exciting hobby. Take a substrate, put mycelium in it, create conditions. And it starts to grow like mushrooms.
Growing champignons at home for beginners
Before you start growing mushrooms
You need to think well and weigh your desire and capabilities on two scales. If they are at about the same level, it is worth the risk. Information for beginners: growing mushrooms at home is a more laborious process than growing oyster mushrooms. But less long-term and more effective than growing porcini mushrooms.
It will take certain costs for the purchase of materials, arrangement of the premises, as well as patience and certain skills. Provided that you already have a suitable room and you only need to create favorable conditions in it.
Premises
It should be moderately cool, such as a cellar or basement. If neither one nor the other is not present, it is difficult to advise anything. Perhaps a garage or greenhouse will do (during the cold season). In spring and early summer, before the onset of extreme heat, mushrooms can be grown without a room at all. The main thing is that the air temperature is not higher than + 20 ° С.Indoors, in the case of year-round cultivation, the temperature should be constantly maintained in the range of + 12 ° С ... 18 ° С, and the humidity should be in the range of 65-85%.
Premises for growing mushrooms
Substrate
The most important item on the list of prerequisites for the successful cultivation of mushrooms is the substrate (or, as it is also called for its composition, compost). The following composition is generally recognized as a fruitful compost option.
- Horse or cow dung (or pork or bird droppings, which can be taken, but not desirable).
- Straw.
- Urea.
- Superphosphate.
- Gypsum.
- Chalk.
- Alabaster flour.
Substrate for growing mushrooms
Table. The proportions of the components for making compost from mullein or horse manure.
Table. The proportions of the components for the composting of poultry manure.
By the way! To cover a one square meter area with mushroom compost, you need compost made from 40 kg of straw base (the rest of the components, according to proportions).
Video - How to disinfect mushroom substrate
How to prepare compost
It is better to carry out this procedure in the air or, in extreme cases, in a regularly ventilated area. During the maturation of the compost in a heap, where the straw is layered with manure and watered with water, the heat can rise to + 70˚C. There is an intensive release of carbon dioxide, water and ammonia vapors into the atmosphere. Of course, a person should not breathe this mixture for a long time.
It is good to place the compost place in the sun (the higher the temperature inside this “puff cake”, the faster and better the compost will ripen). But it is worth providing shelter from rains, since heavy rain can wash out of the compost all the useful components necessary for the growth of future mushrooms.
Compost pit for preparing the substrate
Advice! If it is not possible to protect the compost heap with a canopy from atmospheric precipitation, cover it with roofing material or a thick film before the rain. Be sure to lift the film from the sides, leaving the sides open.
The straw for the substrate must be fresh, dry, free from mold and other defects. Before starting laying, the straw is soaked in a large tank of water for a day. If there is no such reservoir, spread the straw on polyethylene and water it abundantly several times a day, preventing it from drying out.
Laying the compost heap
Straw and manure prepared in this way begin to be laid in layers.
The first layer is straw. Then - manure or droppings.
Each layer of straw is sprinkled with ammonium nitrate, urea in the proportions indicated in the table.
Each layer of straw is watered abundantly with water.
In total, there should be at least 3-4 layers of straw and, accordingly, the same amount of manure.
You need to finish the laying with straw.
Water once again to keep the moisture content of the compost heap constant.
The heap must be at least one meter high. The length and width are arbitrary.
Preparing compost for cultivation
champignons
For a week, the multi-layered structure is basking in the sun. Then comes the moment of the first shaking up. The procedure is carried out with a pitchfork. Shaking up a compost heap is not easy. But they cannot be neglected, since for the speedy composting inside it is necessary to provide oxygen access.
During the first shaking, plaster of Paris is added. It will improve the structure of the compost.
The second shaking is carried out without waiting for the next week, 3-4 days after the first. This time superphosphate and chalk are added.
Important! If the pile is slightly dry in the sun, it is watered abundantly with water. It is impossible to dry out the compost, its formation will stop.
The third and fourth shaking is carried out in four consecutive days. After three weeks, the compost heap will lose its strong ammonia smell and will turn into a pleasant chocolate color. The straw in the compost will become soft and tear with your fingers.
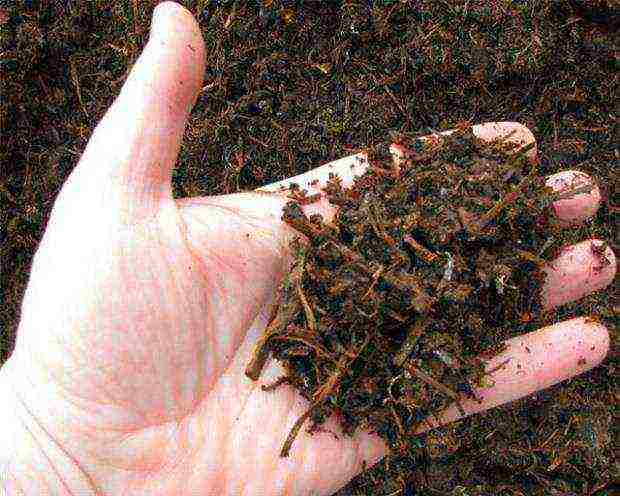
Ready-made compost for growing mushrooms
High-quality compost substrate, completely ready to use, does not stick to the palm, bounces in the fist when squeezed, leaves a wet, but not dirty mark on the skin.
Advice! If you overmoisten the pile, and moisture literally flows out of the compost during compression, it should be decomposed to dry (but not dry, but only reduce the humidity to 60%), adding half the rate of chalk.
The finished substrate is filled with racks, boxes or other containers where mushrooms will be grown. The temperature of the substrate must be lowered before the introduction of the mycelium.
Germination composting process
Preparation of the substrate for further planting of the mycelium
If you plan to grow mushrooms in a room specially designated for this enterprise, for example, on the earthen floor of the cellar, the compost is poured directly onto the floor, in a layer of 70 cm, forming beds with an area of ½ m² or 75x75 cm.
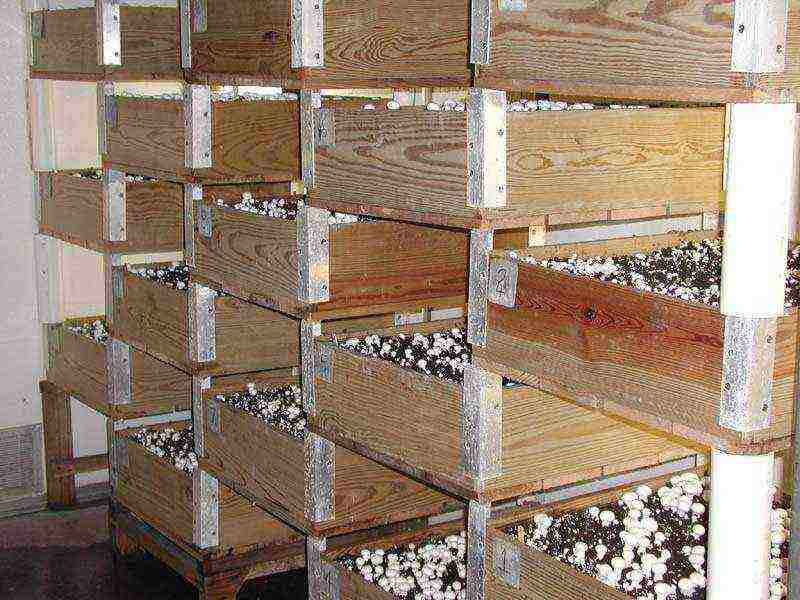
- If in the basement you have equipped racks on which future mushroom crops will grow neatly, they must be equipped with bumpers, and then you can put the compost directly on the racks, with a layer of 45 cm.
- If cultivation is supposed to be in boxes that can be stacked in the same basement or cellar (no more than two meters stack height), because the mushrooms do not need light for development, the compost is poured into boxes. Backfill layer - 25 centimeters
- If you grow mushrooms in an open or greenhouse ground, the compost is rammed directly onto the surface of the ground, 25-30 cm high. The beginning of the laying is early spring, when the ground thaws. Sheds are made over the open ridge to protect from precipitation and sunlight that is too intense for shade-loving mushrooms.
- The compost is well compacted by hand, the surface is carefully leveled.
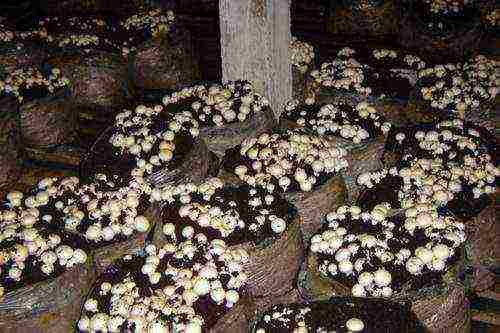
Racks for champignons
Mycelium
After the preparatory work, the most important moment comes - planting the mycelium. Mushroom mycelium can be planted at a soil temperature of no higher than + 28 ° C at a depth of 5 cm.Check the temperature with a thermometer. This is important because exceeding even two degrees will kill the mycelium.
The planting material for growing champignons, like other cultivated mushrooms, is a sterile mycelium, which is grown in special laboratories. Champignons for cultivation in culture are selected in two varieties:
- double-sided white;
- double-cornered brown.
Champignon mycelium
There are no significant differences in their taste and nutritional value. The only difference is in the color of the mushroom, according to the name, white or brown. Sell mycelium or mycelium in bags or jars. Packing is usually 1-2 kg. The mycelium of both varieties is grown in two ways - on manure and on cereals.
The first, dung mycelium, will be needed for planting 500 g per m² of area. Grain - not less than 100 g.
Planting mycelium
The dung mycelium is a fairly monolithic lump, which, before planting, must be divided by hand into small pieces, half a matchbox in size.
- The mycelium prepared in this way is laid out on a large tray in one layer. In the ground, a part of the upper layer is lifted with a wedge-shaped peg so that a piece of mycelium can be laid there.
- Planting is staggered with a cell distance of 20 cm.
- Part of the mycelium is covered with a substrate, no more than 3 cm thick.
Compost overgrown with mushroom mycelium
Grain mycelium is a common grain on which the spores of the fungus are planted. It is sown in the same way as you would sow any cereal.
- The top layer of compost, 3 cm wide, is removed from the ridge or box.
- On the surface, "mushroom grains" are randomly scattered.
- The compost is poured back and slightly pressed down so that there is no void between it and the grains.
Grain mushroom mycelium
By the way! Wild mushroom mycelium is also suitable for growing homemade champignons. If you find a place where mushrooms grow, take a closer look at the soil.A land riddled with a web of whitish-gray mushroom spores is a good starting point for your mushroom plantation.
Champignon plantation care
After you have landed, the room temperature is kept high. This is a prerequisite - the germination of mycelium will not begin at below + 24 ° C and above + 26 ° C. At this time, at the initial phase of mycelium growth, do not expect immediate "shoots". Champignons are not vegetables. They grow deeper into the soil, gaining ground and forming the future harvest. At low temperatures, growth is insufficient, at high temperatures - weak formation of the fruiting body.
Rules for harvesting champignons at home
The moisture content of the compost must be constantly maintained in the range of 55-60%. As soon as it dries up, the mycelium "freezes" and stops growing. The compost is moistened superficially, from a sprayer, so that the water does not flood the mycelium, otherwise it will become moldy and die
It will take 12 days to grow deep into the mycelium. After that, the temperature in the room will definitely decrease. Either the heating is turned off, or the transoms and ventilation openings are opened - all methods are good to reduce the temperature to + 18 ° С… 20 ° С.
By this time, it is necessary to prepare the soil for backfill. The mycelium will grow upwards not on compost, but from nutrient soil of the following composition:
- sod land;
- loam;
- sandy loam;
- fine-structured peat soil.
Any of the listed structural types will work. The main thing is that the soil is not heavy. To add "airiness" and ensure the penetration of air to the spores of the fungus, the soil is sieved on a coarse sieve.
Agricultural practices and terms of their implementation when growing mushrooms
Before backfilling, the soil is moderately moistened. And cover them with a layer of compost 3-4 cm.
Further, caring for the mushrooms is simple.
Maintaining the temperature within the specified limits. - + 16 ° С ... 18 ° С, plus - minus two more permissible degrees.
Maintaining humidity in the range of 65-85% (air) and not higher than 60% - of the earth layer.
Daily intensive ventilation of the room to remove accumulated carbon dioxide.
You can collect the first homemade mushrooms from your own plantation already on the 35-40th day. One fruiting cycle lasts about two months.
Agricultural practices and terms of their implementation when growing mushrooms (continued)
Despite all the seeming difficulties and conventions, the cultivation process, starting from the moment the compost is prepared, takes no more than four months. For two months of fruiting, the crop can be harvested 6-7 times. From 5 to 10 kg of mushrooms are collected from a meter of a square ridge. The next crop ripens after 5 days.
Harvesting champignons
Important! Mushrooms must be collected at a stage when the film between the stem and the cap is not damaged and connects them tightly. Opened mushrooms with darkened (for white varieties) plates and damaged film, the remnants of which can only be seen on the stem, it is better not to eat
Champignons are not cut with a knife when they are collected. The mushrooms are twisted with a gentle movement of the hand. The holes formed after collection are sprinkled with soil and slightly moistened.
Video - Growing champignons at home (part 1)
Video - Growing champignons at home (part 2)
Video - Harvesting champignons
Champignons are quite common mushrooms. They are massively grown for use in the food industry, in particular in cooking. Entrepreneurs build their business on their breeding, which brings good income. But experienced farmers prefer home-grown mushrooms. Read about this in the article.
What is included in the soil?
Is it possible to grow champignons at home? Of course, this is within the power of a farmer or owner of a private backyard without any experience. The main thing is to stock up on knowledge in this matter and clearly follow the instructions. The most time consuming process in mushroom cultivation is soil preparation.For a mycelium area of three square meters, 100 kilograms of plant ingredients will be required, which include the following:
- Straw.
- Cereal grains, you can use rye or wheat.
- Fallen leaves of plants.
- Tops from tomatoes or potatoes.
In addition, the composition of the soil should include:
- Horse or cow manure in the amount of half a centner.
- Water - 300-400 liters.
- Urea and superphosphate in an amount of two kilograms each.
- Plaster - seven to eight, and chalk - five kilograms.
You can prepare a different formulation using poultry droppings. Other ingredients and their quantity are taken here:
- Litter and straw - centered.
- Water - 300 liters.
- Gypsum, alabaster - as in the previous composition.
- Urea is two kilograms.
Composting process
First you need to make a collar with the same dimensions (one and a half meters) in width, length and height. It is with this ratio of parameters that combustion will properly occur. The compost will mature in two to three weeks.
How to grow mushrooms at home? First, you need to plant them in soil, which is prepared as follows: all components of plant origin and straw must be soaked for a day. At the same time, they and manure should be laid in layers, and the straw should be watered abundantly. The components contained in the pile must be thoroughly mixed and moistened once a week to ensure proper combustion. At the first mixing, crushed lime is added to the compost. Second time - superphosphate. Then mixing is carried out with the addition of crushed gypsum or alabaster. Each time after mixing, the resulting stack is covered with foil.
It should be borne in mind that during the preparation of the soil, an unpleasant odor will be emitted, similar to ammonia and carbon dioxide. Therefore, it is better to do cooking on the street. But at the same time, protection from sunlight and precipitation is needed. If you organize the process indoors, it should be well ventilated.
How to grow champignon mushrooms at home? To do this, you need to take into account important points, without which this process is impracticable. First of all, a stock of compost is made, since it is necessary in a large volume to grow mushrooms. During its preparation, the temperature can reach from 53 to 70 ° C. When the combustion process is over, the thermometer will drop to 21-25 ° C, and the unpleasant odor will disappear. The finished soil has an elastic structure and a brown color. It does not stick to your hands, the straw can be easily torn apart.
How to lay out the compost correctly?
When the preparation of the soil is completed, they proceed to another procedure - laying it. First you need to select containers in which the mushrooms will be grown. They can be racks, wooden boxes, plastic containers, bags. The compost mass is laid out in prepared containers in a layer, the height of which should not exceed 22 cm.
Mycelium types
The seed of mushrooms is called mycelium. It is grown at home or in laboratories. There are two types of mycelium:
- Compostable - this type of seed is stored for a long time at zero temperature, for about a year. For an area of one square meter, 500 g of mycelium will be required.
- Grain - this composition is more effective than the first. Seed material of this type germinates better and gives large yields. Its consumption for the same area is less, only 330-350 g. But this mycelium has a significant drawback: a short shelf life. Only half a year its properties are preserved. Keep the seed in the refrigerator.
How to grow mushroom mycelium at home?
If the mushrooms are grown commercially, it is better to buy planting material. But some are embarrassed by the conditions in which it was grown, and therefore they do it on their own. To obtain the material, you need to sow spores or isolate it from the fruit bodies, and then place it in a specially prepared medium: wort agar.Its preparation is carried out according to the following technology:
- First you need to mix beer wort (one liter) and agar-agar (20 g) with boiling water.
- After dissolving the ingredients, the composition is poured into test tubes for a third of them. Then the containers are plugged with cotton swabs and placed in an autoclave with a temperature of 101 ° C and 1.5 atmospheres for 30 minutes.
- The tubes are not placed straight, but obliquely, so that no more than 3.5 cm remains to the plugs. Now it remains to wait until the wort hardens.
- After that, spores or a piece of the fruiting body must be added to the test tubes, while maintaining sterility.
- Containers should be kept in a thermostat or dark room at a temperature of 24 ° C until they are overgrown. In a couple of weeks, the nutrient medium will be assimilated by the myceliums. This means that they are completely ready for landing.
Usually this composition is used by mushroom pickers to grow mycelium at home, although there are also substitutes: oat agar, carrot agar.
Correct mushroom cultivation technology
Champignons can be grown at home using mycelium. To do this, you need to plant it correctly, and in the room you need to correctly select the temperature and humidity mode. If these conditions are met, the first harvest can be obtained in a year.
If grain mycelium is the planting material, grooves 30 cm deep and 50-60 cm wide should be made in the soil. The distance between the pits should be 20 cm. In order for the temperature to normalize, you need to leave them for two to three days and only then lay the mycelium. A checkerboard pattern is used to locate the body of the mushroom.
If compost mycelium is used for planting champignons, the technology is different. The bottom of the small pits is covered with drainage. Compost is placed on top, in which the mycelium is placed. After that, the planting material is closed by it. Subject to all the rules, taking into account the high-quality mycelium, after seven days, you can expect the appearance of new branching threads.
After 21 days, you need to lay out moist soil on top of the beds 25-30 cm thick. If the layer is larger, the bodies of the mushrooms will be blocked, their germination will not occur soon.
In order to maintain the temperature regime in the room where the mushrooms are grown, it is necessary to temporarily install sheds or cover the ground with straw. If a white bloom appears on the compost, it means that it needs to be moistened. After watering the soil, the canopy or straw is removed.
The first harvest will not take long, only 45 days. You need to pick mushrooms as soon as they ripen, since the yield period is short, only three to four days. The next fruiting period should be expected in three to four months. The harvests of the first waves are the richest.
Champignons in bags
How to grow champignon mushrooms at home? There are many possibilities for this. Each courtyard has outbuildings and basements. They are adapted for growing mushrooms. However, you can grow mushrooms at home in plastic bags. This method has been used in many countries for a long time. It allows you to get large volumes of mushroom harvest.
Bags can be made by yourself from a transparent polymer film of various capacities. For growing at home, 25 kg are more suitable. But the main criterion for choosing bags is the convenience in performing work on growing mushrooms. And for it to be successful, you need to correctly arrange the bags in the room. This is done in a variety of ways, but the most common are the following:
- According to the principle of chess arrangement. With this method, the usable area is not used only by 10%.
- Parallel bag placement. In this case, the area loss is even greater - 20%.
This can be compensated for by deep bags, which are filled with more substrate. And the space between the unusual beds is used for air circulation.There are different options for how to grow mushrooms at home. If everything is done in compliance with the technology, you can achieve an excellent result.
Harvest in bags
The mushroom picking time is the most enjoyable time. The mushrooms ripen four months after planting the mycelium in the soil of the bag. When harvesting, you need to be very careful: you cannot cut off the mushrooms with a sharp blade or other object, they need to be twisted. After that, the mycelium is sprinkled with a nutritious substrate and watered using a spray bottle. It will bear fruit for two weeks. During this period of time, the mushrooms are harvested in two to three days. It is advisable to use fresh, not frozen mushrooms for food. Mushrooms with light plates inside the cap are useful. If the mushrooms are old, then they will have a brown color, as these mushrooms accumulate toxic substances that can be poisoned.

Benefits of growing mushrooms in bags
These mushrooms are unpretentious, they can grow in an open-air garden bed or indoors. But experienced mushroom pickers prefer to grow them in bags, since this method has a number of advantages:
- Pests and various diseases do not spread to the entire area, since if the need arises, you can always remove a specific bag from the room.
- Thanks to the mobility of the unusual bag-shaped beds, mushrooms can be grown seasonally and continuously.
- During placement, bags can be placed in several tiers on special stands. This will save space. This is especially important when growing indoors.
- The cost of polyethylene bags is lower than plastic containers. This is important when growing mushrooms in large quantities.
The disadvantage of this technology is the use of manual labor. But if the scale of cultivation is small, it is not burdensome.
Champignons in the basement
It is convenient to grow mushrooms in such a place, since there is a stable microclimate in the basement located under the ground. Here, the labor costs for creating optimal conditions for cultivating champignons are much less than, for example, in greenhouses. It is not difficult to grow mushrooms at home in the basement, the main thing is to monitor the temperature and humidity conditions. During the incubation period, the air humidity should be 75%, not lower. If the basement is dry, use a humidifier. It is important to know that spores are activated at a higher temperature - from 24 to 28 ° C, and fungi germinate when it drops to 16 ° C. The basement must meet the following requirements:
- Have concrete walls.
- Wooden flooring is strictly prohibited. The floor needs to be concreted, in extreme cases - to cement it.
- There must be ventilation in the basement.
- To prevent fungi from damaging insects that can enter the basement, the ventilation holes are closed with nets.
- Walls with ceilings should be disinfected. For this, you can use lime.
- If the basement is large, it must be divided into zones: for the incubation period and for obtaining fruit bodies.
How to properly grow mushrooms at home in the country?
Growing mushrooms in this way is much more difficult than, for example, in a basement. Here, the choice of a site for planting mycelium is of great importance. How to grow mushrooms at home? To do this, you need to find a place that is always in the shade, and the soil never dries up. A canopy is being erected over the site or a darkened greenhouse is erected at this place. How mushrooms are grown at home (photos are presented in the article)? The mycelium is planted using standard technology. For champignons, an important condition for growth is the correct temperature and humidity. These indicators should be maintained, especially since the mushrooms categorically do not tolerate heat. The choice of substrate is equally important.It should contain large amounts of nutrients and small amounts of carbon dioxide. The best option is land, which must be brought from the forest in advance.

Growing champignons in an apartment
This method is suitable for those who do not have a summer cottage or vegetable garden. The main task for such cultivation of mushrooms is to create optimal conditions under which they will grow and bear fruit normally. An example of how to grow champignons at home is presented step by step below:
- The first thing to do is to isolate any room in the apartment for growing mushrooms from those rooms in which people live.
- Measure moisture. It should be high, about 90%. If its readings are lower, you need to install a humidifier.
- To maintain the optimum temperature, the room is equipped with heaters and ventilation. With their help, the temperature regime will be maintained. It should be borne in mind that mycelium germinates at 20 ° C, and fruiting bodies - at 15 ° C.
- After preparing the room, the selected containers are filled with the substrate.
- Mycelium is planted in them, covered with a film on top, which must be removed after the appearance of the fungi.
- The soil is constantly moistened, it must not be allowed to dry out.
- When the time comes, the mushrooms should be harvested.
Many of us cannot imagine a festive table without mushrooms. But in recent years, these are mainly mushrooms not harvested in the forest, namely those grown in artificial conditions and in the first place in popularity, of course, champignons. Today, dear readers, we will try to tell you how to actually grow mushrooms at home, the entire technological process from mycelium to the table.
Spore fingerprint
The key to a high-quality harvest is naturally a good mycelium. What we need to create it, well, of course the seed, or the so-called mycelium. Champignons (like all mushrooms) multiply by spores, it is not necessary to go to some specialized store, or to revise many Internet pages in search of champignon mycelium, it is very easy to grow it yourself, at home, which will be discussed below. Let's get started: the first step is to get the so-called controversial imprint.
For this, we will prepare everything you need, namely:
- Food foil
- saucer
- knife
- disposable washing gloves
- plastic bag
- alcohol
- and an alcohol burner or candle
- and, accordingly, the mushroom itself, which should be mature and preferably not cut for a long time.
In the room, everything should be purely desirable to quartz
And so, we put on sterile gloves and wipe absolutely everything with alcohol, including the surface of the table on which the action will take place. Put a piece of foil about 10 by 10 centimeters on the saucer. We burn the knife over the flame of the burner, wipe it again with alcohol and take the cooked champignon. Now you need to remove the leg from it, cut off the protective film, thereby exposing the dark seamy side. After the performed manipulation, put the mushroom down with the dark side (cap up) on sterile foil and slightly press it into it. We again take a sterile bag and (a file for papers is best suited) and remove the champignon with a saucer into it.
Obtaining a controversial fingerprint The first stage of mushroom cultivation has been completed, it remains to remove the resulting product in a dark place for a week, after which a black bloom forms on the foil - these are spores, or as mushroom growers call "spore imprint". Let's repeat:
At the same time, everything should be as sterile as possible, otherwise nothing will work!
spore footprint
Spore suspension
After a week, we have a spore print available and we proceed to the next stage, the preparation of a spore suspension. As noted above, everything in the workplace as well as the workplace itself must be sterile! Let's prepare the tool:
- sterile gloves
- syringe 10 cubes
- water for injections
- alcohol
- cotton wool
- the print itself
- knife
- glass or flask
- saucer
- gauze bandage
We put on a bandage, gloves and proceed. In a sterile (I repeat again) a glass or flask, carefully place the spores from the spore print, removing them with a knife and shaking the foil slightly, it should be noted that one print can be divided into three or four parts and for this reason you should not put everything in one container, then we collect ten cubes of water for injection into the prepared syringe, after wiping the ampoules with alcohol, pour it into a glass with spores, as if washing off from the walls what has settled on them. You should get a dark solution.
Spore suspension Having mixed everything thoroughly with the same syringe, we collect into it what happened. Be sure to squeeze air out of the syringe, it should not be at all! It is important! Having closed the needle with a special case, we put the syringe in a sterile plastic bag and put it in the refrigerator at the very bottom, where the temperature is three to four degrees above zero in this form, the suspension can be stored for quite a long time.
Did you know that mushrooms can be eaten raw? These are class A mushrooms, and all mushrooms of this class can be eaten raw, as well as porcini mushrooms, milk mushrooms, mushrooms, etc.
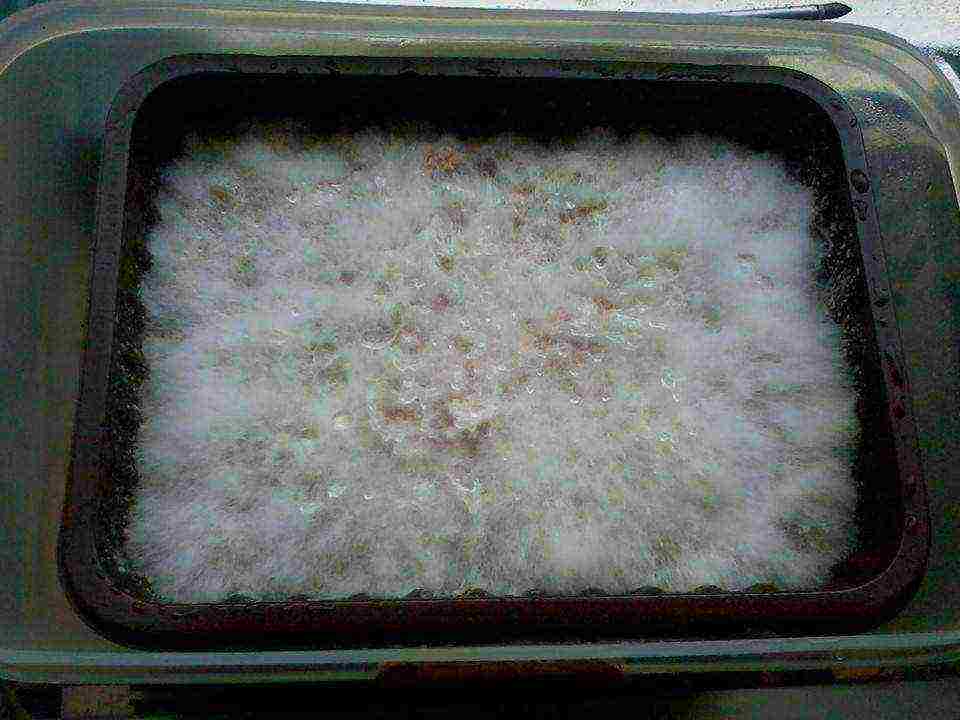
And thus we will deal with the environment where the actual spores will develop and turn into mycelium. To do this, fill a one and a half liter jar with wheat, full to the eyeballs, roll up the lid, if the jar with a twisting lid, then close it by simply twisting it very tightly, punch a hole in the lid with a nail of a slightly larger diameter than the syringe needle, put it in a pot of water so that the water covers the whole wheat and boil, you need to boil for exactly thirty minutes, then cool it without removing it from the water and inject the contents (spores) from the syringe through the hole, after sterilizing the needle.
fill in the spores of the mushroom Now it remains to wait until the jar dries, just in case, wipe it with alcohol, close the hole in the lid with a sterile cotton swab, place it in a sterile bag and put it in a dark place for two weeks. In two weeks you will see how the wheat has become white, completely overgrown with mycelium, which means it's time to sow mushrooms into the substrate for further cultivation at home.
Growing mushrooms in pots
If you did everything correctly, observing perfect cleanliness, then in the process described above you will receive high-quality planting material, which we need to grow champignons at home, and now we will actually plant it. You will not need humus for this, but first we will prepare it, for this we steam it in the oven for 12 hours at a temperature of 70 degrees, thereby killing pathogens, but preserving all the nutrients in it. In the pot that actually suits you best, which will be the most convenient for you in size for growing mushrooms at home, we pour exactly half of the humus, the pot is naturally clean and we pour grains overgrown with mycelium into it, the thickness is one grain, and then not quite often it is worth, as they say, everything is good in moderation!
On top we pour a mixture of peat, gypsum or chalk, and chicken droppings (ten parts of peat, one gypsum and droppings) about three to five cm, no more. We spray from a spray bottle from above in such a way as not to create puddles and at the same time very abundantly. Next, cover the top with a piece of polyethylene, and put a jar or even two or three with water under it, in order to create the most comfortable conditions by increasing the humidity. Water every other day so that the soil remains moist all the time, but in no case is it very wet!
Two weeks have passed and this is the actual result you should get!
mushrooms in a pot The article was prepared based on the materials of the channel "Mikha Donetskiy"
Cultivation of champignons video