Content
- 1 Growing cacti from seeds
- 2 Care of cactus seedlings
- 3 General rules
- 4 Video "How to grow cacti from seeds at home"
- 5 Sowing preparation
- 6 Sowing technology
- 7 Further care
- 8 Sprout transplant
- 9 What you need to plant
- 10 Seed preparation
- 11 How to care for them to ascend
- 12 How to care after seed germination
- 13 When to transplant. Care in the first year of plant life
- 14 Useful video
Many growers prefer not to buy houseplants in the store, but to grow them on their own at home. The advantage of home-grown plants is that you can create the best conditions and get healthy, strong plants for your collection. In addition, it is less expensive than buying plants each time in a specialty store.
Growing plants yourself, you can get even rare varieties and clean lines of indoor flowers. Seed cacti can also be grown at home. The main thing is to follow all the recommendations for growing.
Growing cacti from seeds
Everyone can grow a cactus from seeds at home. The process does not require large costs and special knowledge, and if everything is done correctly, then soon new copies will appear in the home flower garden. An important role in the cultivation of cacti at home is played by the time of sowing the seeds.
The most favorable is the middle and the end of February. In February, daylight hours are longer and the sun's rays are already warming up well. Experienced growers use professional tools when growing cacti - special lamps, greenhouses. But cacti can be grown using the materials at hand.
Sowing preparation
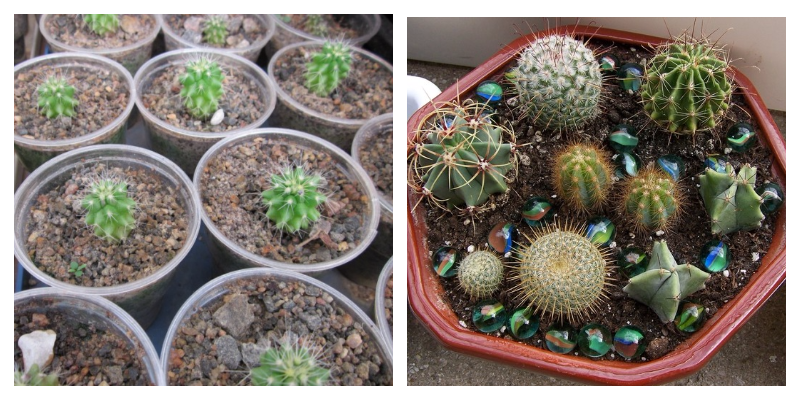
Cactus seeds will need greenhouse conditions for successful germination. Therefore, the most suitable container for this is cake packaging. It is wide, comfortable, and the lid should be transparent. You can purchase mini greenhouses at a garden supply store. All planting containers - pallets and lids must be thoroughly washed with laundry soap and wiped with a cotton swab dipped in potassium permanganate.
This treatment will prevent the development of mold and mildew in the soil, which can cause significant damage to seeds and seedlings. In the bottom of the pallet, you need to pierce holes in order to then water the plants through it. After preparing the planting containers, they begin to prepare the soil for the cacti.
It is previously disinfected with a solution of potassium permanganate or placed in a hot oven. The soil can be purchased at the store, it should be designed specifically for cacti.
Sowing seeds
The greenhouse is filled with soil mixture. The layer thickness should be 2-4 cm, this will be enough. Before sowing, the soil is watered from a pan with boiled water at a temperature of about 50 degrees. Using a ruler, you need to level the soil, and then cut grooves every 1.5-2 cm.
Seeds are sown at 1 cm intervals; for convenience, you can do this with a toothpick dipped in water or a needle. After sowing, the seeds do not need to be covered with earth. If they are of different varieties, then it is better to sow them in different greenhouses, or, in extreme cases, divide one in half with a paper partition.
After sowing, the greenhouse lid is tightly closed and placed on the windowsill. Seedlings will appear in about 3-10 days.
After the emergence of seedlings, it is necessary to carefully look after them so that the cacti grow healthy and strong.
Care of cactus seedlings
To grow cacti at home, you need to not only sow seeds, but also organize good care for the seedlings that have appeared.
Temperature
This is the most important point of care. If the conditions in the greenhouse are not warm enough, the plants may die or stop growing.
Therefore, in the daytime, it is necessary to maintain a temperature of at least 25 degrees Celsius, and at night not higher than +20 degrees. This difference between day and night temperatures contributes to the emergence of friendly seedlings and good growth of cactus seedlings.
The temperature in the greenhouse must be measured periodically so that, if there is a lack of heat, measures can be taken to increase the temperature. It is not necessary to expose the greenhouse in direct sunlight, especially when the seedlings have already appeared.
Humidity of soil and air
Adult cacti can do without moisture for a long time, but young seedlings are very susceptible to moisture deficiency. Even a short-term drought can lead to their damage or death. Therefore, you need to carefully monitor that the soil in the greenhouse is always moist.
Watering cacti is only necessary from the pallet. Water for irrigation should be boiled and warm. A month after the emergence of seedlings, you can begin to accustom the plants to ordinary watering and short-term droughts.
Airing
Greenhouse conditions deprive plants of access to oxygen, so the greenhouse with seedlings must be aired daily. This will promote good root development. The first airing is done on the eighth day after sowing.
Do not open the entire lid completely at once. First, it is slightly opened, gradually increasing the gap. In the second month, holes can be punctured in the lid so that the greenhouse is constantly ventilated.
Picking
After the seedlings grow up a little and they become cramped in the greenhouse, they dive. Increase the gap between plants. When picking, you will need one or two more greenhouses, they are prepared in the same way as when sowing.
They also disinfect the soil, level and make grooves. It is necessary to remove plants from the soil very carefully, so it is better to use a fork. The transplant is done together with a lump of earth.
Lighting
For cacti to grow properly, they need good lighting. If the greenhouses are on the windowsill, then it is necessary to shade them, avoiding direct sunlight. When exposed to the bright sun, the skin on young cacti begins to turn red, in this case, you need to immediately shade the plants and after a while they will again acquire a green tint.
Growing a cactus from seeds is not as difficult as many might think. When growing, you can completely do without expensive equipment, and use improvised means. In addition, this method of growing will allow you to have any varieties and types of cacti in your collection, not being limited to the choice in flower shops.
Many growers prefer to grow indoor flowers from seeds, since the seedlings purchased in the store are not always happy with their quality. In today's article, we will talk about how to grow a cactus from seeds.
General rules
To grow cacti from seeds at home, you must first prepare. In addition to planting material, we will need a soil mixture and a container in which we will plant.
You can get the seeds yourself or buy them in a specialty store.
In the first case, you need to wait until the cactus that you want to propagate blooms. The disadvantage of this method can be considered, first of all, the lack of uniqueness, because you can plant only those varieties that you already have. Besides, it will take a long time to wait. However, for a growing experience this is the best option.

In the store, you can buy the seeds of those cacti that you do not have yet. You don't need to expect anything. True, you must find a bona fide seller who will sell you quality seed.
But the soil mixture is definitely better to buy from the store. Of course, you can prepare the soil yourself, but this procedure requires certain knowledge and experience. The finished land will contain all the necessary trace elements.
For planting, we need a small box with a transparent lid, for example, a cake package. You can, of course, take a disposable plastic box. In a word, you need a kind of small greenhouse.
Video "How to grow cacti from seeds at home"
In this video, an expert will talk about how to grow cacti from seeds at home.
Sowing preparation
Planting containers must be thoroughly washed and disinfected with a cotton swab dipped in potassium permanganate. This treatment is done in order to prevent the development of mold and mildew in the soil, which can harm the seeds. We make a small hole in the bottom so that we can water through it later.
Now you need to prepare the soil for planting home cacti with seeds. It is also disinfected with potassium permanganate or by placing it in a hot oven. Only after all these procedures can cacti be sown.

Sowing technology
We fill the greenhouse with soil, 2–4 cm thick. Before planting cactus seeds, pour hot boiled water over the soil (about 50 ° C). We level the soil and make grooves every 2 cm.
Seeds must be sown at 1 cm intervals. This can be done with a toothpick dipped in water. It is not necessary to cover the seed with soil. If you decide to germinate seeds of different varieties at the same time, it is better to place them in different greenhouses or separate them with a paper partition from each other.
After the end of the sowing process, the greenhouse is covered with a lid and placed on the windowsill. It is important that the sun illuminates the entire crop area during daylight hours. Water is also required, but you cannot water from above. The most convenient way is to put the greenhouse in a container of water so that moisture can flow through the hole from the bottom.
The germination period is usually 3–10 days.

Further care
Growing cacti from seeds involves not only planting seeds, you also need to properly care for the seedlings. First of all, it is the correct temperature. If there is not enough warmth in the place where the seedlings are located, then the growth of plants will slow down, and some may even die. During the day, the thermometer should show +25 ° C, and at night +20 ° C. This temperature will ensure seedling emergence and excellent growth.
The temperature should be monitored in order to take appropriate measures in time and avoid sudden fluctuations. When the seeds have sprouted, make sure that the sprouts do not come into direct sunlight and do not get burned. If adult specimens can tolerate the lack of moisture, then even a short-term drought is destructive for young seedlings.
Watering is carried out only from the pallet. To do this, use soft water: boiled, settled or filtered. A month after the seedlings have emerged, they can be gradually adapted to the usual watering, alternating with periods of dryness.

In order for the roots to develop well, the house plant needs to be ventilated. The first time is aired 8 days after sowing. If the cacti are in the greenhouse, then you cannot completely remove the cover. Open it slightly, then enlarge the crack. After two months, you can make constant ventilation by making holes in the lid.
You can start fertilizing the "young growth". First, you need to do it literally a little at a time. Top dressing is bought in specialized stores. Look closely at the box and study the composition. The main condition is that the composition contains a lot of potassium, phosphorus and calcium. As for nitrogen, there should be very little of it.

Sprout transplant
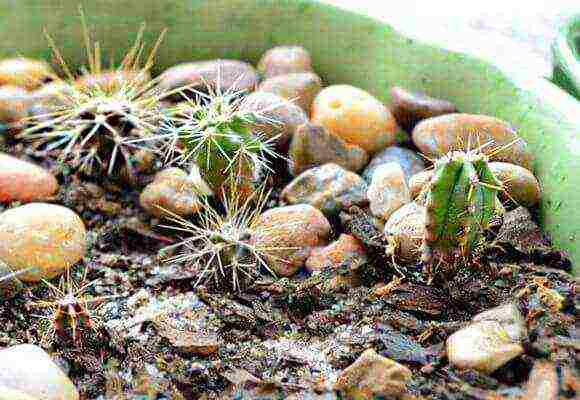
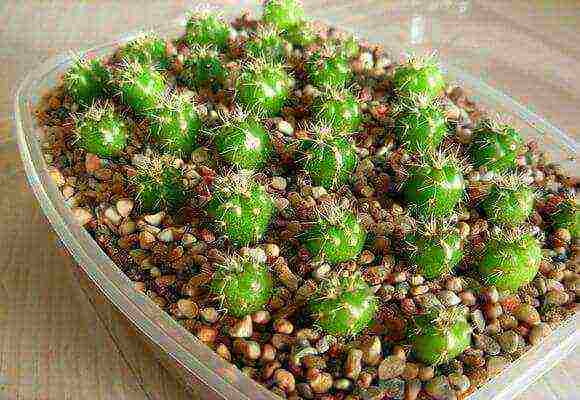
Sprouted cacti, on which thorns have already appeared, must be transplanted. It is necessary to plant young shoots together with an earthen clod so as not to damage the young roots.First, a pot is selected that is suitable for this purpose. It should be small, since the roots of the cactus do not particularly like extra space. A plastic or clay pot is suitable.
Prepare the soil. To do this, buy ready-made soil in a store or mix garden soil with river sand. The sand plays the role of a baking powder here, since it is important that the soil is water and air permeable. Coconut substrate is also used as a baking powder. Drainage holes should be made in the pot. Drainage is laid at the bottom of the pot - you can use crushed stone, broken brick, pebbles.
The pot should be at least one third full of drainage. Top fill the container with soil mixture. The surface is carefully leveled and a small hole is made, where the sprout is planted. Lightly sprinkle the root system with a layer of humus.

The "kid" is placed in a room where it is warm and light. The small plant is positioned so that it is protected from direct sunlight and drafts. Watering is carried out in moderation. Under such comfortable conditions, the cactus will grow and develop well.
As you can see, it is not so difficult to grow a beautiful home cactus from seeds.
There are many cactus lovers in the world, but not everyone knows how to propagate and grow them from seeds at home. In fact, there is nothing difficult here, however, it requires certain skills. Another problem is that the seeds are not planted correctly and, in the end, they simply rot in the ground.
One of the most problematic questions is: "How to properly grow a cactus from seeds?" In this article, we will try to describe in as much detail as possible the entire process of preparation and cultivation, as well as how to monitor and care for future plants. Let's get started!
What you need to plant
Before telling how to plant seeds, you should prepare everything you need so as not to be distracted in the process. We will need:
- Cactus seeds
- Land for landing
- Capacity, where we will plant
Now, let's briefly dwell on each of the points.
Seeds
You can get our planting material in two ways - on your own or buy in a store.
In the first case, you will need to wait for your favorite cactus to bloom and a box of seeds will remain in place of the flower. The disadvantage of this method is obvious and not one - you need to wait a long time and the lack of uniqueness. If it is clear about the waiting time, then “uniqueness” means that you can grow several more cacti of the same type from the seeds obtained. Although, to gain experience in growing, this option is also fine.
The second method is the most preferable. You don't need to wait, you can go to a flower shop at any time and buy seeds of any kind, even rare.
Earth
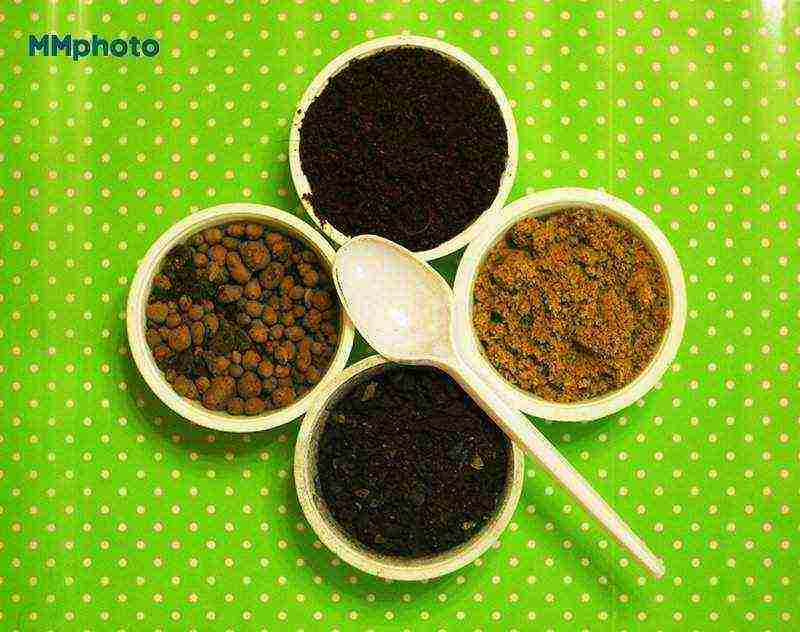
With the land, everything is also simple. The soil can be made on your own, but this is not recommended for growing seeds, as it requires certain knowledge and will take a certain amount of time. You can independently prepare the soil for older cacti, but for growing seeds, it is better to purchase a special, already prepared soil in the store. It will already contain all the necessary fertilizers, trace elements and other components.
Remember to tidy up the soil before planting. To do this, you can fill it with a manganese solution and let it dry completely, or pour it onto a baking sheet and send it to the oven for 5-10 minutes, at a temperature of 100-120 degrees.
Capacity
For planting, we need a small greenhouse with a transparent lid. You can find it in a flower shop, but you can also save money. What is needed for this? Cake packaging! Most cake containers now have a transparent lid and a pallet with small sides. This will be enough for us.
Another greenhouse can be replaced with a plastic "disposable" (as it is called) box, the lid of which can be on plastic "loops" or removable.You can find it in the same place where plastic cups, plates, forks, etc. are sold. They are also quite common in supermarkets - they usually pack cookies, straws and other things.
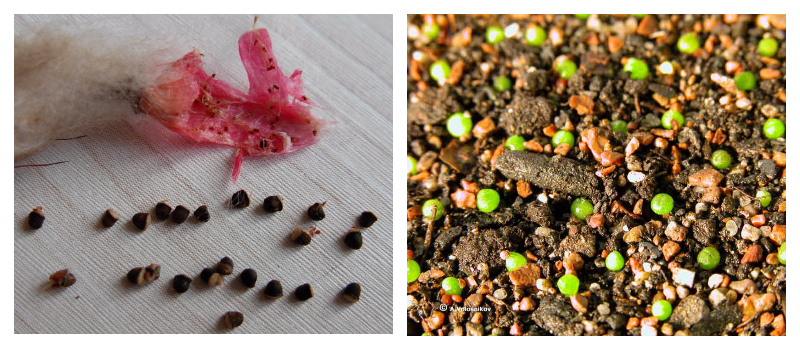
Seed preparation
It is imperative that the seeds should be treated and disinfected before planting. This can be done with a weak solution of potassium permanganate. The seeds should be soaked in the solution for 9-10 hours, but not more than 12! So, mark the time, or better, so as not to forget - set the alarm.
Disembarkation
After everything is ready, you can start sowing seeds. We take our greenhouse and fill it with earth. The layer should be no more than 5 cm. Some people prefer to lay drainage on the bottom, which, in principle, will not be superfluous, but it is possible without it. The poured earth now needs to be watered - it must necessarily be boiled water with a temperature of 40-45 degrees. Water evenly, avoiding overflow, otherwise you will have to reap when excess moisture evaporates.
Further, when the ground is wet, it must be leveled and shallow holes made for seeds. The distance between them should be 1.5-2 cm. The holes can be made with a toothpick or a match. Now, you can start seeding. We place each seed in the finished hole, but do not fall asleep with earth. When finished, the greenhouse should be covered with a lid or cling film, and placed on the windowsill.
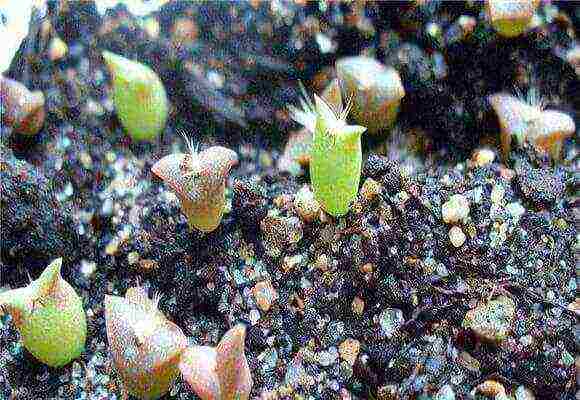
During the first week, you will see your future cacti begin to sprout. As soon as the first thorns appear, the greenhouse can be opened slightly so that the plants breathe fresh air.
How to take care to ascend
In order for our planted seeds to sprout, certain conditions must be observed, namely:
- Watering
- Temperature conditions
- Lighting
A little more detail on each of these 3 points.
Watering
During the growing period, it is imperative to ensure that the soil is moist and do not let it dry out. But, you should also not abuse it, otherwise the seeds will simply rot due to excess moisture. Check moisture with your finger. If the soil is slightly damp, but more dry, then it should be watered.
Just do not try to water from a bottle or mug. The best option is a pipette or a nebulizer (spray bottle). Using a pipette, moisten the soil around each seedling. Yes, this will take time, but you can use a spray to save it. It covers a much larger area and moisturizes the entire earth at once. Remember that you need warm water!
Temperature conditions
No matter what time of the year you plant the seeds, for their proper growth, you must maintain the right temperature. The normal and most suitable temperature is 23-25 degrees Celsius. At night, the greenhouse can be moved to a slightly cool place, with a temperature of 13-18 degrees - it will even be useful.
Lighting
As for lighting, young plants should receive it in full, so when choosing a windowsill, make sure that a large amount of light, both daytime and sunlight, falls on it, but at the same time, avoid direct sunlight. Additionally, you can use artificial lighting devices.
How to care after seed germination
As soon as the first thorns appear, the greenhouse can be opened for ventilation. During this period, it is important not to spoil anything. In addition to spraying from a spray bottle, you can add a little watering from a watering can. Soil moisture, check everything yourself and do not let it dry out completely.
As for the temperature, it remains the same - 25 degrees, but gradually, it can be increased to 30. At night, it is also possible (even necessary) to transfer cacti to a cooler place.
As for the lighting, it also remains unchanged. The only thing is, you can remove artificial lamps if you have used them.
In addition to all of the above, young shoots can be fed with fertilizers, albeit in small quantities.To do this, take a special top dressing at the flower shop. The main thing is that it contains a large content of potassium, phosphorus and calcium, but nitrogen should be in scanty amounts. Feeding with fertilizer can be done once every one and a half to two weeks - this will be enough.
When to transplant. Care in the first year of plant life

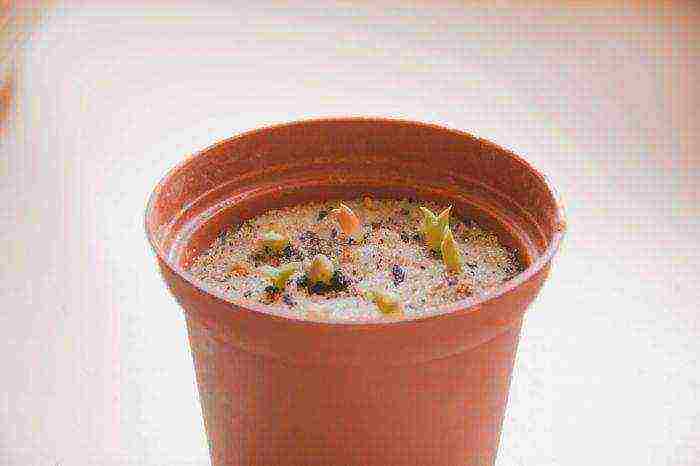
After 3 months, the seedlings can be planted for the first time. To do this, you need small pots or, for the first time, plastic cups with a volume of 0.5 liters. On the bottom of the cups, be sure to make several holes, like on pots. If the planter is without holes, observe the watering regime. (water a little bit and not often). So, let's start transplanting.
- At the bottom of each pot, pour a layer of drainage (expanded clay, gravel, crushed brick). After that, start pouring the soil. Use the same land as when landing, the other is not needed yet. Fill the pots almost to the top with soil, leaving 1 to 2 cm of soil. In the middle, you need to make a depression, you can use your finger. This is necessary in order to place our cactus there.
- Now, from our greenhouse, together with a lump of earth, we take a seedling and transfer it to a "new home". He carefully tramples everything with his fingers, after which, the soil can be fertilized and watered a little. All the same should be done with all the remaining seedlings.

As for leaving in the first year, there are no difficulties here. The most important thing is to continue to care properly. The only thing you should remember is that gradually, the plant needs to be accustomed to proper watering, that is, to the same as in older plants. You can start doing this after about six months. Do not forget about the feeding, which must be carried out before September, and, of course, during the dormant period, provide the plant with peace, and do not disturb it again.
After the first year, the cacti will need to be transplanted into larger pots, and later on, the transplant should be done as they grow.
Read more about cactus care
 Option for decorating pots with decorative sand
Useful video
And that's all! Good luck in growing!
How to grow cacti from seeds? 4.08 / 5 (81.67%) 12 votes
Growing cacti from seeds not only an exciting and interesting activity for every cactusist, it is at the same time the most accessible, in our conditions, way obtaining large, well-formed, flowering plants of rare species and clean lines for their collections. To do this, sowing must be done with benign, non-hybrid seeds.
Sowing time
Sowing can be done at any time of the year, since it has been experimentally established that seed germination in culture does not depend on the season. In the presence of greenhouses with fluorescent lamps, sowing is best done in autumn or at the beginning of winter (September-January), since the seedlings have time to grow to a significant size by the next winter, nor can they tolerate the subsequent wintering well. In the absence of greenhouses, winter sowing is not recommended; it is best produced in the spring.
Sowing equipment preparation
It is better to sow each species separately, or two species together in small boxes (for example, children's cubes), which are then conveniently put into one common bowl.
You can also sow in one plastic or ceramic dish, at least 3 cm deep, which is divided into cells using vertical partitions. The sowing site of each species is marked with a number or name. Previously, the dishes should be thoroughly washed and disinfected with a strong solution of potassium permanganate, bleach or formalin. It is advisable to boil ceramic dishes. All preparation is carried out on the eve of sowing.
Seed substrate preparation
The sowing substrate should be well air and water permeable, poor in nutrients, able to retain moisture, have a slightly acidic reaction (pH-6) and be sterile.These requirements are met by a mixture of equal parts of sifted sheet earth and coarse washed sand that does not contain lime, with a small addition of sifted peat and charcoal powder. More complex formulations have no noticeable advantages.
For sterilization, the finished mixture is poured into a saucepan, well moistened, tightly closed with a lid and placed in an oven, where the temperature is maintained at 200-250 ° C. Three liters of the mixture are sterilized for 1-1.5 hours. For a smaller amount of mixture, the sterilization time is reduced.
It is also convenient to sterilize over steam in a pressure cooker pan. After sterilization, the substrate must remain moist. Sterilization is performed the day before sowing. For drainage, use small pebbles, well washed and boiled.
Presowing seed preparation
Before sowing it is necessary:
- Carefully examine the seeds under a magnifying glass, remove damaged and covered with mold. Fruit residues adhering to the seeds will also be removed.
- Rinse the seeds in boiled water or in a pink solution of potassium permanganate. Washing is conveniently carried out in a test tube, the contents of which are shaken.
- Etch the seeds in a solution of quinosol (1 g per liter of boiled water) for 2 hours. In the absence of quinosol, etching can be carried out in a pink solution of potassium permanganate for 12 to 20 hours. There is a method of etching in a solution of hydrogen peroxide (40 g per liter of water) for 10 minutes, after which the seeds are immediately washed in boiled water.
For etching, the seeds are placed on pieces of filter paper or white dense cloth and dipped into the solution, after having inscribed the name of the species. You can also put the seeds in small dishes, for example, cubes (each type separately) and cover with a dressing agent.
The best method of etching is dry using the TMTD preparation (aka thiuram, gerill). To do this, dry seeds, if there are a lot of them, are dipped into a test tube, add a little of the preparation and shake. The seeds are covered with a thin layer of the preparation and are sown in this form. If there are few seeds, they can be pollinated on a sheet of paper. Very small seeds, in order to avoid their loss, do not need to be pickled. The drug TMTD is moderately toxic for warm-blooded animals and therefore, it must be handled with caution. It is useful to add a little TMTD to the substrate (1 g per liter).
Sowing
Drainage is placed at the bottom of the seed boxes using a sterile spoon, and the substrate is poured on top of it. compact it by light tapping so that the surface of the substrate is slightly below the edge of the boxes, level the surface and cover it with a very thin layer of fine, washed bricks, or even better white quartz sand. Dark seeds are clearly visible on a white background. Seeds are laid out on the resulting surface.
For unfolding, it is convenient to use the tip of a pencil or back, to the slightly moistened end of which the seeds adhere well and are easily separated. Large seeds are slightly deepened into the substrate, small ones remain on the surface. The seeds of astrophytums are placed with a scar up, the rest of the seeds - with a scar down; the sprouted seedlings will be directed downward with their roots.
Moisturizing
The finished sowing is moistened from the pallet until a dark spot of moisture appears on the surface of the substrate. Crops in a common bowl can be moistened with a watering tube (a thin tube or glass with a hole in the bottom, installed vertically and reaching the bottom of the bowl). Subsequent moistening can be done from a pallet or a spray bottle, but not with a strong jet, so as not to push the seeds from their places. Watering should ensure continuous and sufficiently high moisture content of the seeds.
Overdrying of seeds is not allowed. For irrigation, distilled, rain, or snow water is used, and in their absence, boiled water. Water for irrigation can also be softened by adding to it a small amount of oxalic, boric acid, or monobasic potassium orthophosphoric acid.Such water can be used after sedimentation of the turbidity. The utensils for storing water and irrigation must be sterile.
Germinating seeds
After moistening, the sowing is placed in a greenhouse with fluorescent lamps (autumn-winter sowing), or in a warm, light, but dark place from the sun's rays (spring sowing) and tightly covered with a plexiglass plate or a transparent cap. To ensure the greatest germination the temperature in the greenhouse during the day should be in the range of 20-25 °. At a temperature of 25 °, seedlings appear faster. Even a short-term increase in temperature above 25 ° reduces germination. For some alpine species (Rebutia), the optimum temperatures are slightly below 15-20 °, the nighttime temperature should not be higher than the daytime, or excessively low (below 10 °). It can be what is installed in the greenhouse when the lamps are turned off. Sowing illumination should be approximately equal to 5000 lux.
The requirements are met in a greenhouse with 5-6 lamps, no side walls and installed in an open place. The chokes should be located outside the greenhouse. As a temporary measure, you can recommend switching off one or two lamps during germination to lower the temperature in the greenhouse.
The duration of lighting is 12-14 hours a day. 2-3 weeks after sowing, when, basically, the emergence of new shoots ends, you can raise the temperature in the greenhouse for several hours to 40-50 ° and repeat the procedure the next day (heat shock). After that, the appearance of several new shoots is possible. Unsurfaced seeds can be collected, washed in potassium permanganate and left until the next sowing. Sometimes, with such a reseeding, several shoots appear.
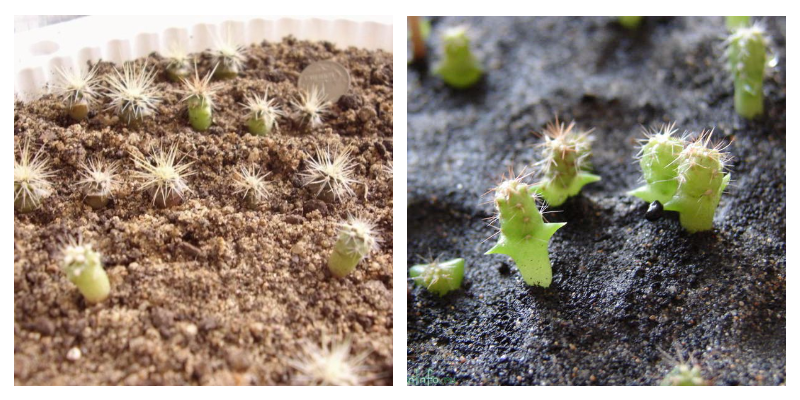
Seedling care
Seedlings need care from the moment they are born. For seedlings whose roots are in the air, you need to make a hole in the substrate with a sharpened, clean stick and push them there with the roots. Seedlings that have not thrown off the shell need to be helped to free themselves from it in all possible ways, up to using the fingers. Seedlings that have not thrown off the shell die. After the appearance of the main part of the seedlings, the moistening of the sowing is reduced, and the bowl is covered with plexiglass, while leaving a gap for air access. The temperatures indicated above, which are optimal for seed germination, are not necessary for growing seedlings, however, excessively high temperatures can cause a strong sunburn in the seedlings and stunted growth, therefore the temperature should not be higher than 30 - 35 ° C. In order for the seedlings of some alpine species (for example, Lobivia) were not very elongated, they are located closer to the lamps. The rest of the species can be located at a height of 15-17 cm from the lamps. Moderate stretching of seedlings is not dangerous and is eliminated with age.
In the process of growth and development, seedlings should be regularly inspected, ventilated and watered. Diseased seedlings with gray spots or transparent stems are removed. The seedlings' regime, their temperature, illumination, humidity and location should not be subject to drastic changes. So, for example, the complete removal of the covering glass, which can be done only for seedlings that have reached significant sizes, is not carried out immediately, but by constantly accustoming them to the new regime. Otherwise, the seedlings stop growing for a long time. Prolonged overdrying also depresses the seedlings and can lead to their death.
At the first signs of the appearance of algae (greenery), part of the substrate where it appeared is removed, fresh substrate is added and watering is reduced. An effective tool is sprinkling the surface with TMTD powder mixed with fine sand (95% sand + 5% TMTD). The use of antibiotics is possible. To do this, 1 tablet of biomycin and 1 tablet of instatin are ground with alcohol and the resulting gruel is dissolved in 100 ml of water.The resulting solution is applied to the surface with a pipette and is used only for seedlings that have already noticeably grown.It is more dangerous to damage the seedlings with molds.Such seedlings are immediately removed, and the surface of the substrate is disinfected with alcohol, TMTD powder or antibiotics, as mentioned above. It is also possible to use the drug "captan". In case of repeated cases of mold infestation, the affected part of the crop is immediately dived. A 0.1% solution of karbofos is used against the fly of the skiara (more precisely, its caterpillars eating up the lower, underground part of the seedlings). Nicotine preparations are also used or the surface of the substrate is sprinkled with a layer of fine sand. Plants should not interfere with the sowing greenhouse. infected with nematodes, worms or mites.
If the growth of seedlings stops or lime formations appear on the surface of the substrate and the walls of the boxes, which indicates alkalization of the substrate, you need to do several watering with acidified water (5-6 drops of acid: sulfuric, nitric per liter of water, pH-4). The use of organic acids is also possible. Watering with fertilizer mixtures is occasionally allowed. But you should not force the growth of seedlings with enhanced fertilizing with fertilizers or the use of growth stimulants, since such seedlings are not able to resist infection and, as a rule, die. Seedlings that have received minor damage to the root necks can be rescued by grafting, for which you need to have several growing rootstocks in the greenhouse.
Dive seedlings
For seedlings where proper measures of protection against the appearance of mold, algae, alkalization of the substrate have been taken, it is better to carry the diving as far away as possible. since the diving of small seedlings is usually accompanied by losses and temporary cessation of their growth. Diving becomes inevitable when repeated cases of mold infestation of seedlings are observed, when the surface of the substrate is severely affected by algae (especially blue-green, which have a dark color and an unpleasant odor), when the substrate sours (acquires a sour odor), when the growth of seedlings stops, when they reach significant sizes, begin to crowd each other.
For diving, the seedlings are carefully removed from the substrate with a lump around the roots using a small spatula, the upper part of the lump is removed, the root collars are washed with a brush with potassium permanganate or quinosol solution and transplanted into a new substrate of the same composition as during sowing. Seedlings are planted at a distance from each other approximately equal to their diameter. The first watering is carried out only after 2-3 days. When diving seedlings from a substrate covered with greens, greens in a new substrate can quickly reappear, so it is possible that there will be a need for a second dive.
Seedlings of some difficult-to-grow species (for example, Ariocarpus) often die after diving, but their possibilities should not be shocked at all. If further stay in the substrate becomes impossible, they should be grafted. Seedlings of some species cannot exist in culture for any length of time on their roots (Blossfeldia Lilliputana). They must be vaccinated at the age of several days (preferably on Pereskiopsis spatulata).
First summer and first wintering
With the onset of warm spring time, the sowing from the greenhouse is transferred to the room, where it is installed in a bright, but closed place from the sun. This should be preceded by a period of training and adaptation of seedlings to new conditions. The sowing is not covered with glass, watering is reduced, it can be done after the top layer of the substrate has dried. With the establishment of warm weather, the seedlings can be transferred to a greenhouse outside the window, but shaded from direct sunlight. This can only be done if there is a guarantee against sudden overheating or cooling.
Otherwise, the entire crop can be ruined.Seedlings can hibernate by the window at a temperature of 12-15 °. Careful watering, once every 10-15 days. but after preheating them to room temperature. If over time it turns out that such a regime leads to a deterioration in the condition of the seedlings, in January-February, after preliminary preparation, they can be placed in a greenhouse, under lamps, where their rapid growth is again observed. Plants receive cold and dry wintering in the third year of life.