Content
- 1 Is it possible and how to grow tomatoes on the balcony at home
- 2 Planting and growing cherry tomatoes on the windowsill: step by step instructions
- 3 Correct care step by step
- 4 Diseases and pests
- 5 Suitable self-pollinated varieties
- 6 About choosing a variety
- 7 Video "Growing tomatoes on the balcony"
- 8 Soil and seed preparation
- 9 Sowing
- 10 Seedling care
- 11 Transfer
- 12 On a note
- 13 Video "How to compactly plant tomatoes and herbs on the balcony"
- 14 Balcony tomatoes: variety selection
- 15 Growing conditions: what should be the balcony
- 16 Soil and containers: what to prefer
- 17 Planting seeds
- 18 Living on the balcony: transplant and care
- 19 What should be balcony tomatoes?
- 20 Soil for planting
- 21 Landing
- 22 Care
- 23 Outcome
Not all people have the opportunity to grow tomatoes in their vegetable garden or garden. It was for this category that special varieties that can be grown directly at home on the balcony... To understand how to grow this vegetable at home, you need to disassemble each stage separately. Consider growing a tomato on a balcony step by step.
Is it possible and how to grow tomatoes on the balcony at home
Growing tomatoes includes the following steps:
- Seed preparation... To do this, they are soaked in a weak solution of potassium permanganate, then treated with a growth stimulator Epin.
- Container preparation... You should pick up such a container so that it contains at least 3 liters of earth.
- Land preparation... For cultivation, land from a garden or purchased land from a store is suitable.
- Sowing seeds... To do this, first, small stones are poured on the bottom of the containers, in which holes are made, so that excess moisture does not accumulate at the bottom. Cover with earth and spread the seeds no deeper than 2 cm. Sprinkle with earth and water.
- Seedling picking... When the sprouts grow up, and a second real leaf appears, you can dive the seedlings. Seedlings are carefully removed from the previous place of growth and planted in separate containers.
- Transfer to a permanent place... After about 30 days, the transplant is started. Larger containers are filled with earth by a third, then the seedling is lowered, carefully covered with earth, and abundantly watered with earth.
When transplanting to a permanent place, stones must be poured into the bottom of the containers to ensure drainage.
 Growing tomatoes on the balcony includes several stages
Planting and growing cherry tomatoes on the windowsill: step by step instructions
Let's look at an illustrative example of how you can grow a cherry tomato on a loggia.
This will require:
- prepare seeds;
- prepare fertile soil and cylindrical containers;
- sow seeds. The containers are filled with earth, sown seeds, watered, covered with foil and placed in a dark place;
- when seedlings appear, provide them with sufficient lighting. If necessary, include lamps for additional lighting;
- dive seedlings in separate containers;
- place in spacious containers in a permanent place.
Growing tomatoes on the balcony will not be difficult if you follow the step-by-step instructions and follow all the requirements, monitor the seedlings and provide optimal conditions for plant growth.
Growing tomatoes on a windowsill:
How to plant and grow in plastic bottles
This growing method was invented in Japan.where it is not possible to grow organic vegetables in vegetable gardens.
Planting and cultivation is carried out in any plastic containers, the main thing is that there is enough land for the normal development of the plant.
Seeds are disinfected, treated with growth stimulants... Then they are sown in plastic bottles. With the emergence of seedlings, the seedlings are placed in a lighted place.
The pick is made when one or two true leaves appear. Saplings are planted in separate containers or they are planted in several pieces in one container, the main thing is to ensure free growth and development of each plant.
Watering and regular feeding will allow you to grow a good harvest even at home on the windowsill.
 The method of growing tomatoes in plastic bottles was invented in Japan
What pot size is required
Any plastic containers or pots are suitable for growing. Small bottles are used for sowing seeds, and when the seedlings grow up, they are sown in larger bottles.
Most suitable containers with a volume of 5 liters... One seedling is placed in each bottle.
What should be a balcony (loggia)
For growing tomatoes a balcony facing south-east or south-west is suitable... The south-facing balcony will be too hot and will need shading for the seedlings.
Plants need sunlight, if it is on the loggia for less than 3 hours, growing tomatoes will fail.
The best place for tomatoes is near the walls and railings of the balcony... It is important to protect the seedlings from strong winds. High grades are placed in a place protected from the wind and fixed to the trellis.
To scare off pests, you can plant spicy herbs next to tomatoes, for example, mint, oregano, parsley.
With the correct location and care, the loggia will replace the usual vegetable garden, although the harvest will be slightly less.
If the balcony is glazed, regular ventilation is necessary.
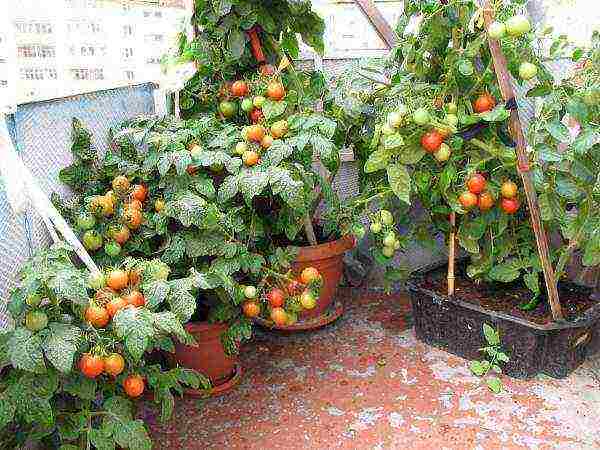 For growing tomatoes, a balcony facing the southeast or southwest side is suitable
Correct care step by step
Tomatoes growing on the balcony need to be looked after in the same way as those growing in the garden. Watering, loosening, feeding, disease prevention necessary when growing tomatoes on the balcony.
In addition to the basic elements, caring for tomatoes on the balcony has some features.
How to care for balcony tomatoes
For successful cultivation on the balcony, it is necessary to maintain the optimum temperature for the development of tomatoes.
The temperature during the day should be from 19 to 22 degrees, at night 15-16 degrees. In extreme heat, it is important to open the vents and ventilate.
Tomatoes can do without watering for several days, watered when the ground becomes dry.
Topping
With the growth of the plant, stepchildren begin to appear. Stepsons remove so that the plant forms in 1-2 or 3 shoots.
For tall seedlings, the best option is to form 1-2 stems, for low ones - 2-3 stems.
When the ovaries are formed, you can remove the bottom sheets... Spoiled, yellowed leaves must be removed.
When the plant is finally formed, pinching is necessary. Pinch the top and all the inflorescences, while leaving at least four. So the seedlings will develop correctly.
It is better to harvest unripe crops. In the conditions of the apartment, the tomatoes will finally ripen.
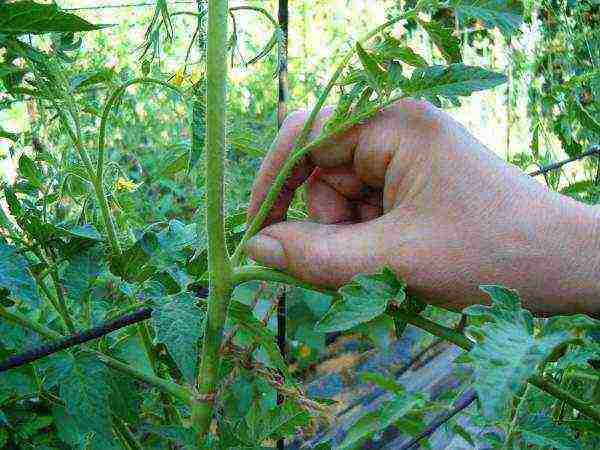 The stepsons remove, the lower leaves too, pinch the top and inflorescences
What and when to feed
After 40-50 days have passed after sowing the seeds, the seedlings can be fed. The best feeding is humus.
It is added to the ground to a height of 2 cm. Such dressing can be carried out 3 times before transplanting the seedlings into a permanent container.
Thanks to such feeding, the roots are saturated with oxygen and receive the necessary nutrients. Ready-made humus is bought in a store.
How often to water
Tap water is too hard to irrigate... The best option is warm water that has been settled for a couple of days, since tomatoes are a thermophilic plant.
It is very important to monitor the condition of the earth in the containers. The ground should not be too wet, then the roots of the plant will begin to suffocate, and the plant may die.
Too dry soil will lead to a lack of moisture, the roots of the seedlings will begin to dry, the tomatoes will turn yellow.
Tomatoes are not watered often: once every 3 days... After watering, the soil is loosened. In cloudy weather, you need to inspect the soil, if it is wet, you should refuse watering.
 Tomatoes are not watered often: once every 3 days. After watering, the soil is loosened
Diseases and pests
Tomatoes growing on the balcony may be affected by late blight disease... Brown spots form on the leaves, stems and fruits. This fungal disease can quickly destroy the plant and fruit.
To prevent the disease, special drugs are used.
Can on balcony tomatoes attack spider mite, whitefly... For whitefly, use the drug Inta-Vir, Commander. Akarin, Fitoverm, Borneo - preparations for combating spider mites.
Suitable self-pollinated varieties
With proper care, even a beginner can handle growing tomatoes at home.
There are special varieties suitable for balcony cultivation. If the balcony is spacious enough, you can start growing tall varieties. Low-growing and dwarf varieties are also grown.
The most popular and suitable varieties for growing on the balcony:
- Pearl;
- Bonsai;
- Balcony miracle;
- Angelica;
- Ballerina.
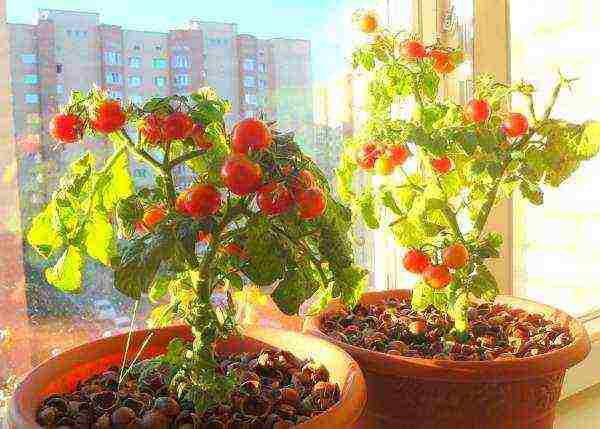 There are special varieties suitable for balcony cultivation
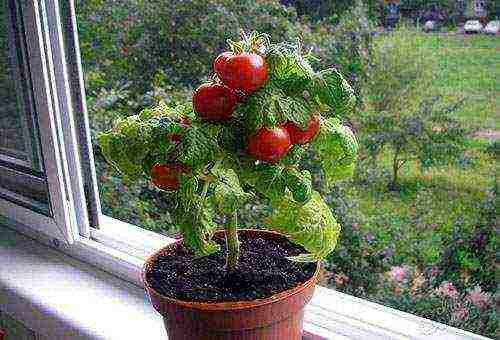
Pearl the most unpretentious variety. The fruits are slightly elongated, tasty.
Balcony miracle - a common balcony grade. The bushes are low, productive, resistant to diseases. Red fruits are suitable for fresh consumption and canning.
Bonsai refers to dwarf varieties. Fruits rarely grow more than 25 grams. Such bushes look very beautiful.
Angelica one of the earliest varieties. The fruits ripen 80 days after germination. The bushes are low, do not need support.
Ballerina - a tall variety, when ripe, the fruits turn pink. The shape of the fruit is very interesting - pear-shaped.
All tomatoes are self-pollinated plants. They are also undersized and cocktail. The table shows which varieties are such.
| View | Variety name |
| Self-pollinated | All tomatoes are self-pollinated |
| Undersized | Angelica, Pearl |
| Cocktail | Ballerina |
You can grow tomatoes on the balcony in summer and winter... Plants will decorate any apartment with their beautiful view. Proper care will provide the whole family with delicious and beautiful fruits.
Tomatoes are healthy vegetables with a specific pleasant taste. You can even enjoy them all year round, growing a culture at home. In addition, it is possible to do this in an apartment.
Growing tomatoes
on the balcony is a popular way to get juicy fruits. Observing the technology of the process, you can, with a little effort, get an excellent harvest.
About choosing a variety
Growing tomatoes on the balcony will bring positive results only if the variety is chosen correctly. If the size of the loggia allows, then you can grow both undersized and tall vegetables there. In small areas, it is better to plant dwarf bushes of the following varieties: Cherry, Malysh or Dubok. The fruits of these plant varieties are small but juicy, and the yields are significant.
Today there are special, so-called "balcony tomatoes". This is the "Balcony Miracle" vegetable variety. It is characterized by limited growth (up to half a meter) and a high ripening rate (up to 3 months). At the same time, on average, 2 kg of round red fruits are collected from each culture bush. It is permissible to use such a crop in salads and canning. You need to care for such tomatoes carefully. They need abundant lighting, but, at the same time, they do not need to be tied up.
At home, you can also grow the culture of varieties White filling or Bull's heart. True, they are tall, so it is necessary to place such plants only on the floor. Experienced gardeners also advise the varieties Angelica, Ballerinka, Zhemchuzhinka. The view of Florida Petit with yellow fruits is also considered a balcony. All these vegetables bear fruit perfectly on the balcony.
You can also grow cherry tomatoes on the balcony.
Video "Growing tomatoes on the balcony"
A video about how and how difficult it is to grow tomatoes on a balcony or windowsill.
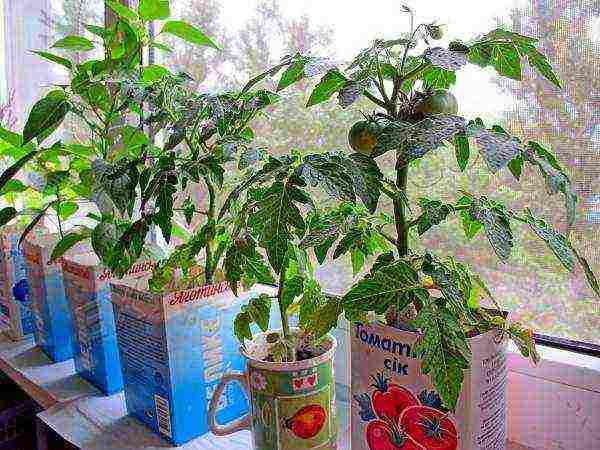
Soil and seed preparation
Balcony tomatoes bear fruit well only if they grow in the “right” soil. Therefore, special attention is paid to soil preparation. You can get a special soil mixture, which will not be difficult to buy. Ideally, it should consist of turf and humus in equal proportions. For more looseness, sawdust or peat is added to the soil. The best fertilizers are superphosphate, potassium sulfate, saltpeter, and even wood ash.
How to grow tomatoes on the balcony? First of all, it is worth preparing the seeds. This procedure takes place at the end of February - beginning of spring. First of all, you need to place the seeds on a cloth and fill them with warm water. Then leave the seed warm until the first shoots appear.
You can plant plants in different ways. For example, fill glasses with soil and pour boiling water over it. Instead of glasses for growing tomatoes at home, a plastic bottle with a cropped neck is perfect. Then make holes and place them in the seeds. Sprouted seeds are placed in containers of 1 piece, not germinated by 2-3.
There is no need to make holes at the bottom of the glass, because through a small volume of soil, the liquid perfectly penetrates and is absorbed. After all the manipulations, the containers are placed in heat and covered with cellophane. After a couple of days, sprouts appear. After a few days, the crops are moved to a cool place. Water the seedlings as the soil dries.
Another planting option is to pre-treat the seed with potassium permanganate. Then the material for sowing is placed in a soaked cloth and on a plate, then wrapped in cellophane. Keep the seed in a moist and warm environment. The sprouted material is placed in the ground and the containers are covered with glass, again placed in a warm environment.
After the emergence of young sprouts, the containers must be provided with a sufficient amount of light. It is also necessary to provide systematic watering with warm liquid.
Sowing
Tomatoes on the balcony can be grown in garden or purchased soil. Land from the nightshade garden is best suited. You can make your own potting mix by mixing peat, turf and humus in equal proportions.
The main element in preparing for sowing seedlings is the preparation of containers for it. Wooden or plastic boxes, cone-shaped buckets and large pots are great for this. Vegetables require 3 liters of soil.
Next, you need to form a drainage layer, which will rid the plants of excess water, which significantly harms the culture. The easiest way is to place small stones on the bottom of the containers. After that, the soil mixture is poured, filling the container by a third.
When planting a culture, each individual is placed in the ground 2 cm lower than it grew in the previous container. Sprinkle the plant with soil and water it under the root in sufficient volume. Vegetables can be exposed to the sun after 7 days, when the root is well fixed in the soil.
It should be borne in mind that apartment tomatoes suffer from excess moisture and lack of air. Therefore, on cool nights, containers with seedlings should be placed in a warm room. And vice versa: in hot weather it is necessary to ventilate the balconies well, especially the glazed ones.
Seedling care
In the middle of spring, the culture needs fertilizing with minerals. After that, it is worth organizing the transplanting of vegetables into large containers, for example, buckets.It is recommended to make holes in a plastic container so that excess moisture can drain through them. Also, this operation will enrich the roots with oxygen. The soil is poured into a bucket, the seeds are buried into it a couple of centimeters and abundantly moistened. Tall plants require tying to a support. After the culture is left alone for a week for rooting.
Seedling growth should be accompanied by tying and adding soil to containers. Systematically organized watering and weekly feeding of plants are the main components of caring for them.
Over time, stepchildren appear on the vegetables, which need to be eliminated, leaving only two stems. If the tomato variety is undersized, then you can form its bush in three shoots. Sick and yellow leaves are subject to elimination. After the formation of the ovaries, the lower leaves must also be removed.
Complete trimming of leaves in a balcony should not be carried out, as this can disrupt the natural metabolism of the plant. Lateral shoots growing from the leaf axils are subject to elimination. Do not allow the plant to thicken. All these procedures are best done in the morning.
At least four bundles of ovaries are left on each stem, and the tops of the bushes are completely pinched. The peculiarity of balcony tomatoes is that insects do not need to pollinate them, since they are parthenocarpic species.
When the fruits are finally formed, the top of the bush must be cut off, like all inflorescences. Otherwise, the tomatoes will not develop properly. It is better to harvest unripe, the final ripening will occur in an apartment.
Diseases and pests are terrible for balcony vegetables no less than for garden vegetables. At the first signs of late blight (dark spots on the green parts of the plant), the culture is treated with a special preparation.
In addition, pests such as spider mites and whiteflies can attack the plant. They can also spread to other plants, so it is worthwhile to closely monitor the crop and not allow an "enemy" attack on it.
Transfer
When young sprouts become strong, they need to be planted in a larger container and separately from each other. Usually, the seed packaging indicates the period of their transplantation to a permanent place. This is roughly 30 days after planting the seeds. You can also proceed from the state of the plant. Once its root has grown to fill the entire glass, it is time for a transplant.
For the "permanent residence" of vegetables on the balcony, a cylindrical container filled with fertile soil is well suited. It is advisable to fertilize the culture after the growth of its roots. Complex feeding is carried out at intervals of 10 days.
The systematic irrigation depends on the rate of soil drying. Humidification should be such that it completely nourishes the clod of earth with water.
A balcony with open windows is the best place for culture, starting in late spring, when the air temperature reaches 15 °.
On a note
Balcony cultivation of vegetables has its own secrets. Here are some of them:
- It is best to grow the crop on the balcony on the south or southeast side of the house. This is due to the fact that tomatoes are very fond of heat. The balcony on the north side is a place where it is impossible to grow culture.
- On an unglazed loggia, landing should be carried out no earlier than April. At the same time, the daytime temperature should be at least 23 °, and the nighttime - 13 °, and even higher during flowering.
- Air humidity within 60% - 65% is optimal for plants. Increased rates can provoke fungal diseases, so the balcony needs systematic ventilation.
- The water, ideal for watering plants, is warm.
- It is better to install containers for seedlings on special slats. The ideal option is to place the slats in the trough, and in it the boxes.
- Frequent fertilization with nitrogen and organic fertilizing will make the bushes of the culture powerful and tall. But on such plants, color and fruits are poorly formed.Therefore, fertilization should be carried out no more than once every 10 days.
- The branches of the vegetable can break under the weight of the fruit, so it is better to tie them to a support.
- The main secret for speeding up the formation of bushes is breaking off small roots. To do this, simply pull the plant up by the bottom of the stem.
So, everyone can grow tomatoes on the balcony. The main thing is to learn how to do it step by step and follow the recommendations. The cultivation process will bring only positive emotions, as well as the resulting crop.
Video "How to compactly plant tomatoes and herbs on the balcony"
Video from the program "Everything will be fine" about how to grow tomatoes and greens on the balcony in the most compact way.
Mini-gardens on balconies, loggias and verandas are becoming fashionable. They provide an opportunity for people who do not have land plots to try their hand at plant growing and enjoy delicious, healthy, fresh vegetables, herbs, berries. One of the most popular balcony crops is tomatoes. With the right choice of variety and skillful care, they will certainly delight you with a good harvest.
How to grow tomatoes on a windowsill
Balcony tomatoes: variety selection
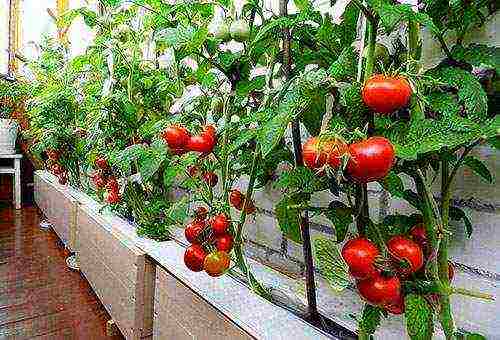
For the limited space of a loggia or balcony, not all varieties of tomatoes are suitable. Too tall, branchy bushes with heavy fruits are best left for industrial greenhouses or open ground. On the balconies, compact specimens are often grown, which are easy to care for.
Tomatoes on the balcony
Among the basic requirements:
- Bushes size... Long vines in a balcony will feel uncomfortable. The ideal option is determinant plants, whose growth does not exceed 50 cm. Such bushes do not require tying, they do not need to be pinched and pinned. Not too branched tall varieties are suitable for growing on trellises; they can also be planted in hanging baskets;
- The growing season. For a balcony or loggia, you need to choose ultra-early ripening varieties. The shorter the time from emergence to harvest, the better;
- Yield... It is convenient to grow cluster tomatoes on the balcony, which are cut in whole bunches;
- Disease resistance. The stronger the plant immunity, the higher the chances of a good harvest. It is advisable to choose hybrids that are especially resistant to the main diseases of the nightshade;
- Decorativeness. Balcony tomatoes should be not only fruitful, but also beautiful. Brush mini-tomatoes of different colors look especially impressive. Bushes planted nearby with fruits of rounded, elongated, pear-shaped pink, yellow, orange, bright red shades look no less elegant than exotic flowers;
- Versatility. It is worth choosing varieties with moderately dense skin, suitable for fresh consumption or canning.
Tall tomatoes on the balcony
|
Balcony Miracle |
Carp tomatoes, round, bright red. The taste is pleasant, sweetish, the skin is dense. | 2 Kg |
|
Caramel Red |
Standard low bushes, oval fruits, bright red. The taste is delicate, sweet with a slight sourness. | 2.5KG |
|
Caramel Yellow |
Very productive, honey-yellow fruits, elongated, ripen in large clusters. The skin is firm, the taste is sweet, with fruity notes. | 2.8KG |
|
Cranberries in the Sahara |
Very small round fruits with dense skin, ripen in large clusters. The yield is good, the taste is rich, sweetish-sour. | 2.6KG |
|
Golden Drop |
Indeterminate shrub suitable for hanging baskets. The fruits are pear-shaped, bright yellow, with a delicious fruity taste. | 4 Kg |
|
Date Yellow |
Moderately tall shrubs can be grown on trellises or in hanging baskets. Fruits are oblong-oval, sweet, ripen in clusters. | 2.8KG |
|
Garden Pearl |
Ampel variety with long flowing branches and sweet cherry fruits of deep pink color. | 2.5KG |
|
Cherry fingers |
Suitable for hanging baskets. Compact bushes, elongated fruits, bright red, very sweet. | 3 Kg |
Three of the best varieties of tomatoes to grow on the balcony
Growing conditions: what should be the balcony
To organize a mini-garden, a balcony facing southeast or southwest is suitable. On hot southern loggias, you will need to organize shading. Northern balconies, where the sun is less than 3 hours a day, are not suitable for growing tomatoes.
Create conditions for growing tomatoes
It is advisable to place plants closer to the railing or balcony wall. The constant strong wind slows down the development of plants. Baskets with ampel varieties are not hung too high so that it is convenient to care for the plants. Tall bushes are conveniently attached to trellises made of wood, plastic or rope. They are mounted on a free wall, protected as much as possible from the wind.
Spicy herbs can be placed next to the tomatoes. They will not only decorate the composition, but also scare away pests. The best companions for balcony tomatoes are lettuce, mint, oregano, celery, parsley or curly parsley.
With sufficient care, the balcony can replace the backyard and feed the whole family with tomatoes.
Video - Tomatoes on the windowsill
Soil and containers: what to prefer
Tomatoes love light, nutritious soil with neutral or slightly alkaline acidity. You should not use ready-made soil mixtures, they are poor in nutrients and contain an excessive amount of peat.
Soil for tomatoes
However, such a substrate can be taken as an additive to self-compiled soil. Novice gardeners can try one of the following options:
- a mixture of garden soil with humus and a small portion of peat;
- sod land, combined with compost and ready-made peat-based substrate;
- old garden soil with the addition of compost and washed river sand.
All components are thoroughly mixed. For greater nutritional value, wood (preferably birch) ash or superphosphate is added to the substrate.
Superphosphate
It is convenient to grow tomatoes in deep plastic or wooden boxes located along the railings and walls of the balcony.
Hanging box
Hinged box
Planting seeds
For the fastest harvest, balcony tomatoes are recommended to be grown in seedlings. Planting begins in March. Deep containers with pallets are filled with soil so that about 1 cm remains to the edge. The soil is slightly compacted, furrows are made in it, into which the seeds are sown. Before planting, they are treated with a growth stimulant for 10-12 hours. Decontamination of store-bought seed is not required. It goes through all the necessary procedures before packing.
Seed preparation
Seed Treatment Substances
Seeds are planted with a shallow depth and covered with a layer of soil. Then the soil is sprayed generously with warm soft water from a spray bottle. It is possible to grow tomato seedlings in plastic cassettes or individual pots. This method excludes picking, the plants are moved into the ground by transshipment, which excludes damage to the roots.
When growing seedlings, the grains are buried shallowly
The seedling boxes, covered with transparent material, are placed in a warm place.
During growth, the seedlings are watered once every 5-7 days. After the appearance of the first true leaves, the tomatoes are fed with full mineral fertilizer or a weak mullein solution. The second feeding is carried out before moving young plants to their permanent residence.
Seedlings tomato seedlings
Seedlings in cups
Picking tomato seedlings and transplanting to a permanent place
Video - How to grow tomatoes or tomatoes on the balcony
Living on the balcony: transplant and care
On glazed balconies, grown seedlings can be planted in the first half of May. They are planted on open balconies later, closer to the beginning of June. Bushes are placed at a distance of at least 40 cm from each other, closer proximity reduces yield.It is better to tie tall varieties to trellises, they will add decorativeness to the balcony, heavy branches will hold securely, without breaking off when the wind gusts.
In the cold season, you need to water infrequently, when the earthen lump dries up
It is important to know that you can not spray the leaves of seedlings, because the plant can get sick and die
When transplanting, you need to take into account the needs of the plants. Each bush should have at least 4 kg of nutrient substrate. A layer of expanded clay or pebbles is laid at the bottom of the boxes. The same soil mixture is used in which the seedlings grew, wood ash is mixed with it for nutritional value. Young tomatoes move with a clod of earth that protects the roots for damage. In the first days after transplanting, the bushes should be protected from direct sunlight, protecting them with awnings or roller blinds.
Tomatoes are a rather demanding crop. They love warmth and moisture, but cannot tolerate direct sunlight and stagnant water in the soil. Water the tomatoes only with warm soft water (rain, settled or boiled). Watering is carried out in the morning or evening, after sunset. From time to time, it is useful to water the plants with water in which the eggshell has been infused.
Plants of an indeterminate type growing on trellises or in baskets require pinching. After the formation of the third flower cluster, the lateral shoots are removed. With excessive stretching of the stem, you can pinch the growth point, this stimulates the early formation of ovaries.
Grassing tomatoes
Immediately after transplanting, the plants are no longer fed with complexes containing nitrogen (urea, ammonium nitrate). These components contribute to the abundant growth of green mass to the detriment of fruiting. To stimulate the ovaries, superphosphate and potassium sulfate in the form of aqueous solutions are more useful. During the season, the plants are fed at least 3 times. Mineral complexes can be replaced with organic matter (humus, bird droppings, diluted mullein).
Photo of a tomato on the balcony
First harvest
Video - How to grow tomatoes on the balcony
Not everyone has gardens, but many want their own vegetables during the summer season. Not all of them know that gardeners have long been practicing growing tomatoes on the balcony. This method will allow you to plant a garden culture at home. It is worth painting it step by step.
There are a number of differences between balcony plants at home and plants planted in the open field, so it is important to choose the right varieties of future tomatoes before planting.
What should be balcony tomatoes?
The main difference between plants grown on a window and greenhouse plants is their final size. Varieties that are used for planting in the garden can grow to a height of one meter or more. Taking care of such a plant at home when growing on a windowsill is very problematic, since the tall bushes have a highly developed root system that needs a lot of soil.
Low-growing varieties are perfect for planting on the windowsill of the house. In addition, they should bear fruit abundantly, because tomatoes on the window, due to the smaller amount of nutrients, have very small fruits. Therefore, the harvest of even 10 such tomatoes on the windowsill of the house will seem very modest.
Having entered a store that sells seeds, you should take a closer look at varieties such as:
- Pinocchio;
- Balcony miracle;
- F1 balcony red;
- Pearl (yellow and red);
- Balconies elow;
- Thumbelina;
- F1 bonsai micro;
- Cherry;
- Button;
- Bonsai.
The bushes of these varieties are undersized and at home on the windowsill grow up to a maximum of half a meter. The fruits are arranged in large clusters on them, due to which, during ripening, the bush is dotted with many small berries. Due to the difference in conditions and varieties, plants planted at home, unlike greenhouse ones, require a completely different care.

Soil for planting
Grow cherry tomatoes, Thumbelina, Miracle and other small-sized varieties on the windowsill of the house should be in prepared soil. There are several variations of the mixture. So, in specialized stores you can buy ready-made mixtures:
- "Tomato and Pepper";
- "Exo".
You can also prepare a mixture for Miracle tomatoes and other varieties at home. There are some simple recipes.
- In 1 part of vermiculite, add a tablespoon of azofoska and a glass of ash, then add 4 parts of compost. Stir the resulting mixture in the soil, the amount of which should correspond to the compost.
- In a 1: 1: 1 ratio, sod land, manure humus and peat are mixed.
- Sand and peat are mixed in one-to-one proportions, 2 parts of leafy earth are added to the resulting mass.
In the resulting soil, indoor cherry tomatoes, Balkonnoe miracle and others grown at home will be able to receive the necessary nutrients and will better get used to the windowsill.

Landing
In order to grow tomatoes Balcony miracle and other varieties at home on the window, you need to prepare a special container. Each bush is planted separately.
Advice
Choose a container volume for planting at least 3 liters. The container material can be absolutely any. So, instead of a clay pot, many plant tomatoes in plastic bottles.
The technology of planting cherry and other species is very simple; it can be broken down into several stages step by step.
- A drainage layer is poured into the bottom of the pot. They can be brick chips or gravel. This layer should be approximately 3 cm thick.
- On top of the drainage, tamping a little, lay specially prepared soil so that about 2 cm remains to the upper edge of the container.
- The largest seeds must be selected from the seedlings, after which they must be soaked for 25-30 minutes in a solution of potassium permanganate, consisting of 10 g of the substance and 1 liter of water.
- Rinse the seeds thoroughly with clean water.
- Finished seeds can be planted in the soil. The depth of the groove in the soil of the pot can vary from 1.5 to 1 mm.
The final stage of planting cherry seeds and other tomatoes on the window - whether in plastic bottles or in clay containers - is abundant watering. Next, the pots are covered with glass and placed by the window on the south side of the apartment.
Care
Thumbelina, Balcony Miracle and other indoor tomatoes grown at home on the windowsill require special care, different from that to which plants planted in open ground are accustomed. This is due to the fact that there is a limited amount of nutrients in a closed pot.
Watering should occur as the soil dries out. Usually indoor cherry trees can live up to 8-10 days without additional watering. Before giving water to plants living on the windowsill, it should be defended for several days. But this is not the whole care.
Periodically, the sprouts will require feeding, which begins 12 days after the balcony miracle shows its first shoots.
In order to grow tomatoes on the balcony, it is necessary to constantly maintain the optimum temperature in the room. So, during the day, thermometer readings can fluctuate from 18 to 22 degrees, at night the average value can vary from 15 to 16 degrees.
The intense heat of cherry, Balcony miracle and other low-growing tomatoes growing at home on the windowsill are extremely disliked. Therefore, you should from time to time open the window to ventilate the room. Also, the care includes protection from unnecessary drafts. Therefore, in case of cold weather, it is necessary to install some kind of dense panel, for example, of plywood, between the window and the cherry.

Outcome
Growing tomatoes at home is not as difficult a process as it might seem at first glance. In addition, why should the balcony room of the house be empty when it can be usefully used for planting tomatoes?
The guarantee of success in growing is the purchase of tomato seeds suitable for planting at home, and adherence to the growing technology. Caring for tomatoes is also easy, the main thing is to make sure that the soil does not dry out. Then juicy and tasty tomatoes will grow at home.


