Content
- 1 Types and varieties of thuja
- 2 Breeding methods and cultivation features
- 3 Correct planting and care of thuja outdoors
- 4 Thuja: home care
- 5 Self-forming bonsai
- 6 Diseases and pests
- 7 Features of seed reproduction
- 8 Seed collection rules
- 9 Stratification is needed!
- 10 Planting seeds
- 11 Home cultivation
- 12 The most important thing is care
- 13 Varieties and types of thuja
- 14 Features of planting thuja at home
- 15 Choosing a place and planting a thuja at home
- 16 Planting Tui at home
- 17 Thuja care at home
- 18 Reproduction of thuja
- 19 Pruning thuja at home
- 20 Watering thuja at home
- 21 Thuja planting and care
- 22 Reproduction of thuja
Experienced gardeners have long been using not only beautiful, but also useful plants and shrubs for planting in their summer cottage. Thus, thuja gained popularity - an evergreen perennial plant that releases phytoncides into the atmosphere, which have antimicrobial properties.
Planting and caring for thuja outdoors for experienced gardeners is not difficult. That is why thuja can also be planted at home, where the features of care may differ slightly.
Types and varieties of thuja
There are a huge number of species and varieties of the presented plant. There are 5 main types, which include:
- Chinese;
- Korean;
- Japanese;
- west;
- folded.
Each of the species includes up to several dozen varieties, but only the most unpretentious representatives are suitable for growing in garden plots.
The following are distinguished here:
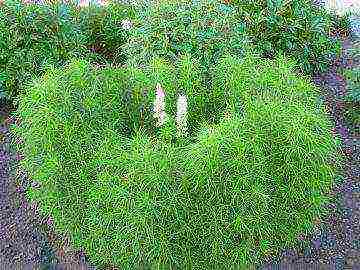
Thuja spherical
- it was due to the shape of the crown that it received its portion of popularity in cultivation in summer cottages.
Danike is one of the most popular varieties with a spherical crown.
... They prefer to plant it near gazebos or try to dilute the created woody composition. This variety reaches a height of
60 cm
, which makes it attractive in appearance and easy to clean.
 Thuja Brabant
- a cone-shaped plant variety that can grow 40 cm in height and increase in size up to 15 cm in diameter in a year. This variety, when grown in summer cottages in Russia, can reach a height of all
4
or even
5 m
... Therefore, it is used less often. Such bushes can be found in the garden plots of elite residences, where thuja plays the role of a hedge.
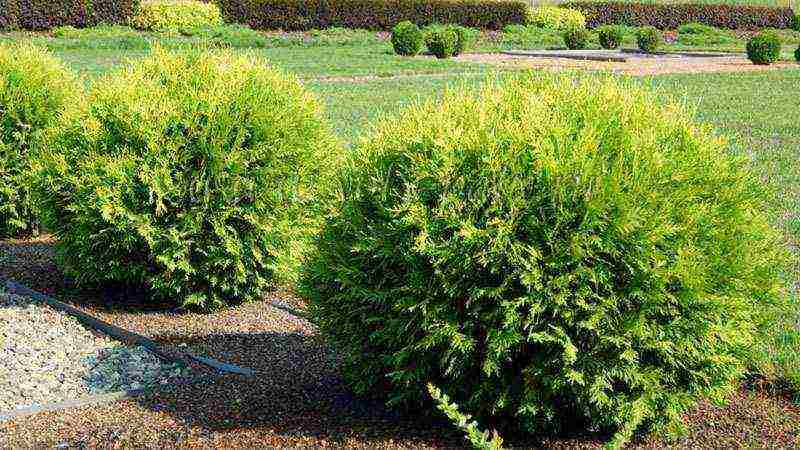
 Thuja Smaragd
- the same conical crown shape attracts most gardeners. An adult bush in diameter reaches
2 m
... The crown is quite dense, so it can also be used as a hedge. The presented variety pleases with its longevity - the shrub can grow up to 150 years.
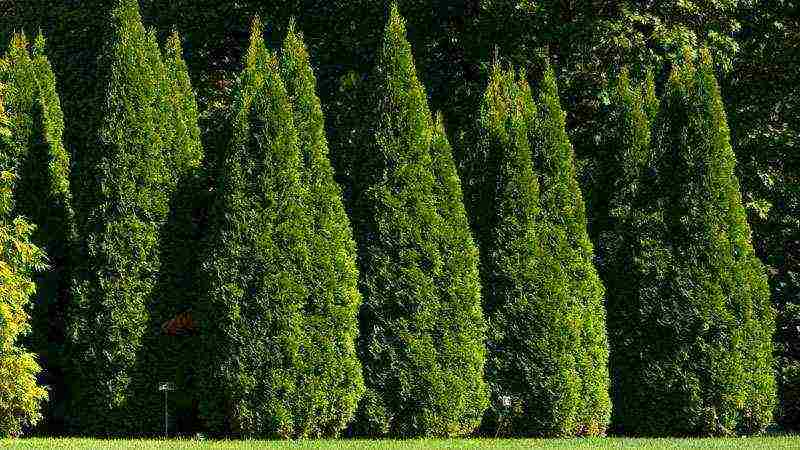
Each type and variety of thuja Deserves attention. They need to be studied due to the need or desire to plant a particular variety in the garden. Such actions are necessary for the normal and full growth of the plant.
Which is better: juniper or thuja? Video:
Breeding methods and cultivation features
The shrub is grown at home, and only then planted in open ground in the garden.
You can use a simple and easier way - to purchase a ready-made seedling, which must be planted immediately after purchase. But self-cultivation is much more interesting.
So, you can grow thuja from a seed or from a selected cuttings. Both methods are worthy of detailed consideration.
Growing a seedling from seed
If you are new to gardening, then the question is, how to grow thuja from seeds, should be considered in more detail. The seeds of the presented plant can be purchased at a specialized store or you can get it yourself.
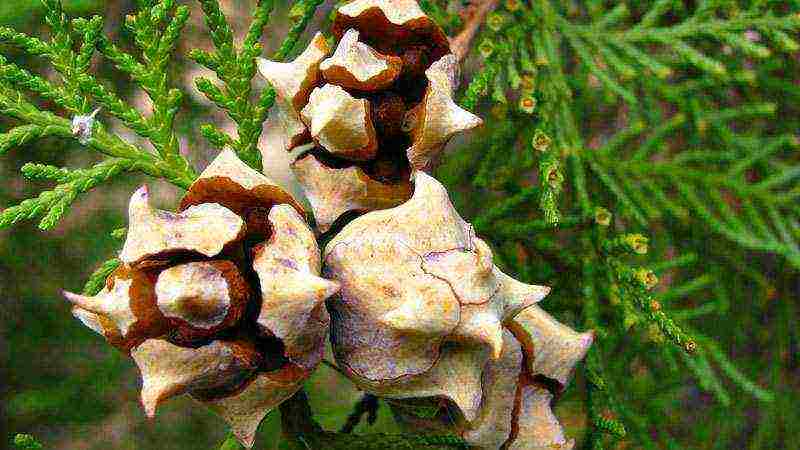
Thuja has woody cones, from which seeds are extracted from September to December.
Cones are placed in a ventilated place under diffused light. After a while, they open, and you can safely remove the seeds.
Further growing thuja from seeds at home happens as follows:
1. The first method of planting seeds involves using a regular flower pot and soil mixed with peat and humus.
Previously, the seeds are kept for a day in a damp cloth. You should not plant the seeds deeply, just sprinkle them with earth or sawdust on top.
As necessary, the planted seeds are watered (with drying out of the soil) and kept under diffused light. Sprouts should be planted with warming up the soil in the garden in the spring.
2. The second method of planting seeds gives a germination rate of about 90%. Here, in September, you should remove the seeds from the cones and put them in a bag, which must be stored in a cool place until it snows.
As soon as the snow completely covers the earth's surface, the seeds are buried in snowdrifts and kept there until spring. In the spring, it is already possible to plant the preserved thuja seeds also shallowly into the soil of the garden plot at a distance of 10 cm. It is important to water the garden abundantly.
Thus, sprouts grow for 3 years, taking care of them properly - removing weeds and regularly watering as the soil dries up. In the fourth spring, you can plant the sprouts in a permanent place.
From the above, it becomes clear that such a cultivation takes a long time.
Therefore, gardeners resort to the second method of self-growing seedlings using cuttings.
Growing a seedling from a twig
How to grow thuja from a twig, if there is no plant presented on your garden plot?
In April, when the buds are ripe on the branches of the plants, visit a fruit tree nursery or visit your neighbors whose garden is decorated with this unique and interesting shrub. Ask to cut a lignified stalk about 40 cm in size.
Then you will need to perform the following actions:
- Divide the stalk yourself into 2-4 specimens so that each of them has a part of the mother bark.
- The resulting branches must be treated with any solution that stimulates rooting, and left for 12 hours to process.
- Prepare the soil in your garden - add some peat and sand to the soil.
- Plant the cuttings into the ground to a depth of no more than 3 cm.
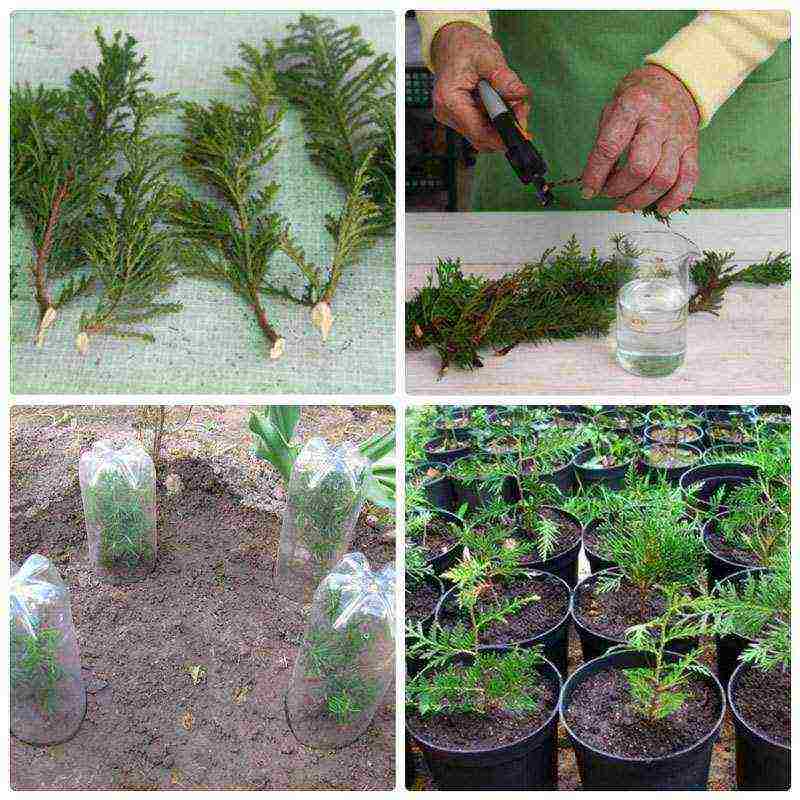
- The soil should be well moistened, but also do not forget about spraying - this is an important condition in the presented method of growing a seedling. When the cuttings are rooted, watering is significantly reduced.
- For the winter, new mini-shrubs are covered with polyethylene if the planting took place in a region with a harsh climate. In other cases, it will be enough to cover with fallen leaves or spruce branches.
Similar thuja propagation by cuttings can be done at home. Branches are planted in a container with soil and covered with a greenhouse - such an action will lead to faster growth.
Just do not forget about the appropriate daily airing, watering and spraying until the cuttings are completely rooted.
How to propagate and grow thuja, video:
Correct planting and care of thuja outdoors
Thuja planting depends on the size of self-grown seedlings. If an acquired plant is planted, then this is done according to the following principles:
- A place for further growth of thuja should have a beneficial effect on the growth of the plant - it is a sunny place, protected from the winds.You should not choose a place on the site that is constantly exposed to direct sunlight - the plant will begin to wither. Also, you can not plant a shrub in the shade - it will begin to thin out.
- The dimensions of the dug hole for planting depend only on the existing root system. The diameter of the planting pit can be up to a meter.
- A layer of stones is laid at the bottom of the hole as drainage - the presented plant does not tolerate stagnant water well.
- A layer of soil is laid on top of the stones, where turf, peat and sand are mixed in equal quantities.
- Now you should set the seedling so that the root collar is at the level of the soil.
- "Fix" the seedling with the remaining soil or turf soil.
- After planting, the seedlings can be watered with a moderate amount of water.
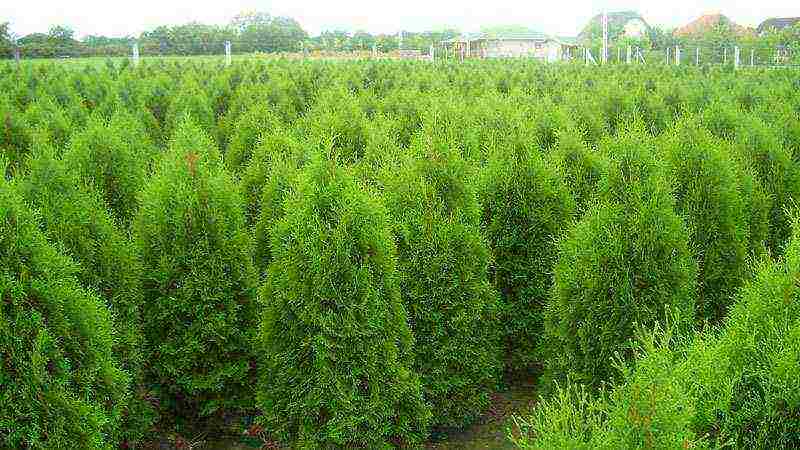
When planting, the distance between the seedlings should be observed. Depending on the variety, it can reach from 2 to 5 m. Consider the possible diameter of the type of shrub used.
This is especially necessary to do if it is implied thuja hedge... In this case, the distance is calculated without taking into account the free space between the future grown bushes.

As for the care of thuja in the open field, difficulties are not foreseen here. It is important to regularly water the shrub, which is done as the soil dries. Periodically, the soil can be hilled, and it is also necessary to constantly remove the weed.
Top dressing of the plant is carried out in early spring, when snow covers the surface of the soil. At this time, nitrogen fertilizers are used.
Such procedures are carried out until mid-summer no more than 2 times a month. Next, you should resort to the use of potash fertilizers, feeding which is extended until late autumn.
At 2-3 years of age, thuja shrubs may require pruning, the whole principle of which is to give an attractive and correct crown for this shrub.
As a rule, in the early years, pruning is only preventive in nature. The complete formation of the bush is carried out already in adult specimens.
How to plant thuja correctly, video:
Thuja: home care
In the absence of your own garden plot, you can grow a small miniature tree at home. Thuja in a pot today it does not seem strange, but quite an adequate solution for those flower growers who want to have a coniferous plant in their home.
There are no additional aspects to care here. It is only important to carry out timely watering and provide the plant with fertile and nutritious soil.
For planting the presented plant at home, choose the eastern thuja and the Ploskovetochnik variety. Planting a plant for self-cultivation in a pot is carried out according to the same principle as described above.
An exception is the absence of a transplantation point to a permanent place - after planting a seed or cutting in a pot with soil, the plant remains in place until fully ripe. The small volume of the container will not allow the shrub to grow as high and wide as possible.
Principle, how to care for thuja at home, is enclosed in the following order:
- Planting a plant in a pot requires good drainage at the bottom of the pot. You can use a regular tray, which will also help remove excess moisture.
- The soil can be enriched with useful microelements by mixing four parts of sod land with two parts of coniferous. Only part of the sand is added to the mixture - the result is a soil suitable for planting seeds or cutting.
- The pot must be placed on a north or west window - this will provide diffused light suitable for normal growth for the shrub.
- For optimal cultivation, an already mature tree is provided with a temperature of 10-15 ° C. In the summertime, it is necessary to take the pot with the plant to the balcony so that it receives its portion of air procedures.
- Watering is carried out as needed as soon as the soil dries out.It is important not to allow excessive moisture or dry out of the soil, all this will lead to the death of the plant.
- Thuja can calmly tolerate any whims of air humidity in the room. However, excessive "air drying" should not be allowed. It is better to maintain a moderate climate in relation to indoor humidity. In summer, in the heat, the plant should be sprayed.
- For the normal formation of a bush, the plant is pruned.
When growing thuja, one should not forget about timely feeding with special universal fertilizers, which are carried out in the spring and during the summer for a favorable and rapid growth.
From August to September, you can start propagation by cuttings.
Self-forming bonsai
Surprisingly, some growers give the bush-like thuja the shape of a bonsai tree. This is not easy to do. It is not enough just to pinch and cut the plant.
To form a bonsai, it is necessary to give the shrub an appropriate shape, subjecting its branches to a forced change in the direction of growth, slightly breaking them at the same time. The curved branch is fixed in a new direction and all branches are cut off.
After a while, the shrub will begin to form into a bonsai tree, where you should monitor the formation of the crown, constantly pruning.
Pay attention to this material - Barberry: planting and care, useful properties.
Diseases and pests
Proper care of the presented plant allows you to achieve an attractive green shrub.
If you make any mistakes, the thuja branches can thin out, and the rich green color will change to pale gray.
But this is not the worst thing that can happen to a plant. Much more dangerous is a fungal infection or an invasion of harmful insects, the fight against which can take a long time. The most common and dangerous diseases of thuja include:
You will be interested in this article - Black currant: planting and care in the open field.
- Fungus - appears in the form of spots characteristic of the fungus, often affecting young shoots. The shrub should be treated immediately. To begin with, all affected areas are completely cut off, and then you can resort to treatment with any antifungal solution.
- False shield - yellow spots form on the branches, which are often perceived as a real shield. To remove them, the plant should be treated with Rogor or Karbofos solutions.
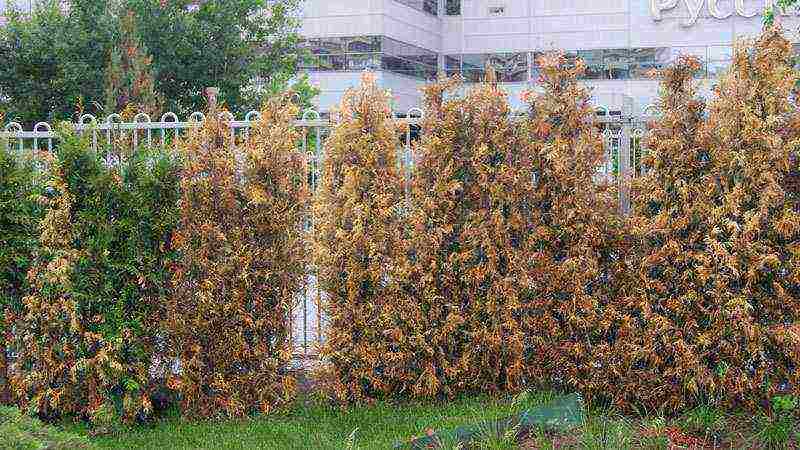
- Speckled moth - often appears when growing thuja outdoors. It manifests itself in the form of the transformation of branches into brown color and the withering away of the top of the tree. You can get rid of pests by treating the shrub with solutions containing pyrethroid.
- Aphids - leads to the fall of the needles from the bush. Here you can use Karbofos according to the instructions.
The correct cultivation of a coniferous plant at home or in the open field will give flower growers and gardeners great pleasure.
Such plants should be "kept" nearby, as thuja needles have excellent beneficial properties.
Thuja needles can be used to treat wounds, as a hemostatic agent, and also for colds.
Like the article ? Show it to your friends:
Evergreens are very attractive for landscaping areas. Especially if you do not set yourself the goal of getting a crop. Conifers and cypress trees require significantly less maintenance than deciduous trees; they are less affected by pests and diseases, are not so demanding on watering, but are very attractive purely visually. Thuja stands alone among such attractive plants. In addition to the fact that it can become a real decoration of the personal plot, it is also available for home breeding. And in the house, thuja is not only pleasant to the eye, it additionally and very revitalizes and purifies the atmosphere - in the most literal sense. The main task in this case is the question of how to grow thuja from seeds.Moreover, this can be done at home, on the windowsill. Many do just that: they keep the tree in room conditions until a certain moment and only then they are planted in a permanent habitat. The advantage of this method of breeding a plant is that it is easy to care for it while it is most vulnerable.
Features of seed reproduction
Good tolerance to urban conditions, undemandingness in relation to temperature, decorativeness and durability - these are the advantages that thuja can boast of. Growing this tree from seeds is more difficult than vegetatively. To begin with, the process will be quite long - up to five years. In addition, it is difficult to guess what kind of tree the result will be. You took seeds of a spherical thuja - and got a pyramidal one (or vice versa). This is a very common incident. However, if the appearance is of fundamental importance to you, you can select the desired seedling with the necessary crown shape already a year after planting, because before growing thuja from seeds, a lot of them are sown, and the probability of finding the subspecies you need among them is 50 per 50. In the end, the seedlings that do not satisfy you can be given away to friends and acquaintances.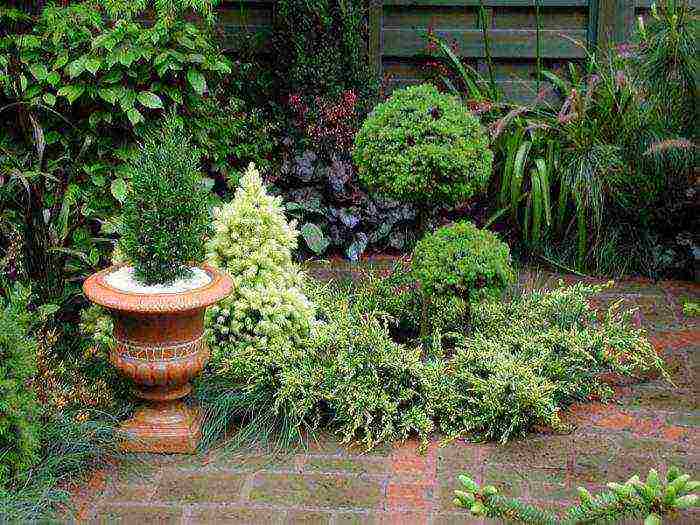
Seed collection rules
Long before growing from thuja seeds, you need to properly collect and prepare them. To ensure good similarity, it is best to use only fresh seed. It is harvested in the fall. The seeds are hidden in the cones. And there is no need to wait for the "containers" to fall off the branches by themselves, since it is guaranteed that thuja can be grown from seeds only from plucked cones. They break off right with the branches, and it's better with a margin, in case something goes wrong. Cones are laid out on paper at home in one layer. The very next day, the necessary seeds will be poured out of them.
Stratification is needed!
Before growing from thuja seeds, moreover, full-fledged and non-painful, the seed must be hardened - almost like children. One of the options is to wrap the seeds in rags, bury them in the ground and cover with insulation - at least with dry leaves. In winter, another layer of snow will be added. In such conditions, the seeds will get stronger and "sleep off" in order to be full of strength in the spring. When the snow is already melting, but the ground is still cold, cloths with seeds are simply moved to the refrigerator, sprinkling a container with them with moistened sand.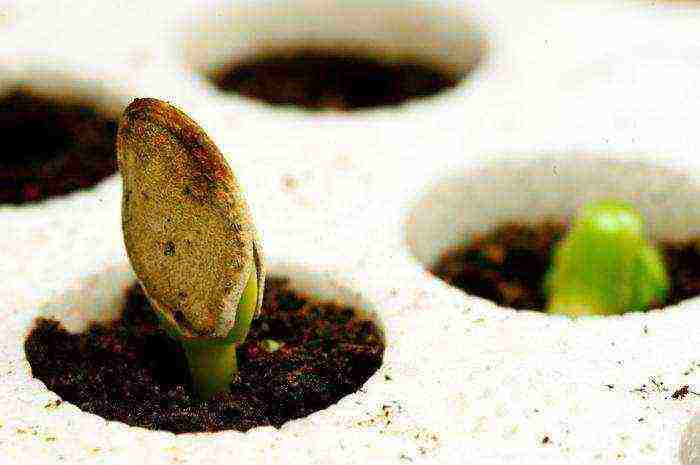
Another stratification option, less reliable and more suitable for those who are thinking about how to grow thuja from seeds at home, is to keep the planting material in wet sand or just in water. For this method, half a day is enough. The seeds will sprout quickly, but the seedlings will need supervision and extra care for quite some time.
Planting seeds
If you are seriously thinking about how to grow thuja from seeds, then somewhere in April you must make short beds. The swollen grains go no more than half a centimeter into the soil. A distance of at least 10 centimeters is maintained between the holes. A very thin layer of soil is poured on top. Watering should be systematic, then in four weeks shoots will appear. If weeds are noticed at this time, they should be removed at this stage - they can drown out weak sprouts. While the trees are still very tiny, they will have to be shaded from the sun - direct rays are destructive for them.
Home cultivation
If you are more interested in the question of how to grow thuja from seeds at home, take into account the following rules. Seed preparation is the same as for garden breeding. A grain soaked for a day gives a shoot, it should be placed in a small pot, covered with either a special soil for conifers, or a universal one with the addition of peat and sand. The surface of the soil should also be sprinkled with sand, sawdust or small pebbles to recreate the semblance of natural conditions.Watering is necessary only to the extent of drying, more frequent moistening will lead to decay of the seedling.
In the allotted container, the sprout will become a seedling and will spend a year in it. The next spring, again in April, he is transplanted into a larger pot with the same soil.
The most important thing is care
And what is interesting - it is not difficult at all! We figured out the watering, their regularity remains the same throughout the life of the tree. The only addition is that when it grows up, it is better to irrigate the crown when watering. You can also start shaping the crown from an early age - any thuja at this stage will willingly learn the pyramidal, spherical, and some intricate shape. The main thing is to trim regularly. With light, the situation is also not too difficult - scattered and even bright will do, if only not direct rays. Only a thick shadow is not good, but in most cases this issue is not difficult to solve. Do not be lazy to loosen the soil either - the thuja will grow faster and more luxuriantly, if, of course, you do not damage the roots. And the main thing! If your tree lives "free", be sure to wrap it up for the winter. Without shelter, he also has a chance to survive, but in the spring you will most likely get a pitiful panicle with shabby branches. And it will take a lot of time to grow new foliage.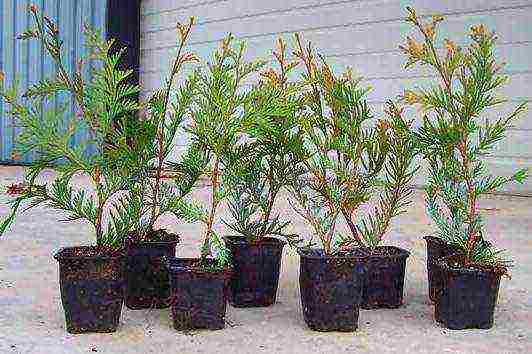
From all of the above, an obvious conclusion can be drawn: it is not necessary to have clear ideas about how to grow thuja from seeds, it is much more important to be attentive to it and take good care of it. And then she will grow beautifully both at home, and on a plot next to the dacha, and on a flower bed near the entrance.
One last remark. If you do grow a tree at home, make sure that your cat does not choose a tub as his toilet. Gnawing of branches by animals (as well as ripping them off by your children) thuja can still endure. But she will definitely not survive the cat "fertilizer"!
Thuja is a type of coniferous tree. Well demanded in summer cottages. Its main difference from coniferous representatives is that instead of needles, branches have flat scales. Considering that thuja itself is planting and care, at home it does not require difficult work, the popularity of this plant is understandable.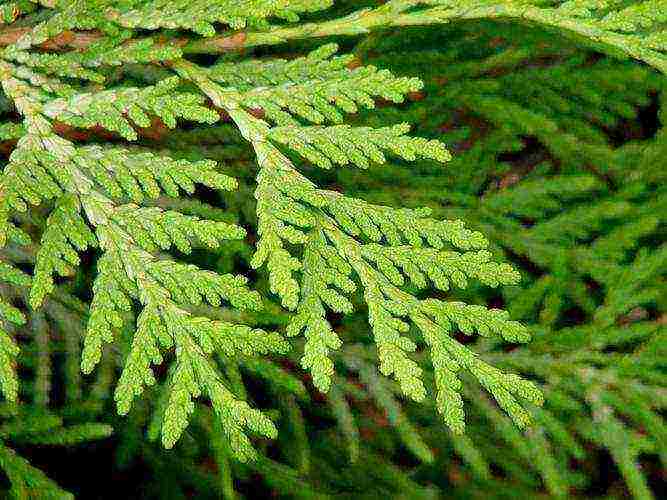
Varieties and types of thuja
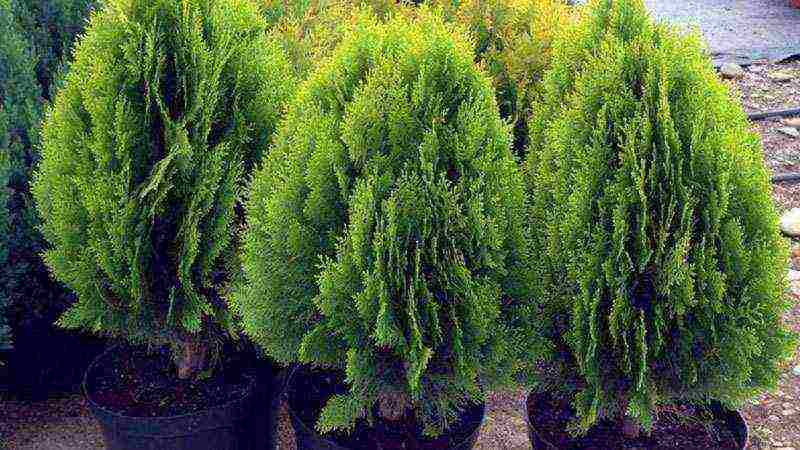
Golden Smaragd. Thuja western Danica is a ball-shaped shrub, which is called dwarf because of its small size. The height of this bush reaches about half a meter, the width is 1 meter. It is characterized by the presence of dense soft needles, shoots growing upward. The growth is slow, no more than 5 cm per year. Due to its compact size, unpretentiousness, external decorativeness, Danika fits perfectly into any design or composition of the garden. The crown of the bush lends itself well to shaping, cutting. Green hedges, borders are an excellent option for this dwarf species. This ephedra is also called spherical.
Fresh articles about garden and vegetable garden
Dannik's spherical thuja. Another representative of the dwarf Danica is the Aureya variety, which is distinguished by a more yellowish shade of needles. Requirements for the conditions of detention, the characteristics of both types are similar. These shrubs love fertile soil, fresh water, regular moisture, and irrigation of the crown when it's hot. Haircuts do not require, lend themselves well to formation, frost-resistant. It should be borne in mind that in the first years of life (2-3 years), the bushes need to be insulated for the winter (mulching, shelter with appropriate material), and also protected from sunburn in early spring.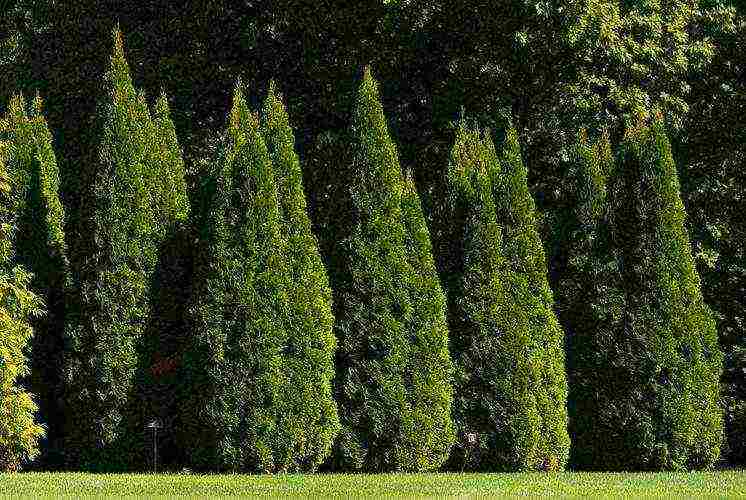
Aurea Danica thuja. Among the varieties of these conifers, there are also giants, which are characterized by rapid growth, can reach heights of up to 20 meters. In central Russia, this variety most often grows up to 2-3 meters, less often - up to 5 meters.
Eastern thuja Biota. Most of the eastern representatives of conifers are heat-resistant, tolerate drought well, feel well in areas with a close occurrence of groundwater, stony soils.
Features of planting thuja at home
For cultivation, it is recommended to take seeds that are inside the cones and ripen in the autumn. The process of growing a seedling will be long and will take about 5 years, however, a bush that was originally grown in local soil will be more adapted to climatic conditions.
When choosing a place for planting, it must be remembered that this plant does not like sunny areas. The abundance of lighting will not have a positive effect on the bush and will not provide it with warmth, on the contrary, frosts will be tolerated much worse.
Too darkened places are also undesirable, since in them thuja quickly loses its visual appeal, partial shade would be an ideal option.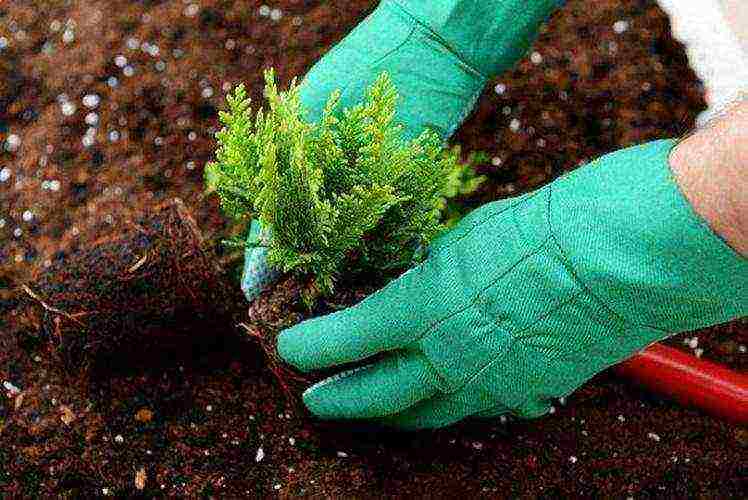
When choosing a landing site, you need to make sure it is sufficiently protected from drafts and cold northerly winds.
Many plants do not tolerate the close occurrence of groundwater, but thuja is an exception in this regard, such a place will be considered very favorable for its cultivation.
Errors in correctly determining the place for planting are not critical, since this plant tolerates transplanting well and, if necessary, it can be easily moved.
Choosing a place and planting a thuja at home
There are two different ways to plant seeds.
The first method involves the presence of a personal plot, since the seeds will be planted directly into the soil, and not into tubs.
If this option suits you, then you need to wait for the snow and even then spread the seeds on the ground, digging shallow holes for them at a distance of at least 10 centimeters from each other and covering them with needles and snow on top.
With proper care, the first shoots will sprout in a few months, but it will be possible to transplant the thuja to a permanent place only in the spring.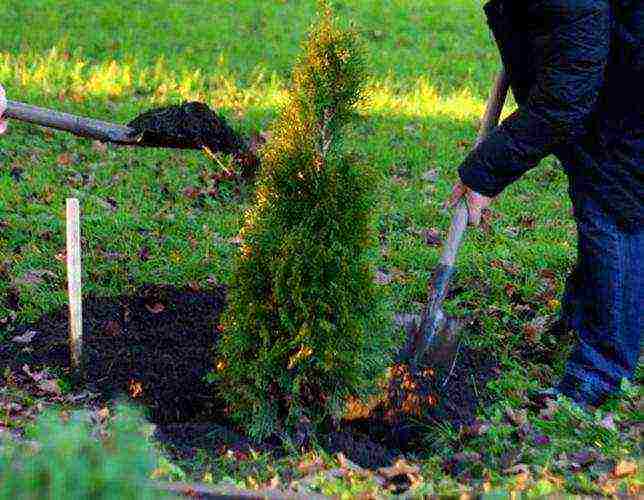
In the second option, you will need boxes or pots, on the bottom of which pebbles are laid out and covered with a thin layer of river sand, and then the soil is already covered.
It is necessary to plant seeds, adhering to the 4x4 scheme. This must be done carefully, the root collar should be flush with the soil, since otherwise the seeds are likely to die.
Young plants should be sprayed regularly, and fertilized once a month. In addition, direct sunlight should be avoided.
Planting Tui at home
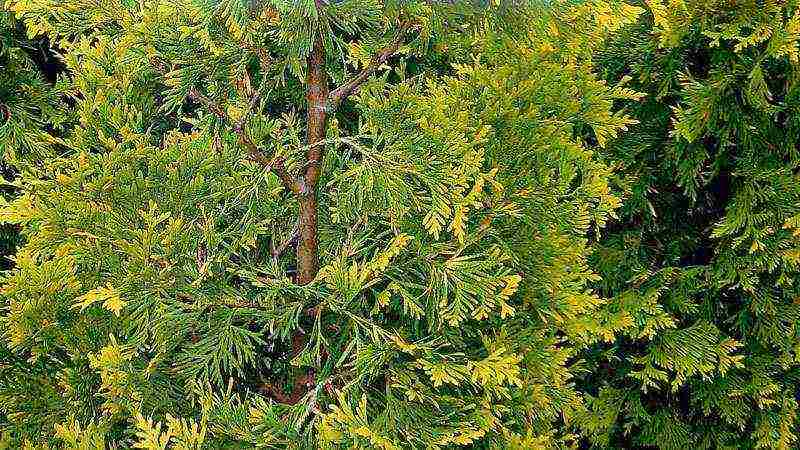
Thuja seedlings are usually sold in special containers with a closed root system. They are well fertilized and ready to be loaded outdoors at any time during the growing season. However, it is better to plant thuja in spring so that the plant will fully adapt and assimilate with the soil until winter. As for illumination, thuja develops well in light partial shade. In some varieties, lack of sunlight negatively affects the appearance: Golden Globe changes color from golden to pale green, and Holmstrup's crown thinns.
Thuja is usually planted in the turf of the lawn, so it is important to properly prepare the hole, the size of which depends on the volume of the seedling earthen clod. It is necessary to leave a reserve for drainage and fertile loose soil so that the roots can expand faster. The hole should be dug 30 cm deeper than the height of the coma and 40 cm wider. If the soil is heavy, then the bottom deepens by another 20 cm to lay the drainage layer: broken brick, expanded clay, fine gravel. Next, a nutritious soil is poured containing compost or rotted manure. Thuja sits in the prepared hole, soil is poured around the earthen coma.
Fresh articles about garden and vegetable garden
When planting, it is very important not to cover the root collar with earth - the place where the roots go into the trunk. It should be at ground level. Otherwise, the thuja will not grow well and will begin to turn yellow.
After the plant is planted, the soil is compacted a little and gradually spills. You will need 1-2 buckets of water (depending on the age of the thuja).Then the root circle is mulched with peat chips, crushed bark of conifers or their litter. This procedure will help protect the roots of the thuja that are close to the surface. The root collar and lower branches should be free of mulch.
Thuja care at home
But keep in mind that in winter this plant needs coolness and a temperature of no more than 12 degrees is desirable. But often, this is not easy to achieve. Although you can take it out to the balcony, but only on the condition that it is glazed and not cold on it.
In addition, indoor oriental thuja loves moist soil. It should be watered regularly, but in moderation, and the soil should be loosened in the pot from time to time.
Remember, the soil should not be allowed to dry in the pot or excessive moisture was present. Indoor thuja grows rather slowly.
Consideration should also be given to proper lighting.
Of course, in order for the plant to grow well and be beautiful and healthy, it will need to be fertilized. This should be done about twice a month. It is recommended to fertilize indoor thuja from May to September.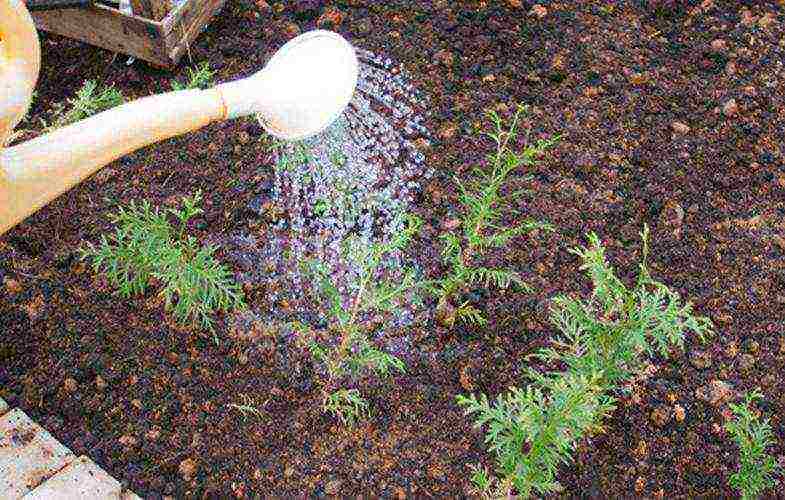
Air humidity also plays an important role. In winter, when the room is hot, the thuja should be sprayed with water from time to time. But not cold, but warm. This will help to better tolerate the heat from heating and preserve this plant in winter.
With the onset of spring, move the pot of thuja to a cool place, and in the summer, it is best to expose it to fresh air. But make sure that no direct sunlight falls on it.
The indoor plant has excellent resistance to all kinds of thuja diseases. But still, in order to play it safe, it is recommended that recently purchased and already planted plants be quarantined for about 10 days.
If you see that during this time there are no negative changes to it, then you can safely put it next to the rest of the indoor plants, including the thuja.
Reproduction of thuja
The soil for growing thuja needs a special one. Prepare it yourself by mixing:
- 1 liter of turf soil;
- 2 liters of garden soil;
- 1 liter of peat;
- 0.5 l of river coarse sand.
Thuja seedlings should be grown in shallow wooden containers. After filling the prepared soil, tamp it lightly and make wide grooves. Spread the seeds evenly, sprinkle with a thin layer of soil and water a little. It remains to put the box in the autumn on the street near the house and wait for the spring shoots.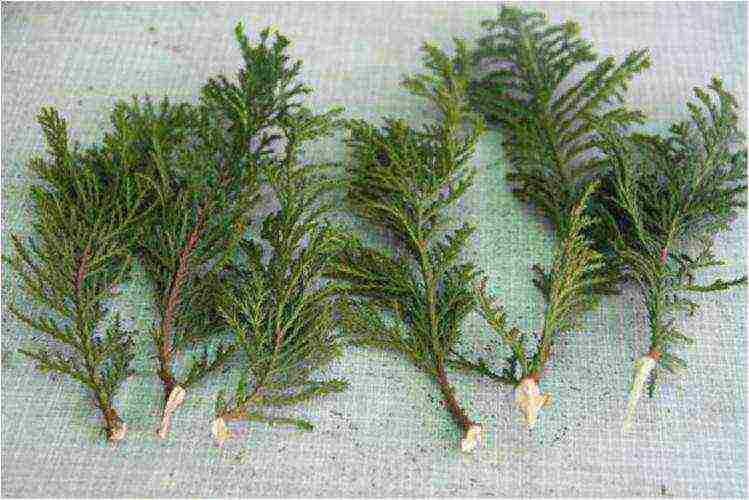
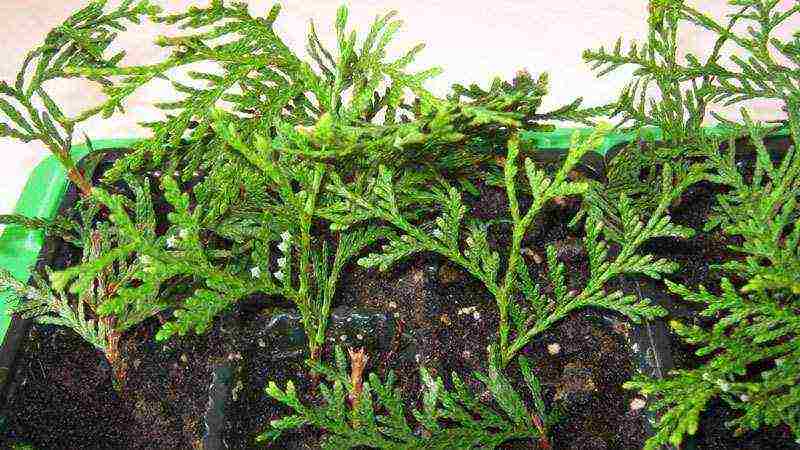
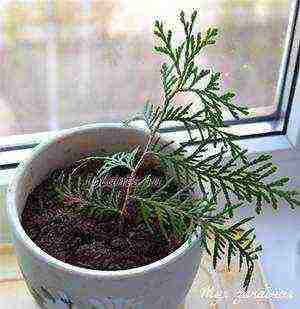
For rooting, choose the most beautiful branches - not woody, but not too green either. They should be long, up to half a meter, with a small piece of tree bark at the end. In order for the "heel" to be formed, it is better to separate the stalk from the tree with your hands, pulling the shoot with a sharp downward movement. Prepare the soil by mixing the same amount of peat with leafy soil. Plant shoots shallow, at a slight angle. When you notice the growth of new branches, be sure that your work has been crowned with success, the cuttings have taken root. Take your time to send the bushes to the garden, temper them a little, regularly leaving them outside for a while. Only after they have become accustomed to the cool conditions, plant them in their permanent place of residence. Be sure to protect young plants from the encroachment of animals or children by building a simple fence.
Pruning thuja at home
Thuja pruning, as a rule, is carried out in the first decade of April or in the last decade of June. But often work to maintain the required shape has to be carried out monthly from the first summer month until the very onset of cold weather. Thuja pruning is also carried out in autumn, the only important condition is dry weather.
All damaged branches are first removed from the plant. In addition, western thuja needs thinning of the crown, for which it is necessary to cut out part of the healthy living branches.This measure improves air circulation between the branches of the crown, and also reduces the risk of pests.
In order to correct the direction in which the tree will grow, its upper part must be trimmed at the required level. As a result, thuja comes out, growing in breadth. And in order to form a dense spherical bush, in those plants whose species provides such an opportunity, it will be necessary to remove from the thuja those branches that differ from the majority that make up the crown of the shoots in length.
In the event that it is planned to carry out a decorative haircut that supports an already formed crown, a certain part of the annual shoots should be cut from the tree. More intensive pruning often leads to the formation of areas in which there are only old branches devoid of fresh greenery, which leads to the plant losing its decorative effect.
In the case when pruning has to be carried out more often than the usual standards for this variety, the amount of mineral and organic fertilizing of the plant should be reduced.
If the formation time is missed, it is necessary to carry out sanitary pruning during the summer months, during which it will get rid of frozen branches, as well as thin out the crown.
Thuja growing in a shaded area usually does not need to be thinned out, since their crowns are often not dense enough anyway.
Watering thuja at home
After planting a thuja, care for it should be carried out regularly. Young specimens need abundant watering, each plant will need a bucket of clean and warm water. The procedure should be carried out at least 1-2 times a week. Adult shrubs will also be happy to quench their thirst; lack of moisture can lead to yellowing of the top. To keep the needles always juicy and bright green, professionals recommend arranging a shower from a garden hose, this will wash away dust particles and fill the air with a fresh scent. All water procedures, including watering, are recommended to be carried out early in the morning or in the late afternoon.
Cypress family. Homeland North America.
Thuja occidentalis Thuja occidentalis is an evergreen coniferous plant with a pyramidal crown, in good conditions lives for a very long time, reaching an average of 10-15 m in height with a trunk thickness of about 40 cm.The bark of young plants is smooth, reddish-brown, furrowed with age, stratifies stripes. The needles are scaly, dense, small (scales are about 3-4 mm), saturated green, by winter they acquire a brown color. Every 2-3 years, thuja renews foliage, throwing in twigs and overgrowing with new needles. Thuja have small 10-15 mm ovoid cones with delicate scales, similar to dried buds. There are more than 300 varieties of thuja.
The original species, thuja occidentalis, is a garden plant, but is sometimes grown as a pre-bonsai. However, there are various varieties of western Polish thuja on sale. Among them are compact plants that grow well in pots. For example, Miky's miniature cultivar Thuja occidentalis ‘Miky’ has a fine foliage structure that remains a rich green color throughout the growing season. The crown is very dense, dense, in an adult plant with a wide conical shape. In winter, it can take on a copper tint. The shoots are slightly twisted, which gives the variety an additional charm. Thuja grows rather slowly: in 8-10 years it will grow about 70-80 cm in height and about 50 cm in girth. This variety practically does not need pruning of shoots.
Thuja planting and care
At home, thuja is a wonderful decoration of a balcony or terrace - it loves fresh air, does not tolerate content in the kitchen or in a smoky room. It also looks attractive in the garden: in the rock garden, rocky gardens, it goes well with other conifers.
Temperature
Plant frost resistance - zone 5b if you plan to grow thuja in a greenhouse or garden.At home, in the summer we have the temperature that is dictated by the weather, but cypress trees do not tolerate heat - they need 22-24 ° C for optimal growth. In winter, a cool content is required, + 8-10 ° C is enough, at least + 2 ° C. At the same time, the soil in the pot is almost completely dry. At the lower temperature limit, the plant must be insulated. You can put the pot in a box of sawdust, wrap it with foam rubber, put it in a large pot and fill it with dry earth between the walls. Coolness must be ensured with the onset of the heating season and until early February.

Lighting
Thuja is photophilous, prefers a certain amount of sunlight, preferably before lunchtime - the east or southeast side, or in the evening - northwest. In the period from February to May, from 12 to 15 o'clock, openwork shading is desirable - at this time the most active sun can cause burns (brown needles). By summer, the thuja gets used to the sun well and does not need shading if it has enough fresh air.
- Attention: at temperatures above 26-27 ° C, the direct sun is hard for thuja to endure. Therefore, if the pot is on an open balcony or near an open window (not micro ventilation, but a well-open window), shading is not required. If you close your windows, it's best to move the pot to a shady, but not hot, windowsill. Young plants especially need shading. In nature, thuja seedlings (from self-seeding) have been growing for decades in the shade of taller trees.
You may have heard that thuja is shade-tolerant - this statement applies only to garden conifers, at home the lighting is always one-sided, and growing on the north side can lead to the formation of uneven foliage of the crown. Therefore, if you have a north side, gradually turn the pot on the window.
Watering
During the growing period, especially in hot weather, watering is abundant enough, with drying of the top layer of the earth. Do not leave water in the pan after watering. Thuja does not tolerate overdrying - as soon as the soil dries up, it deplorably lowers the branches, but after moistening it immediately restores turgor. If it is too dry, especially in the heat, it is irreversible. When the rainy season begins in the fall and a sharp cold snap, make sure that watering is infrequent and the soil has time to dry out almost completely in 3 days.
- Important: the correctness of watering is regulated not only by its frequency and volume of water, but also by the composition and structure of the soil.
- For reference: in nature, thuja grows in humid forests, especially abundantly in coniferous bogs, but at the same time it is a surface root, not completely submerged in water, but on a well-drained substrate. But the most famous long-lived thuja, up to 1000 years old, have survived on cliffs and rocky terrain. For thuja, air humidity is more important than soil moisture - avoid both waterlogging and overdrying.
Fertilization: Thuja fertilization is required two months after transplanting if the soil is too poor. You can purchase a special fertilizer for conifers or use a universal non-alkaline and chlorine-free fertilizer for common indoor plants.
Air humidity: Thuja loves very humid air, optimally 60-80%, humidity below 40% requires humidification - spraying 2-3 times a day or placing the pot on a wide pan with water (water should not come into contact with the roots). When the heating season begins, move the plant to a cool room.
- If there is no possibility of a cool winter, you have two options: fence the edge of the window sill from the battery with plexiglass or greenhouse film, put a humidifier and add artificial lighting. Or, if the size of the bush exceeds the size of the window sill, do not torture the plant - grow it in the garden.
Thuja transplant
Potted thuja is transplanted annually or every two years, very carefully, as carefully as possible, preserving the root ball.When planting, it is important not to tamp the soil too tightly and not to deepen the root collar (the soil level is at the same level, without hilling). Healthy roots are brick-brown and firm in appearance. Soil: 1 part of clay-sod land, 1 part of leaf (or peat), 1 part of baking powder (zeolite granules or akadama, vermiculite or agroperlite can be used, coarse river sand - sifted up to 2-4 mm). The pot should not be too large - slightly larger than the root system. At the bottom, make many holes for water drainage, drainage if desired (in a tall pot, required). If the soil is closer to neutral in acidity, add a couple of tablespoons of pine needles or bark to the pot.
Thuja grows well on weakly acidic soils, does not tolerate alkalization and strongly acidic soil - the optimum pH is 5.5-6.5. If the substrate is caked and compacted, you need to carefully loosen it to a depth of 5-6 cm.If a salt deposit appears on the surface of the soil, it must be removed and the plant should be watered with softer water (filter, boil, soften with aquarium water agents).
If you use peat-based store-bought soil, keep in mind that it quickly depletes nutrients, and in its pure form is far from ideal for thuja (it dries quickly), but it can serve as one of the components. In addition, store-bought soils are often filled with a large dose of fertilizers, even specialized coniferous mixtures, as a rule, are based on pure peat and sand, while light loam will be the ideal soil base for thuja. But do not forget that growing in a closed system (limited by the walls of the pot) deprives the roots of an important element - oxygen. Excessive watering will suffocate the roots if the soil is not porous enough (clean loam). This is why we add baking powder. Drained soil does not mean drainage at the bottom, but drainage particles in the soil itself between the roots.
Topic on the forum: Bonsai from thuja - options for the formation of thuja, as well as the theme of Ephedra
Reproduction of thuja
Thuja propagates by seeds and cuttings. Seed cultivation is impractical - a representative of cypress grows very slowly. But it is a pleasure to grow cuttings - it is important to know how! Very simple: in the fall or spring, cut a twig of a thuja about 15 cm long.
Take a spacious zip-bag (with a fastener), prepare the soil: 1 part of the universal soil (for example, Terra Vita living earth) and 1 part of sand or vermiculite. Stir and microwave for 3 minutes. Cool and pour into a bag. The substrate should be moist, but not too damp (moisten with boiled water). Place the cutting in the substrate and close the bag tightly. Hang it in a bright place - if the stalk is cut in the fall (in October-November), then you can hang it on the south window without shading. If in early spring, then only under shade from the direct sun. There is no need to open the bag, it retains about 90% humidity. Just wait for the roots to appear. They are dark, and not light, like in many indoor plants, therefore they are hardly noticeable.
When the thuja takes root, it must be transplanted into a pot in the soil described above for adult plants. Put the pot in a bag and tie. Shade the first week from any sun and ventilate 2-3 times a day. After a week, the bag can be untied, but not removed, but gradually accustom the young plant to drier air. As soon as the opportunity arises, expose the pot to fresh air on the balcony.
Topic on the forum: Reproduction of thuja, you can discuss, add your comments and share your experience.